Fedora 35
下载
|
Fedora 35:下载
2021/11/03
|
| [1] |
从以下站点下载 Fedora 35(2021 年 11 月 2 日发布)。
⇒ http://download.fedoraproject.org/pub/fedora/linux/releases/35/Server/x86_64/iso/ |
|
为 Fedora 35 创建安装盘
|
|
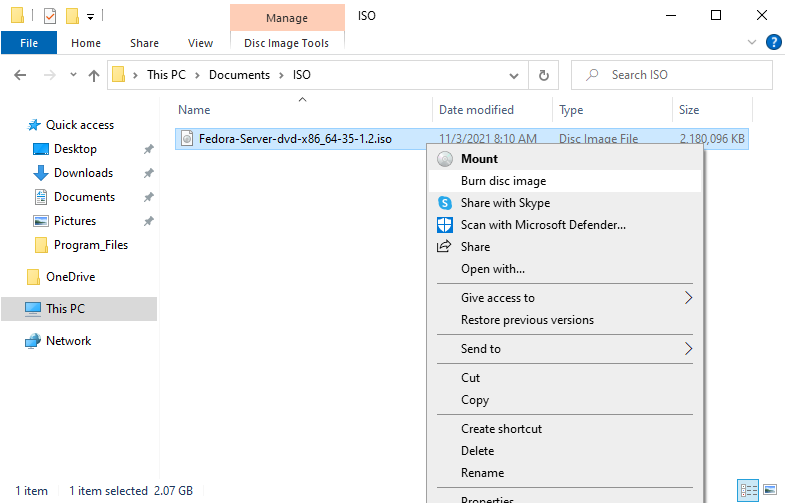
下载 Fedora 35 的 ISO 后,使用刻录应用程序将其刻录到 DVD 以创建安装盘。
如果您使用 Windows 8/10 的功能创建它,请参阅以下内容。 |
|
| [2] | 在 DVD 驱动器中插入一个空的 DVD 媒体。接下来,右键单击 Fedora 的 ISO 映像,然后在菜单中选择 [Burn Disk image]。 |
 |
| [3] | 单击 [刻录] 按钮并开始刻录。 |
 |
| [4] | 完成刻录后,弹出磁盘并继续安装步骤。 |
 |
安装
|
Fedora 35:安装
2021/11/03
|
| [1] | 插入 Fedora 35 安装盘并启动计算机。然后,Fedora 35 安装程序启动并显示以下屏幕。选择您想在安装过程中使用的语言。如果您在下一步中从未更改 [Language Support] 设置,此处选择的语言也将设置为默认系统语言。 |
 |
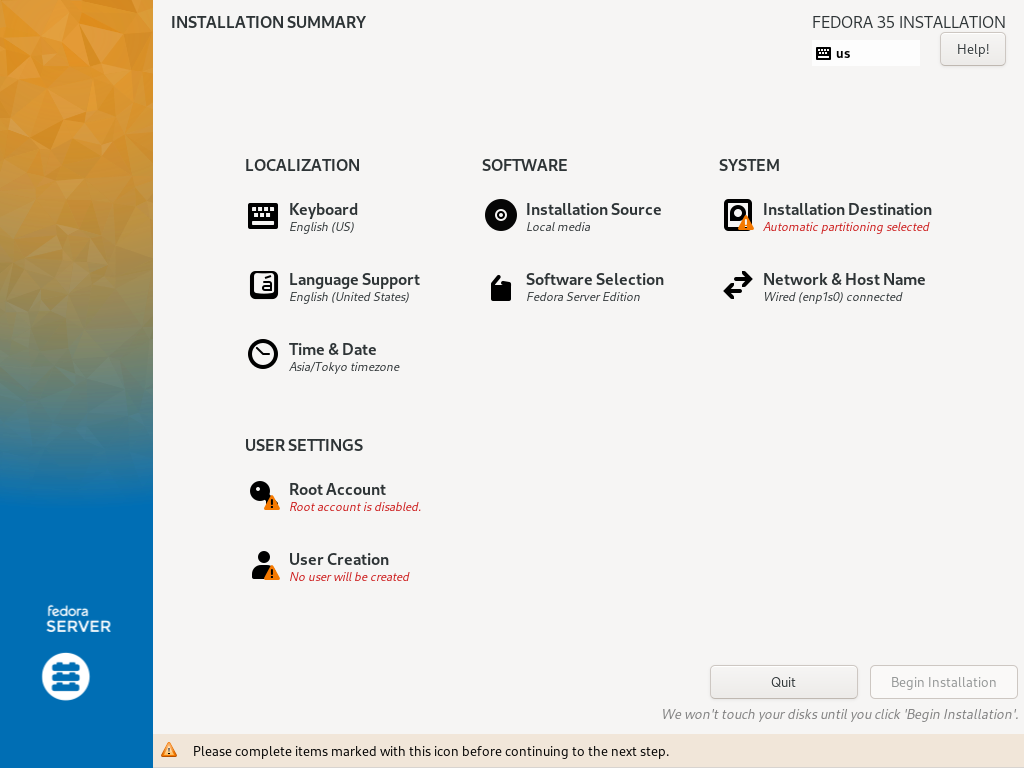
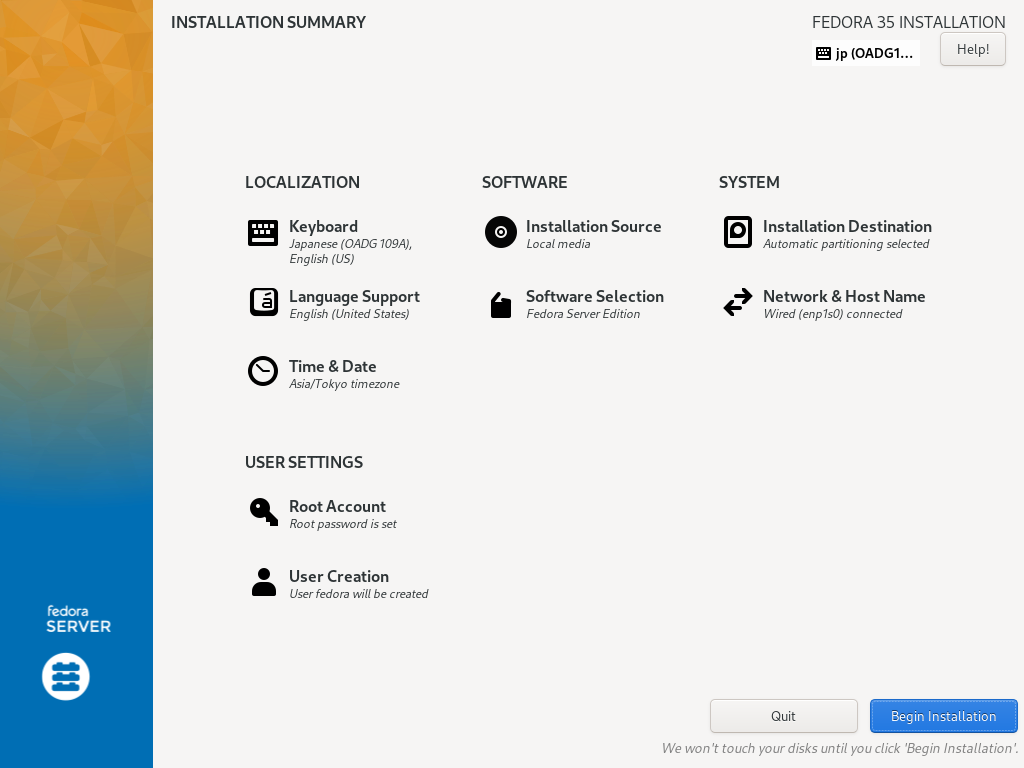
| [2] | 这是一些基本配置的默认安装摘要部分。在此示例中,在 [LOCALIZATION] 类别上配置键盘映射,单击 [Keyboard] 图标。 |
 |
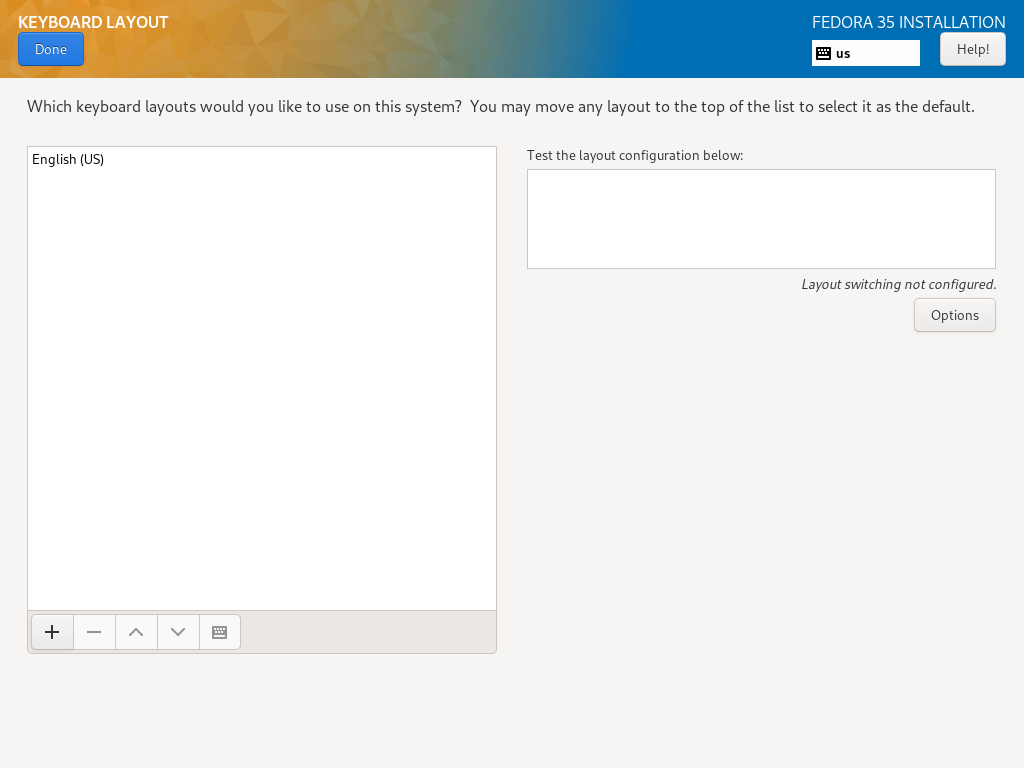
| [3] | 单击左下角的 [+] 按钮。 |
 |
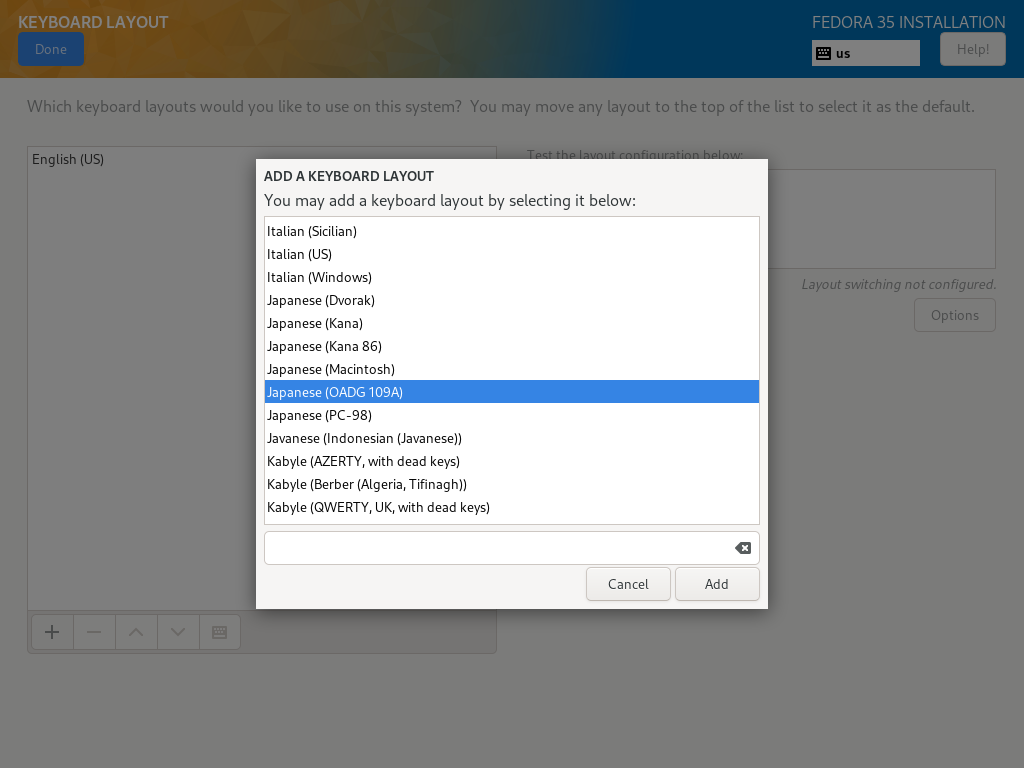
| [4] | 在列表中选择您使用的键盘类型,然后单击 [添加] 按钮。 |
 |
| [5] | 添加键盘布局后,将您的键盘放在顶部的第一优先级,如下所示,然后单击左上角的[完成]按钮完成。 |
 |
| [6] | 返回默认安装摘要部分,如 [2],下一步,设置您的时区,单击 [时间和日期] 图标。 单击地图上您要设置时区的点,然后按左上角的 [完成] 按钮。 |
 |
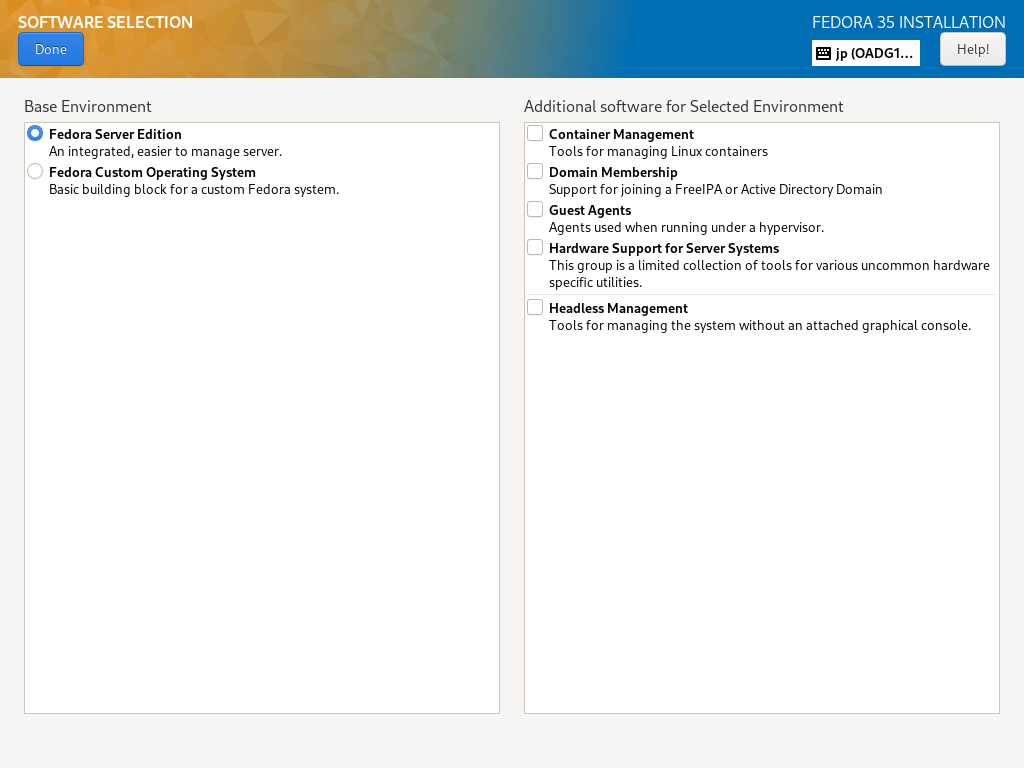
| [7] | 回到默认的 Installation Summary 部分,如 [2],下一步,单击 [Software Selection] 图标安装 Fedora。 在您要安装的列表上选择软件选择。在本例中,它选择 [Fedora Server Edition] 选择。 |
 |
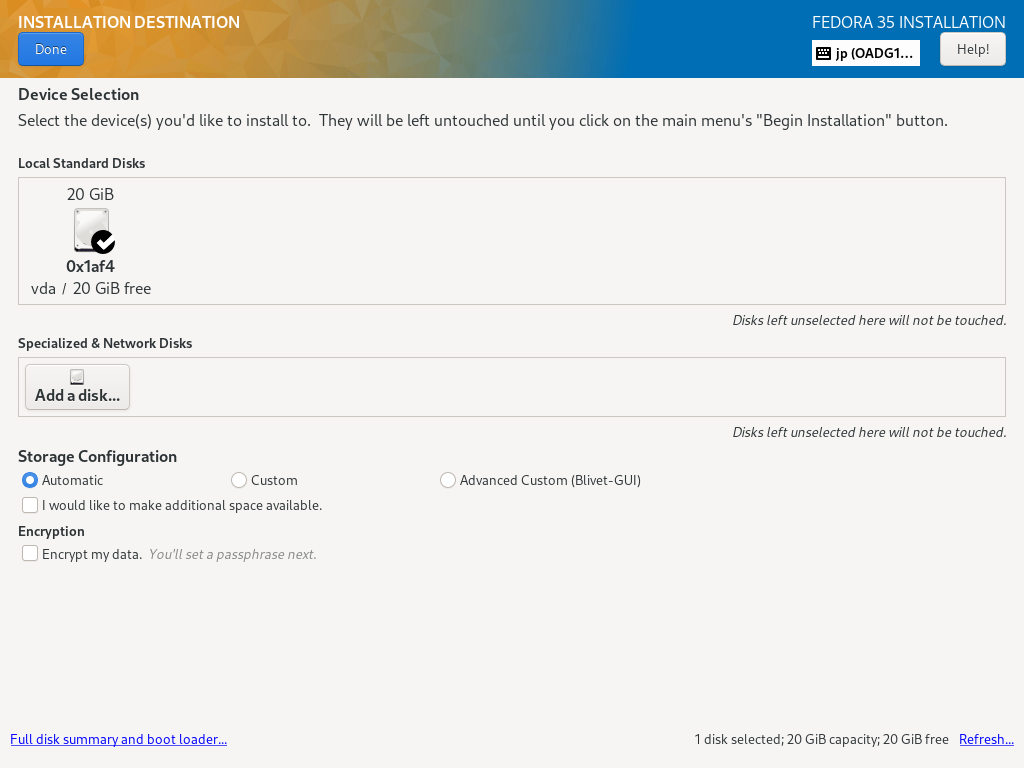
| [8] | 回到默认的 Installation Summary 部分,如 [2],下一步,单击 [Installation Destination] 图标选择您安装 Fedora 的磁盘。 如果您的计算机上连接了某些 HDD,则需要选择安装目标磁盘。 此外,如果您想手动编辑分区布局,请在 [Storage Configuration] 部分选择 [Custom], 但如果您选择 [Automatic],则分区会自动完成。然后分区配置为[/boot], [/], [/home], [swap]。 (但如果目标磁盘的大小如下所示,/home 不会分开)。 如果一切都OK,点击左上角的[Done]按钮完成磁盘配置。 |
 |
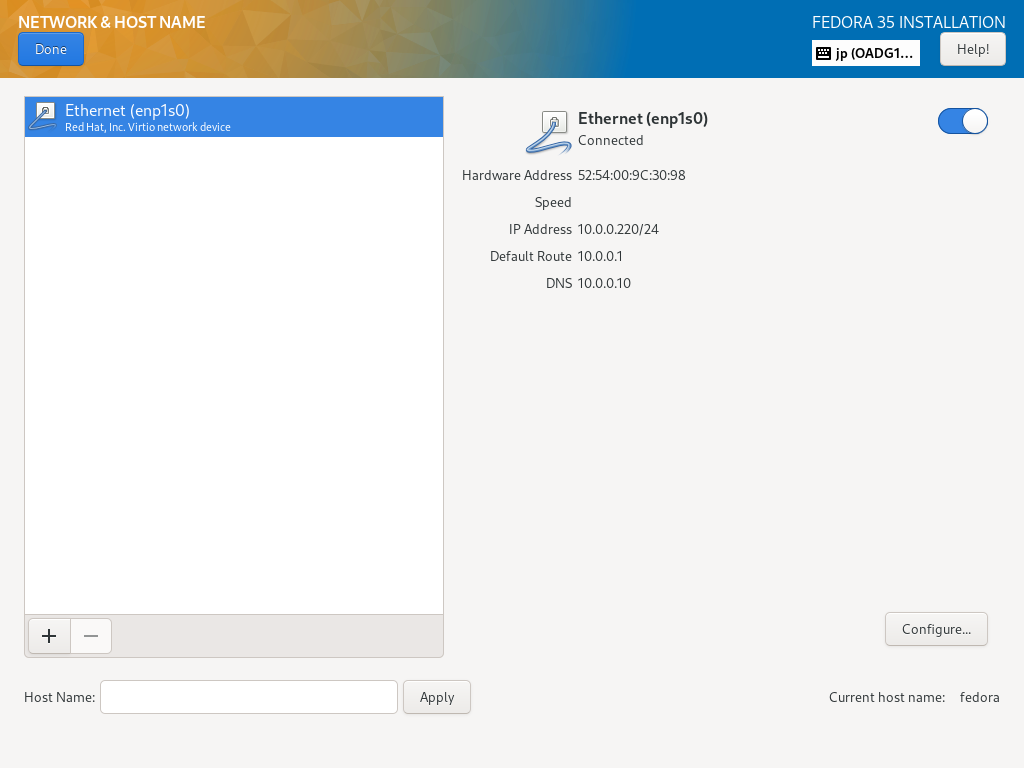
| [9] | 返回到默认的安装摘要部分,如 [2],下一步,单击 [网络和主机名] 图标。 如果您已经有这个新的 Fedora 服务器的主机名,请在 [主机名] 字段中输入主机名。 |
 |
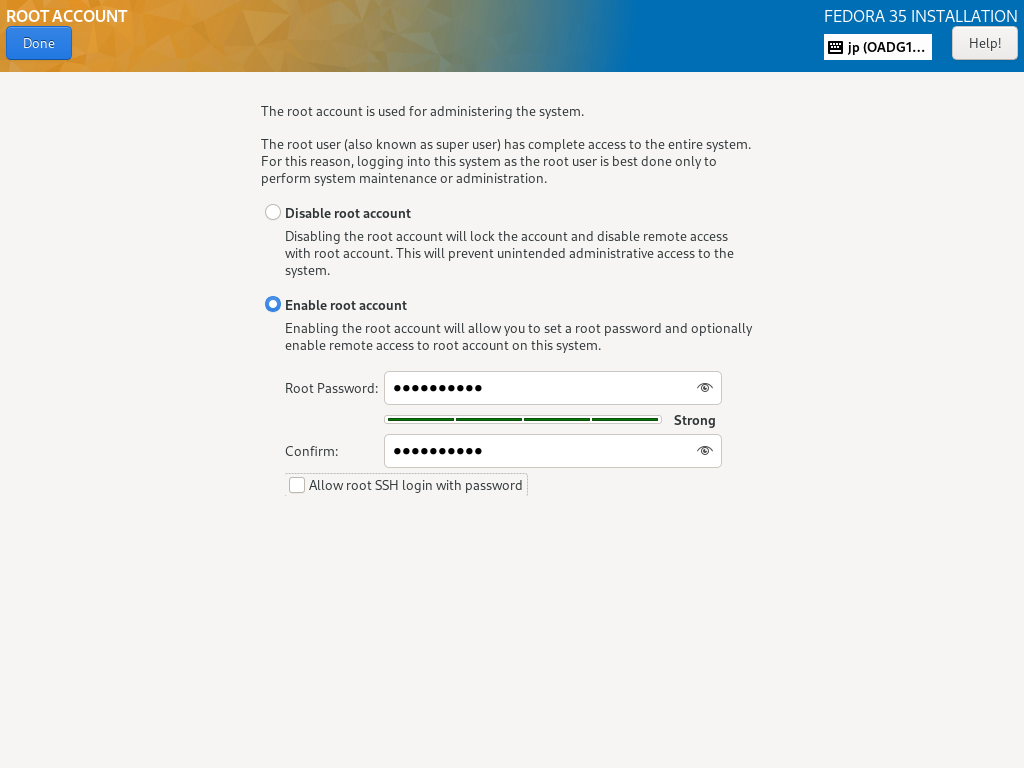
| [10] | 返回默认的安装摘要部分,如 [2],下一步,单击 [USER SETTINGS] 类别下的 [Root Password] 图标。 如果启用 root 用户帐户,请选中 [Enable root account] 框并设置 root 密码,如下所示。 如果您禁用 root 用户帐户,请选中 [禁用 root 帐户] 框。 |
 |
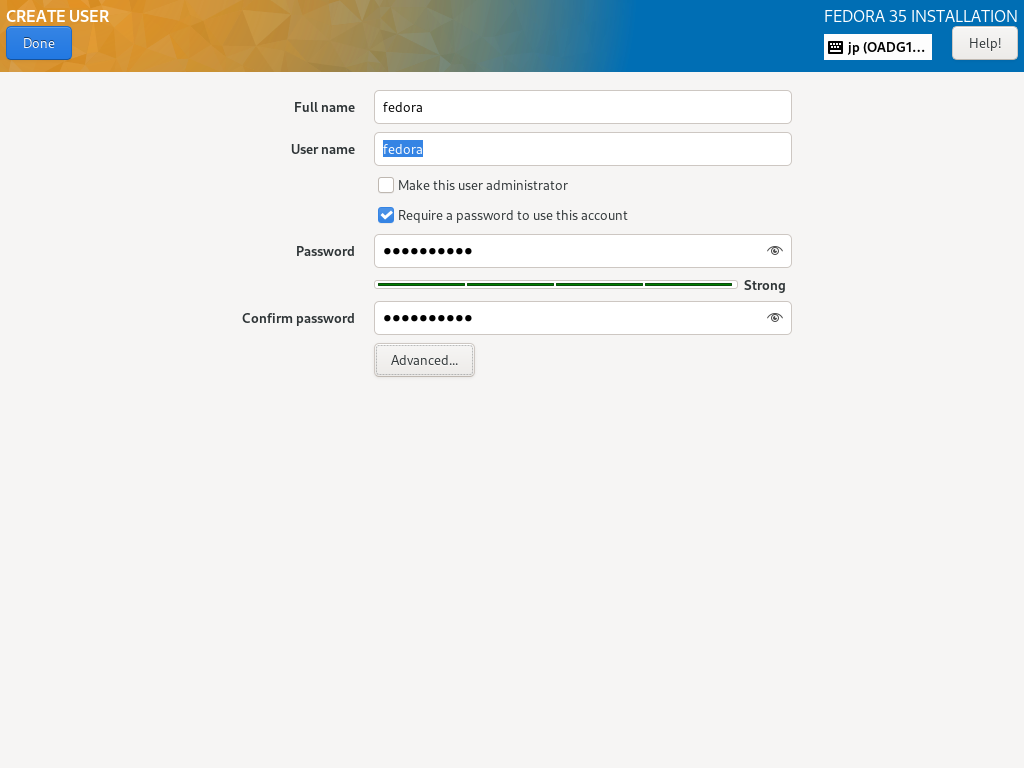
| [11] | 返回到默认的安装摘要部分,如 [2],下一步,单击 [用户设置] 类别下的 [用户创建] 图标。 在此处创建一个普通用户帐户。如果您在上一节中禁用了 root 用户帐户,请选中 [Make this user administrator] 框以授予此普通帐户的管理权限。 |
 |
| [12] | 确认选择,如果没问题,点击 [开始安装] 安装 Fedora。 |
 |
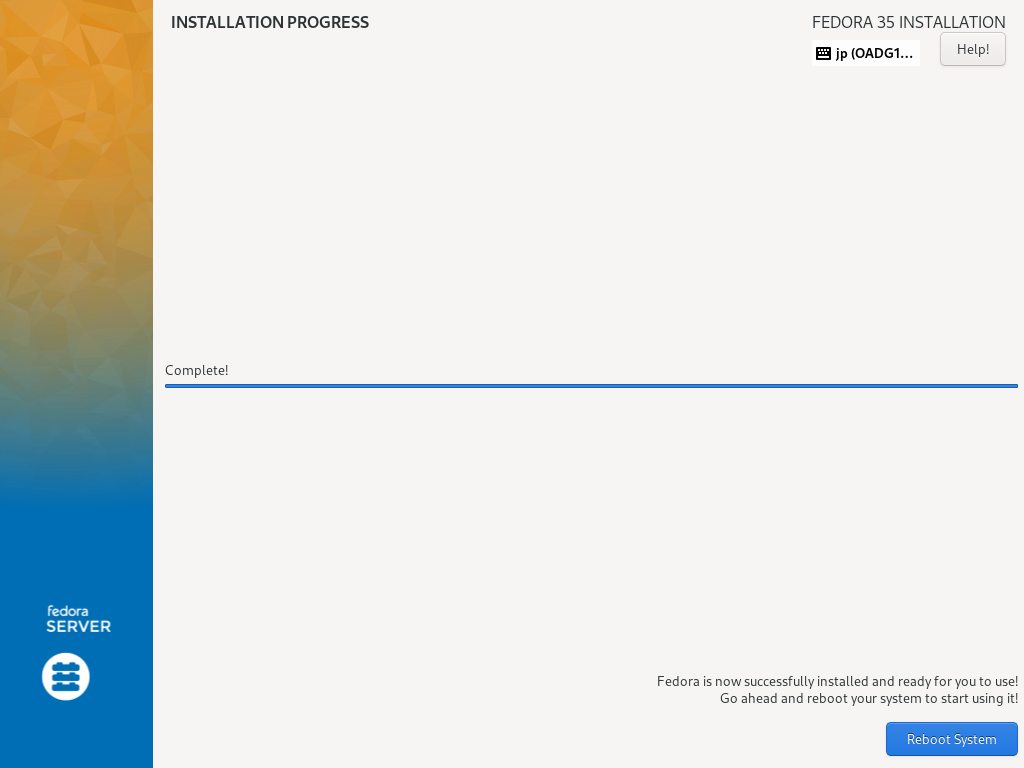
| [13] | 安装完成后,点击右下角的【重启系统】按钮重启电脑。 |
 |
| [14] | 重新启动计算机后,登录提示如下所示。使用 root 用户或您在安装过程中设置的普通用户登录。如果正常登录,Fedora 35 安装完成。 |
Fedora Linux 35(服务器版) x86_64 (ttyS0) 上的内核 5.14.10-300.fc35.x86_64 Web 控制台:https://fedora:9090/ 或 https://10.0.0.223:9090/ Fedora 登录: |
设置
添加用户帐户
|
要在 Fedora Server 上添加用户帐户,请进行如下配置。
|
|
| [1] | 例如,添加 [fedora] 用户。 |
[root@localhost ~]# useradd fedora
[root@localhost ~]# passwd fedora
Changing password for user fedora.
New UNIX password:              # input any password you'd like to set
Retype new UNIX password:       # confirm
passwd: all authentication tokens updated successfully.| [2] | 如果您想从上面添加的用户切换到 root 帐户,请使用 [su] 命令执行此操作。 |
localhost login: fedora         # login username
password:                       # input user password
[fedora@localhost ~]$ su -      # switch to root
Password:                       # input root password
[root@localhost ~]# # just switched to root| [3] | 如果你想限制用户运行 [su] 命令,配置如下。 在下面的示例中,只有 [wheel] 组中的用户可以运行 [su] 命令。 |
[root@localhost ~]# usermod -aG wheel fedora
[root@localhost ~]# vi /etc/pam.d/su
#%PAM-1.0
auth            sufficient      pam_rootok.so
# Uncomment the following line to implicitly trust users in the "wheel" group.
#auth           sufficient      pam_wheel.so trust use_uid
# Uncomment the following line to require a user to be in the "wheel" group.
# uncomment the following line
auth            required        pam_wheel.so use_uid
auth            substack        system-auth
auth            include         postlogin
account         sufficient      pam_succeed_if.so uid = 0 use_uid quiet
account         include         system-auth
password        include         system-auth
session         include         system-auth
session         include         postlogin
session         optional        pam_xauth.so

# verify settings with a user that is not in allowed group
[redhat@localhost ~]$ su -
Password:
su: Permission denied # denied normally| [4] | 如果您想删除用户帐户,请按如下方式设置。 |
# remove a user [fedora] (only removed user account)
[root@localhost ~]# userdel fedora
# remove a user [fedora] (removed user account and his home directory both)
[root@localhost ~]# userdel -r fedora
防火墙
配置防火墙和 SELinux。
[1] 可以看到如下所示的 FireWall 服务状态。(默认启用)
[root@localhost ~]# systemctl status firewalld
*  firewalld.service - firewalld - dynamic firewall daemon
     Loaded: loaded (/usr/lib/systemd/system/firewalld.service; enabled; vendor>
     Active: active (running) since Thu 2021-11-04 08:41:32 JST; 5min ago
       Docs: man:firewalld(1)
   Main PID: 762 (firewalld)
      Tasks: 2 (limit: 4647)
     Memory: 34.3M
        CPU: 388ms
     CGroup: /system.slice/firewalld.service
             +-- 762 /usr/bin/python3 -s /usr/sbin/firewalld --nofork --nopid

# [Active: active (running) ***] means firewalld is running now
[2]如果您使用 FireWall 服务,则需要手动修改 FireWall 设置,因为默认情况下大多数情况下不允许传入的服务请求。
请参阅此处了解基本的防火墙操作和设置(CentOS Stream 8)。
本站Fedora 35的配置示例是基于Firewalld服务始终开启的环境。
[3] 如果您因为某些原因(例如某些 FireWall Machines 正在您的本地网络或其他网络中运行)而不需要 FireWall 服务,则可以如下所示停止和禁用 Fedora 服务器上的 FireWall 服务。
# stop service
[root@localhost ~]# systemctl stop firewalld
# disable service
[root@localhost ~]# systemctl disable firewalld
Removed /etc/systemd/system/multi-user.target.wants/firewalld.service.
Removed /etc/systemd/system/dbus-org.fedoraproject.FirewallD1.service.
SELinux
[4] 可以显示当前 SELinux (Security-Enhanced Linux) 状态,如下所示。(默认启用)
[root@localhost ~]# getenforce
Enforcing     # SELinux is enabled
[5]如果启用 SELinux,有时需要手动修改 SELinux 策略,因为有时 SELinux 会停止应用程序。
有关基本 SELinux 操作和设置(CentOS Stream 8)的信息,请参阅此处。
本站 Fedora 35 的配置示例是基于 SELinux 始终 Enforcing 的环境。
[6] 如果您因为某些原因(例如您的服务器仅在本地安全网络或其他网络中运行)而不需要 SELinux 功能,则可以如下所示禁用 SELinux。
# disable SELinux
[root@localhost ~]# grubby --update-kernel ALL --args selinux=0
# restart computer to apply changes
[root@localhost ~]# reboot
# if falling back to enable, run like follows
[root@localhost ~]# grubby --update-kernel ALL --remove-args selinux
网络设置
[1] 为服务器设置静态 IP 地址。
(将接口名称 [enp1s0] 替换为您自己的名称,因为它在任何系统上都不相同)
# 如果你没有设置HostName,设置如下
[root@localhost ~]# hostnamectl set-hostname dlp.srv.world
# display devices
[root@localhost ~]# nmcli device
DEVICE  TYPE      STATE      CONNECTION
enp1s0  ethernet  connected  enp1s0
lo      loopback  unmanaged  --

# 设置 IPv4 地址
[root@localhost ~]# nmcli connection modify enp1s0 ipv4.addresses 10.0.0.30/24
# 设置网关
[root@localhost ~]# nmcli connection modify enp1s0 ipv4.gateway 10.0.0.1
# 设置DNS
# 如果设置多个 DNS,请以空格分隔 ⇒ ipv4.dns "10.0.0.10 10.0.0.11 10.0.0.12"
[root@localhost ~]# nmcli connection modify enp1s0 ipv4.dns 10.0.0.10
# 设置 DNS 搜索库(你的域名)
[root@localhost ~]# nmcli connection modify enp1s0 ipv4.dns-search srv.world
# 手动设置静态设置(它是 [auto] 用于 DHCP)
[root@localhost ~]# nmcli connection modify enp1s0 ipv4.method manual
# 重启界面重新加载设置
[root@localhost ~]# nmcli connection down enp1s0; nmcli connection up enp1s0
Connection 'enp1s0' successfully deactivated (D-Bus active path: /org/freedesktop/NetworkManager/ActiveConnection/1)
Connection successfully activated (D-Bus active path: /org/freedesktop/NetworkManager/ActiveConnection/2)

# 确认设置
[root@localhost ~]# nmcli device show enp1s0
GENERAL.DEVICE:                         enp1s0
GENERAL.TYPE:                           ethernet
GENERAL.HWADDR:                         52:54:00:D3:14:49
GENERAL.MTU:                            1500
GENERAL.STATE:                          100 (connected)
GENERAL.CONNECTION:                     enp1s0
GENERAL.CON-PATH:                       /org/freedesktop/NetworkManager/ActiveC>
WIRED-PROPERTIES.CARRIER:               on
IP4.ADDRESS[1]:                         10.0.0.30/24
IP4.GATEWAY:                            10.0.0.1
IP4.ROUTE[1]:                           dst = 10.0.0.0/24, nh = 0.0.0.0, mt = 1>
IP4.ROUTE[2]:                           dst = 0.0.0.0/0, nh = 10.0.0.1, mt = 100
IP4.DNS[1]:                             10.0.0.10
IP4.SEARCHES[1]:                        srv.world
IP6.ADDRESS[1]:                         fe80::5054:ff:fed3:1449/64
IP6.GATEWAY:                            --
IP6.ROUTE[1]:                           dst = fe80::/64, nh = ::, mt = 100

# 确认状态
[root@localhost ~]# ip address show
1: lo: <LOOPBACK,UP,LOWER_UP> mtu 65536 qdisc noqueue state UNKNOWN group default qlen 1000
    link/loopback 00:00:00:00:00:00 brd 00:00:00:00:00:00
    inet 127.0.0.1/8 scope host lo
       valid_lft forever preferred_lft forever
    inet6 ::1/128 scope host
       valid_lft forever preferred_lft forever
2: enp1s0: <BROADCAST,MULTICAST,UP,LOWER_UP> mtu 1500 qdisc fq_codel state UP group default qlen 1000
    link/ether 52:54:00:d3:14:49 brd ff:ff:ff:ff:ff:ff
    inet 10.0.0.30/24 brd 10.0.0.255 scope global noprefixroute enp1s0
       valid_lft forever preferred_lft forever
    inet6 fe80::5054:ff:fed3:1449/64 scope link noprefixroute
       valid_lft forever preferred_lft forever
配置服务
要启用或禁用服务,请进行如下配置。
[1] 显示服务列表。
# 现在处于活动状态的服务列表
# 添加 [--all],显示所有包含的非活动服务
# 添加 [--no-pager],不要使用像 [less/more] 这样的寻呼机
[root@dlp ~]# systemctl -t service
  UNIT                               LOAD   ACTIVE SUB     DESCRIPTION         >
  abrt-journal-core.service          loaded active running Creates ABRT problem>
  abrt-oops.service                  loaded active running ABRT kernel log watc>
  abrt-xorg.service                  loaded active running ABRT Xorg log watche>
  abrtd.service                      loaded active running ABRT Automated Bug R>
  atd.service                        loaded active running Deferred execution s>

.....
.....

  systemd-zram-setup@zram0.service   loaded active exited  Create swap on /dev/>
  user-runtime-dir@0.service         loaded active exited  User Runtime Directo>
  user@0.service                     loaded active running User Manager for UID>

LOAD   = Reflects whether the unit definition was properly loaded.
ACTIVE = The high-level unit activation state, i.e. generalization of SUB.
SUB    = The low-level unit activation state, values depend on unit type.
54 loaded units listed. Pass --all to see loaded but inactive units, too.
To show all installed unit files use 'systemctl list-unit-files'.

# 所有服务的列表
[root@dlp ~]# systemctl list-unit-files -t service
UNIT FILE                                  STATE           VENDOR PRESET
abrt-journal-core.service                  enabled         enabled
abrt-oops.service                          enabled         enabled
abrt-pstoreoops.service                    disabled        disabled
abrt-vmcore.service                        enabled         enabled
abrt-xorg.service                          enabled         enabled
abrtd.service                              enabled         enabled
arp-ethers.service                         disabled        disabled
atd.service                                enabled         enabled
auditd.service                             enabled         enabled

.....
.....

udisks2.service                            enabled         enabled
usb_modeswitch@.service                    static          -
user-runtime-dir@.service                  static          -
user@.service                              static          -
wpa_supplicant.service                     disabled        disabled

219 unit files listed.
[2] 如果您不需要,请停止并关闭服务的自动启动设置。
下面的例子意味着停止和禁用 smartd 服务。
[root@dlp ~]#systemctl disable --now smartd更新系统
Fedora Server 成为生产系统后,可能很难更新系统,但至少在安装后,将 Fedora Server 更新到最新。
[1] 更新系统如下
[root@dlp ~]# dnf -y upgrade
Dependencies resolved.
================================================================================
 Package                       Arch    Version                   Repo      Size
================================================================================
Installing:
 kernel                        x86_64  5.14.14-300.fc35          updates   65 k
Upgrading:
 NetworkManager                x86_64  1:1.32.12-2.fc35          updates  2.3 M
 NetworkManager-bluetooth      x86_64  1:1.32.12-2.fc35          updates   52 k
 NetworkManager-libnm          x86_64  1:1.32.12-2.fc35          updates  1.7 M
 NetworkManager-team           x86_64  1:1.32.12-2.fc35          updates   30 k
 NetworkManager-wifi           x86_64  1:1.32.12-2.fc35          updates  116 k
 NetworkManager-wwan           x86_64  1:1.32.12-2.fc35          updates   58 k
 alsa-sof-firmware             noarch  1.9-1.fc35                updates  580 k
 bc                            x86_64  1.07.1-14.fc35            updates  118 k
 bluez                         x86_64  5.62-1.fc35               updates  973 k
 bluez-libs                    x86_64  5.62-1.fc35               updates   84 k
 btrfs-progs                   x86_64  5.14.2-1.fc35             updates  962 k
 checkpolicy                   x86_64  3.3-1.fc35                updates  338 k
 cockpit                       x86_64  256-1.fc35                updates   44 k
 cockpit-bridge                x86_64  256-1.fc35                updates  490 k
 cockpit-networkmanager        noarch  256-1.fc35                updates  523 k
 cockpit-packagekit            noarch  256-1.fc35                updates  572 k
 cockpit-selinux               noarch  256-1.fc35                updates  226 k
 cockpit-storaged              noarch  256-1.fc35                updates  584 k
 cockpit-system                noarch  256-1.fc35                updates  2.4 M
 cockpit-ws                    x86_64  256-1.fc35                updates  1.3 M
 curl                          x86_64  7.79.1-1.fc35             updates  310 k
 dnf-plugins-core              noarch  4.0.24-1.fc35             updates   35 k
 dnsmasq                       x86_64  2.86-3.fc35               updates  333 k
 dracut                        x86_64  055-6.fc35                updates  347 k
 dracut-config-rescue          x86_64  055-6.fc35                updates   12 k
 dracut-network                x86_64  055-6.fc35                updates   61 k
 dracut-squash                 x86_64  055-6.fc35                updates   12 k
 fedora-logos                  noarch  35.0.0-2.fc35             updates  1.3 M
 gdb-headless                  x86_64  11.1-2.fc35               updates  4.3 M
 gdbm-libs                     x86_64  1:1.22-1.fc35             updates   58 k
 gnupg2                        x86_64  2.3.3-1.fc35              updates  2.5 M
 hwdata                        noarch  0.352-1.fc35              updates  1.5 M
 iwl100-firmware               noarch  39.31.5.1-126.fc35        updates  134 k

.....
.....

Installed:
  python3-tracer-0.7.6-1.fc34.noarch
  reportd-0.7.4-4.fc34.x86_64
  sscg-2.6.2-5.fc34.x86_64
  tpm2-tools-5.0-2.fc34.x86_64
  tracer-common-0.7.6-1.fc34.noarch
  whois-nls-5.5.9-1.fc34.noarch

Complete!
使用 Moduler 存储库
[1] 显示可用模块
[root@dlp ~]# dnf module list
Fedora Modular 34 - x86_64
Name               Stream           Profiles Summary
avocado            latest           default [d], minimal  Framework with tools and libraries for Automated Testing
avocado            82lts            default,minimal Framework with tools and libraries for Automated Testing
avocado-vt         latest           default  Avocado Virt Test Plugin
avocado-vt         82lts            default  Avocado Virt Test Plugin
cri-o              nightly          default  Kubernetes Container Runtime Interface for OCI-based containers

.....
.....

varnish            6.0              default  Varnish HTTP cache

Hint: [d]efault, [e]nabled, [x]disabled, [i]nstalled
[2] 为了安装可用的模块,配置如下
# 例如,显示 [Node.js] 模块
[root@dlp ~]# dnf module list nodejs
Fedora Modular 35 - x86_64
Name       Stream     Profiles                             Summary
nodejs     12         default [d], development, minimal    Javascript runtime
nodejs     14         default, development, minimal        Javascript runtime
nodejs     15         default, development, minimal        Javascript runtime
nodejs     16         default, development, minimal        Javascript runtime

Fedora Modular 35 - x86_64 - Updates
Name       Stream     Profiles                             Summary
nodejs     12         default [d], development, minimal    Javascript runtime
nodejs     14         default, development, minimal        Javascript runtime
nodejs     15         default, development, minimal        Javascript runtime
nodejs     16         default, development, minimal        Javascript runtime

Hint: [d]efault, [e]nabled, [x]disabled, [i]nstalled

# 例如,安装 Node.js 12
[root@dlp ~]# dnf module -y install nodejs:12
Dependencies resolved.
==================================================================================================
 Package            Arch    Version                                         Repository        Size
==================================================================================================
Installing group/module packages:
 nodejs             x86_64  1:12.22.7-1.module_f35+13211+80e67b81           updates-modular   94 k
 npm                x86_64  1:6.14.15-1.12.22.7.1.module_f35+13211+80e67b81 updates-modular  3.3 M
Installing dependencies:
 nodejs-libs        x86_64  1:12.22.7-1.module_f35+13211+80e67b81           updates-modular   12 M
Installing weak dependencies:
 nodejs-docs        noarch  1:12.22.7-1.module_f35+13211+80e67b81           updates-modular  3.0 M
 nodejs-full-i18n   x86_64  1:12.22.7-1.module_f35+13211+80e67b81           updates-modular  7.7 M
Installing module profiles:
 nodejs/default
Enabling module streams:
 nodejs                     12

Transaction Summary
==================================================================================================
Install  5 Packages
.....
.....

# [Node.js 12] 的状态变为 [e]nabled 和 [i]nstalled
[root@dlp ~]# dnf module list nodejs
Fedora Modular 35 - x86_64
Name      Stream    Profiles                                Summary
nodejs    12 [e]    default [d] [i], development, minimal   Javascript runtime
nodejs    14        default, development, minimal           Javascript runtime
nodejs    15        default, development, minimal           Javascript runtime
nodejs    16        default, development, minimal           Javascript runtime

Fedora Modular 35 - x86_64 - Updates
Name      Stream    Profiles                                Summary
nodejs    12 [e]    default [d] [i], development, minimal   Javascript runtime
nodejs    14        default, development, minimal           Javascript runtime
nodejs    15        default, development, minimal           Javascript runtime
nodejs    16        default, development, minimal           Javascript runtime

Hint: [d]efault, [e]nabled, [x]disabled, [i]nstalled

[root@dlp ~]# node -v
v12.22.7
# 如果要切换到其他版本,请先重置
[root@dlp ~]# dnf module reset nodejs
# 启用并安装 [Node.js 16]
[root@dlp ~]# dnf module enable nodejs:16
[root@dlp ~]# dnf module -y install nodejs:16/default
# [Node.js 16] 的状态变为 [e]nabled
[root@dlp ~]# dnf module list nodejs
Fedora Modular 35 - x86_64
Name       Stream     Profiles                             Summary
nodejs     12         default [d], development, minimal    Javascript runtime
nodejs     14         default, development, minimal        Javascript runtime
nodejs     15         default, development, minimal        Javascript runtime
nodejs     16 [e]     default [i], development, minimal    Javascript runtime

Fedora Modular 35 - x86_64 - Updates
Name       Stream     Profiles                             Summary
nodejs     12         default [d], development, minimal    Javascript runtime
nodejs     14         default, development, minimal        Javascript runtime
nodejs     15         default, development, minimal        Javascript runtime
nodejs     16 [e]     default [i], development, minimal    Javascript runtime

Hint: [d]efault, [e]nabled, [x]disabled, [i]nstalled

[root@dlp ~]# node -v
v16.11.1
使用 web 管理控制台
如果您安装了 [Fedora Server] 组,Cockpit Admin Console 会默认安装并启动。
可以在 Web 浏览器上的这个管理控制台上管理您的 Fedora 服务器。
如果您想从远程计算机访问 Cockpit,并且 Firewalld 正在您的 Fedora 服务器上运行,它需要允许服务 [cockpit] 或允许端口 [9090]。(但默认情况下允许它们)
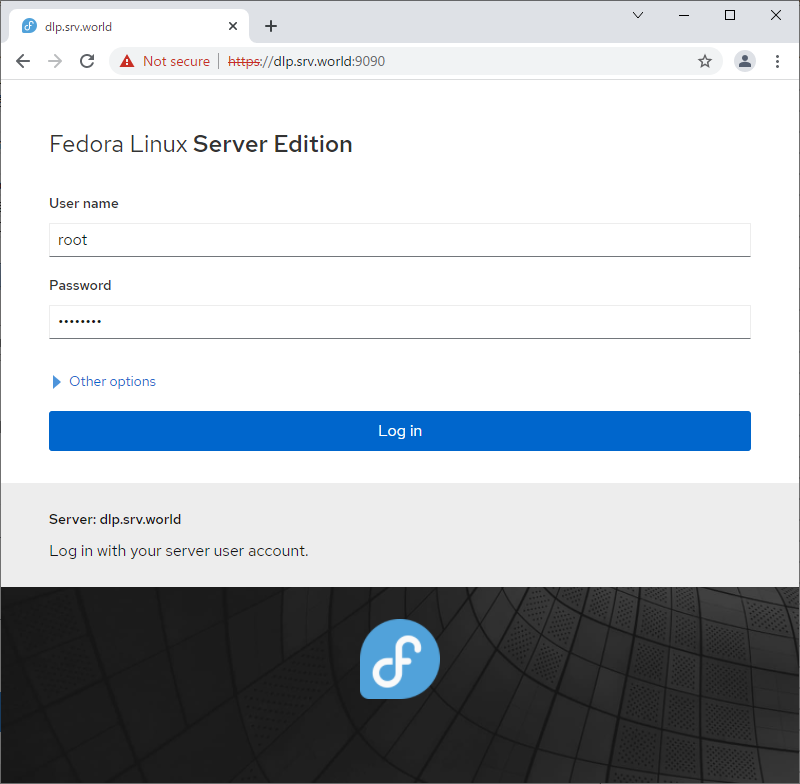
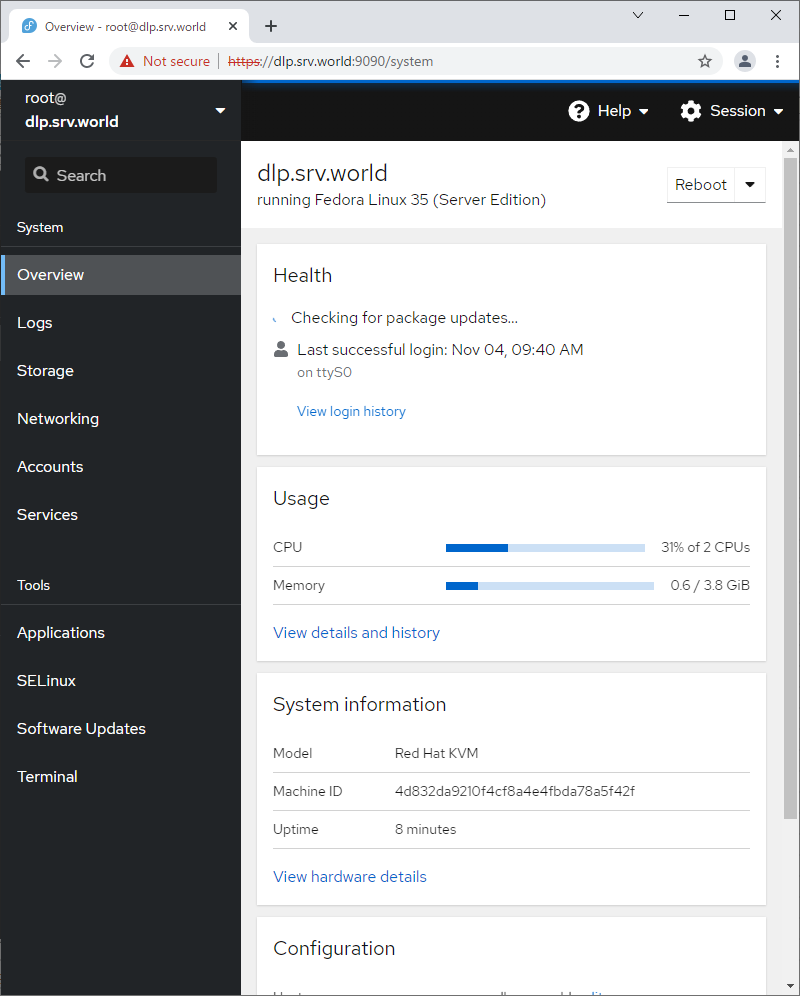
| [1] | 从 localhost 或客户端计算机使用 Web 浏览器访问 [https://(服务器的主机名或 IP 地址):9090/],然后显示 Cockpit 登录表单如下所示。使用用户登录。此示例使用 root 用户显示,如下所示。 |
 |
| [2] | 这是驾驶舱索引页面。可以在这里管理各种系统设置。 |
 |
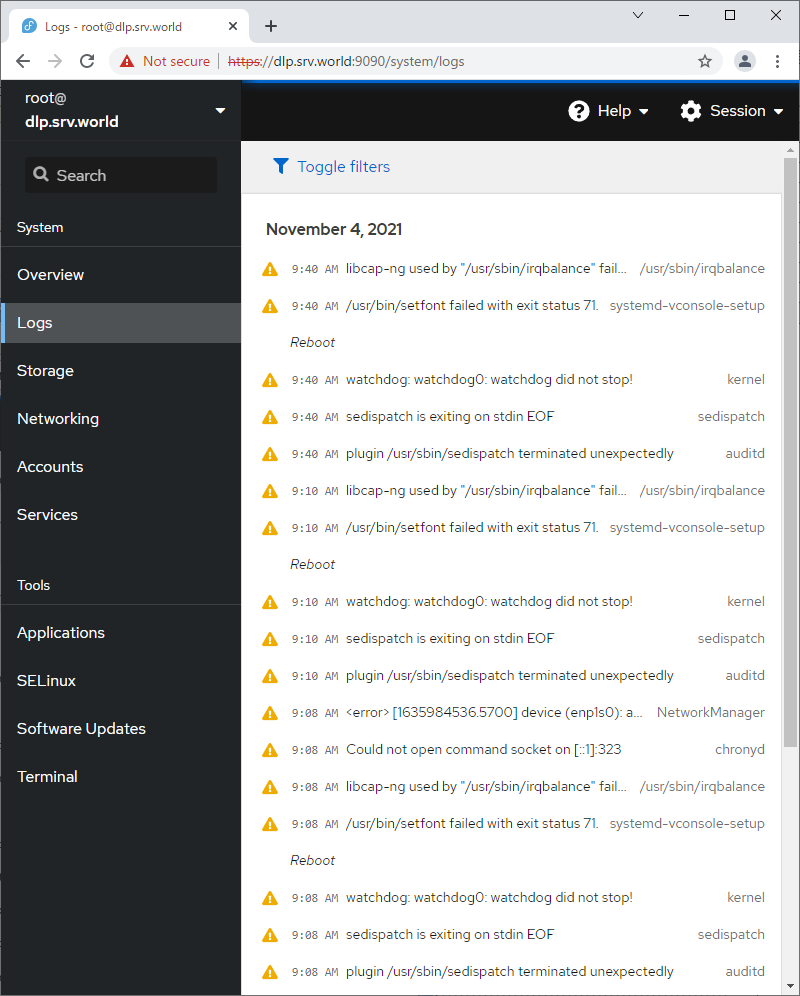
| [3] | 对于左侧窗格中的[日志],可以管理或操作作为日志管理工具的[日志]服务。 |
 |
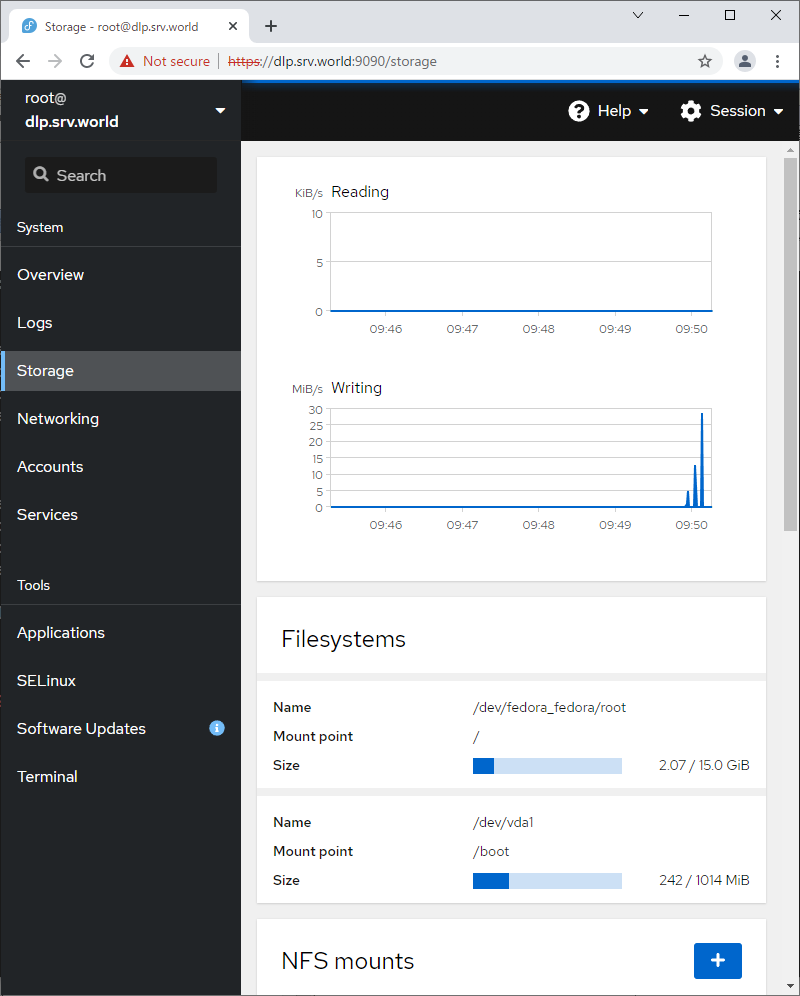
| [4] | 左侧窗格中的[Storage],可以管理或操作Storage。 |
 |
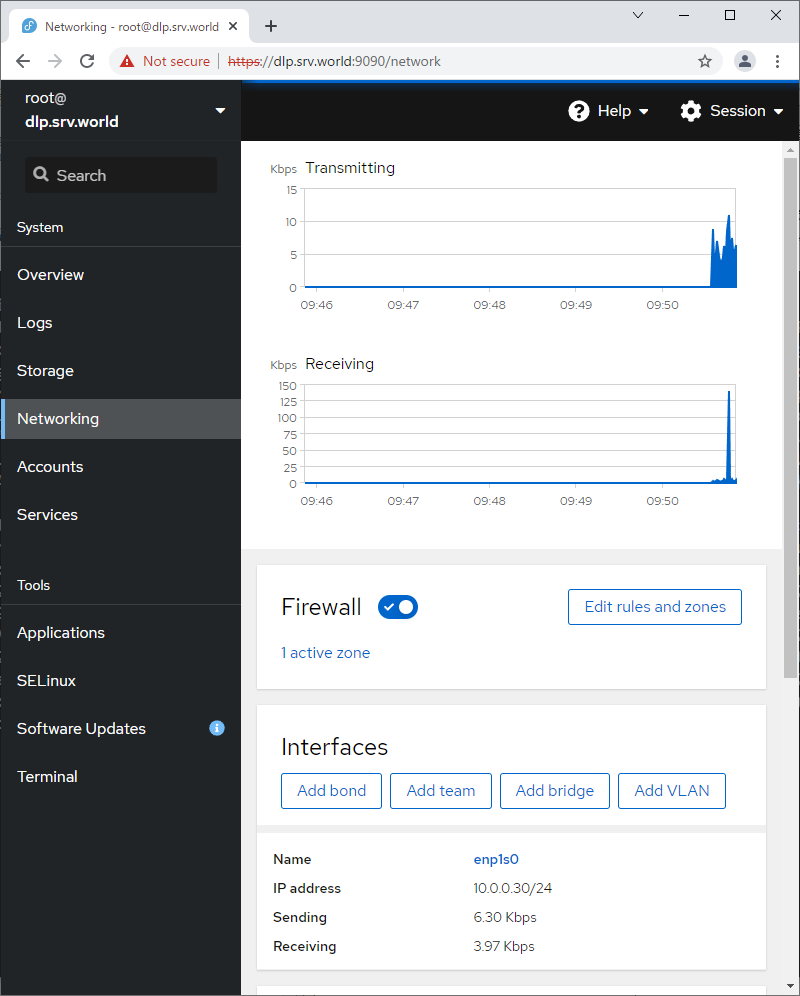
| [5] | 对于左侧窗格中的[网络],可以管理或操作网络设置。 |
 |
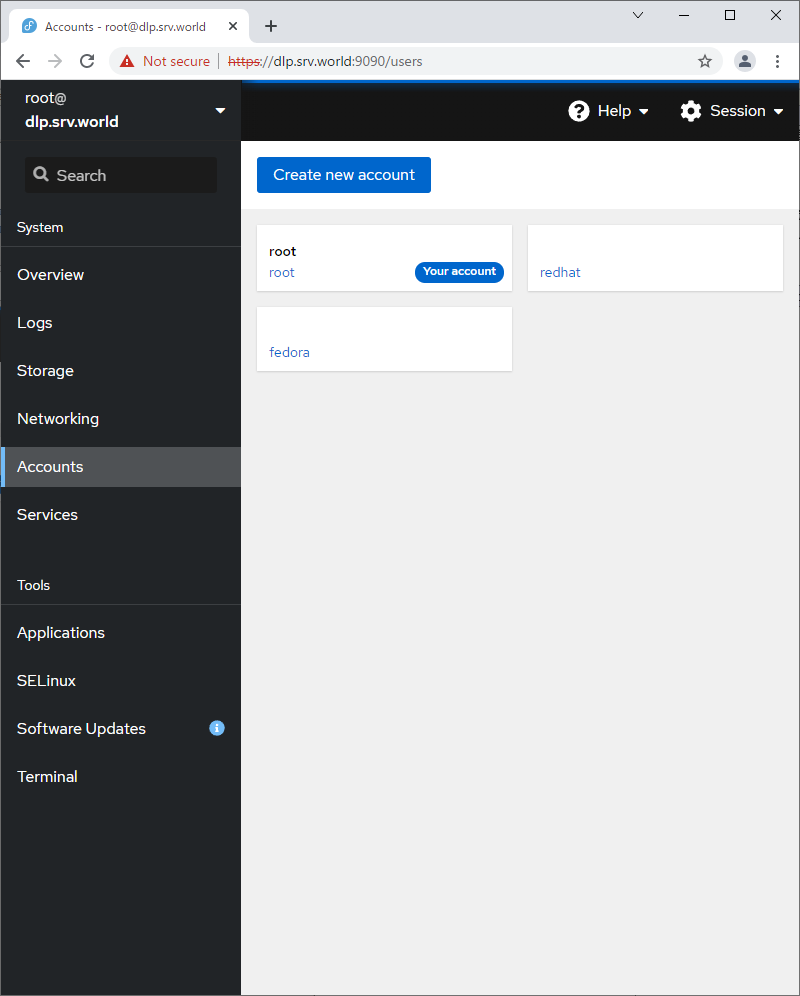
| [6] | 在左侧窗格中的[Accounts],可以管理或操作系统帐户。 |
 |
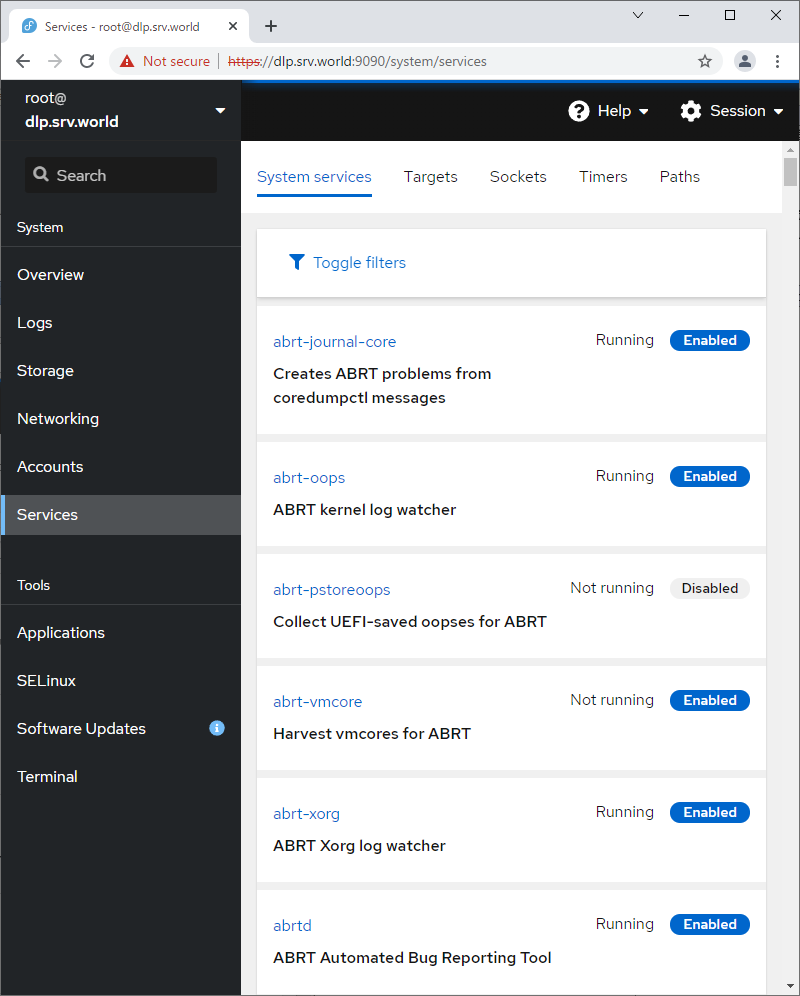
| [7] | 左侧窗格中的[服务],可以管理或操作系统服务。 |
 |
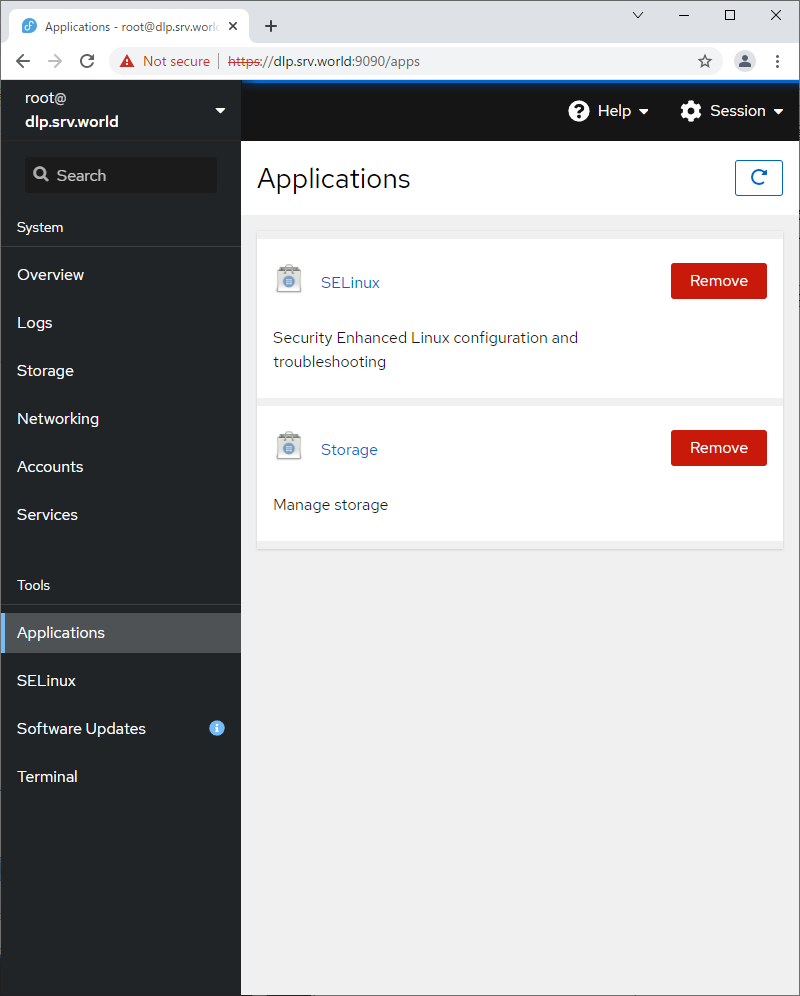
| [8] | 对于左侧窗格中的 [应用程序],可以安装或删除应用程序。 |
 |
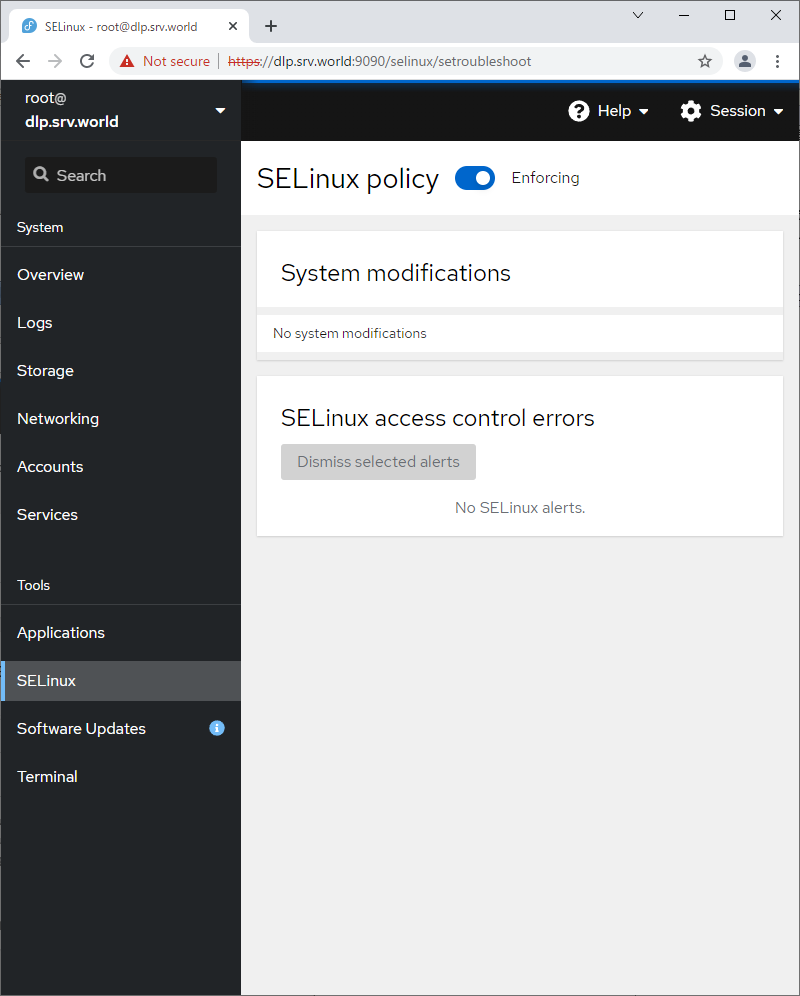
| [9] | 对于左侧窗格中的 [SELinux],可以查看 SELinux 警报日志。(基于 SELinux 启用状态) |
 |
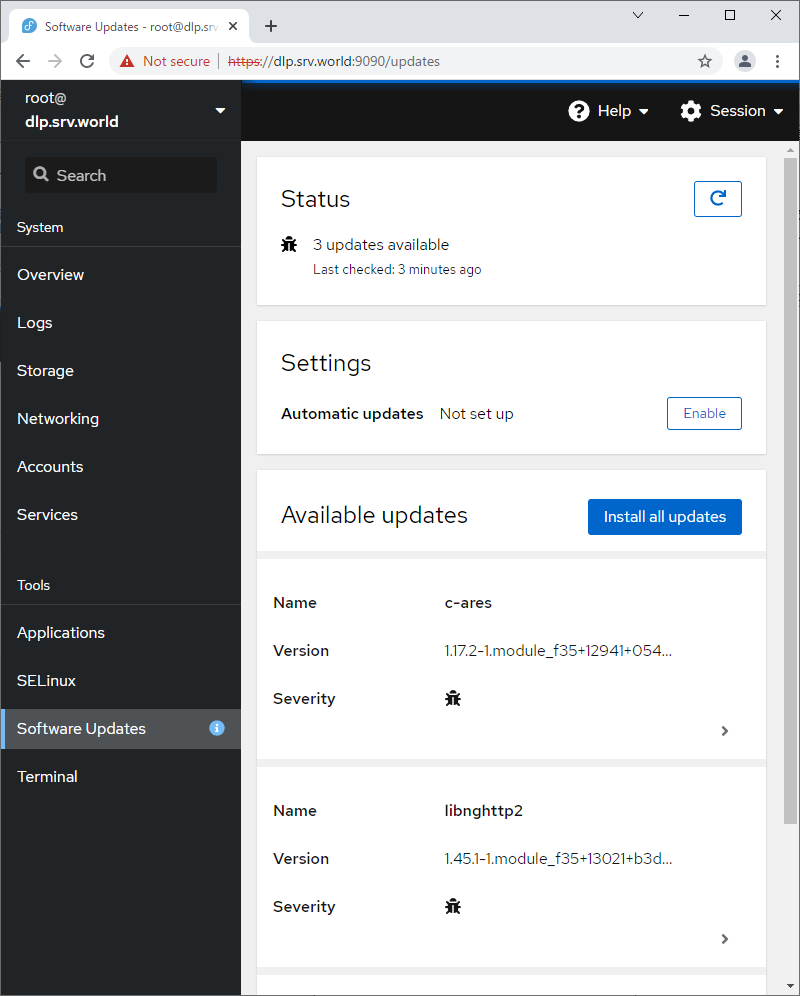
| [10] | 对于左侧窗格中的 [软件更新],可以确认更新或运行更新包。 |
 |
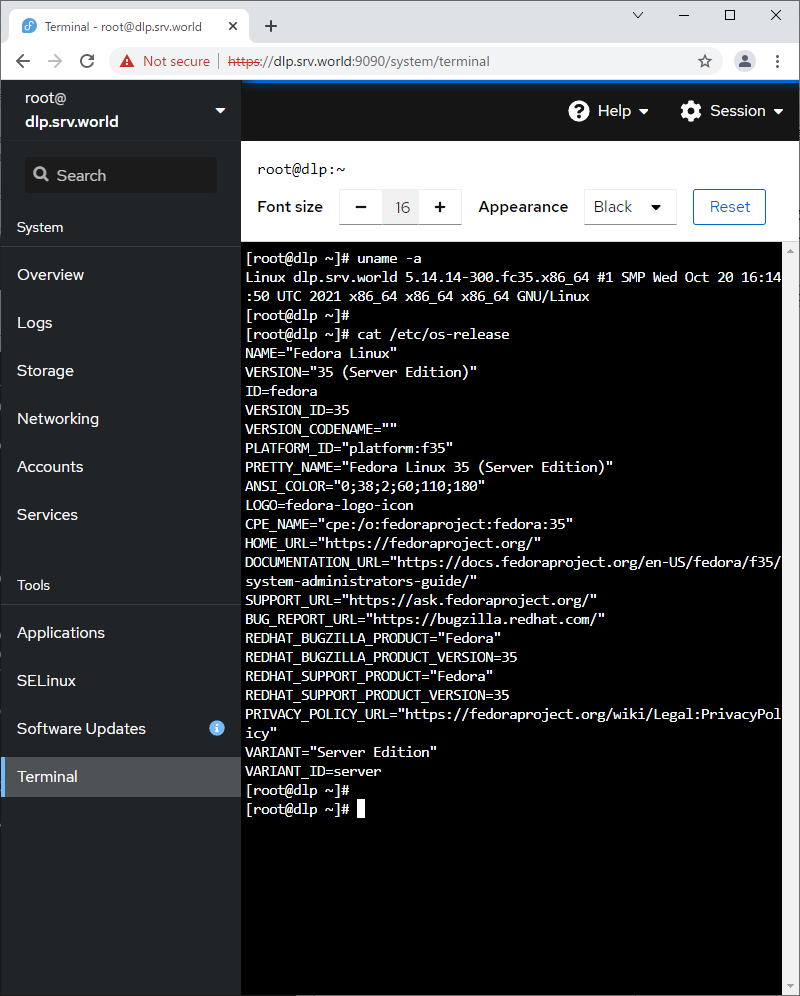
| [11] | 对于左侧窗格中的[终端],可以直接使用命令操作系统。 |
 |
sudo 设置
NTP / SSH 服务器
NTP 服务器
配置 NTP 服务器
安装 Chrony 以配置 NTP 服务器以进行时间同步。
[1] 安装和配置 Chrony
[root@dlp ~]# dnf -y install chrony
[root@dlp ~]# vi /etc/chrony.conf
# line 3: change servers to synchronize (replace to your own timezone NTP server)
# need NTP server itself to sync time with other NTP server
#pool 2.centos.pool.ntp.org iburst
pool ntp.nict.jp iburst
# line 27: add network range to allow to receive time synchronization requests from NTP Clients
# specify your local network and so on
# if not specified, only localhost is allowed
allow 10.0.0.0/24
[root@dlp ~]# systemctl enable --now chronyd
[2] 如果 Firewalld 正在运行,请允许 NTP 服务。NTP 使用 [123/UDP]
[root@dlp ~]# firewall-cmd --add-service=ntp
success
[root@dlp ~]# firewall-cmd --runtime-to-permanent
success
[3] 验证它是否正常工作
[root@dlp ~]# chronyc sources
MS Name/IP address         Stratum Poll Reach LastRx Last sample
===============================================================================
^+ ntp-a3.nict.go.jp             1   6    17     3   +171us[ +843us] +/- 8339us
^* ntp-a2.nict.go.jp             1   6    17     4   +304us[ +976us] +/- 8983us
^+ ntp-b3.nict.go.jp             1   6    17     4  -2654us[-1982us] +/-   11ms
^- ntp-b2.nict.go.jp             1   6    17     3  -1036us[-1036us] +/- 9465us
配置 NTP 客户端
[1] 客户端配置与服务器端的配置大体相同,
但NTP客户端不需要接收其他主机的时间同步请求,所以不需要指定[allow ***]行。
[root@node01 ~]# dnf -y install chrony
[root@node01 ~]# vi /etc/chrony.conf
# line 3: change to your own NTP server or others in your timezone
#pool 2.centos.pool.ntp.org iburst
pool dlp.srv.world iburst
[root@node01 ~]# systemctl enable --now chronyd
# verify status
[root@node01 ~]# chronyc sources
MS Name/IP address         Stratum Poll Reach LastRx Last sample
===============================================================================
^* dlp.srv.world                 2   6    17    11    +19us[+8744ns] +/-   29ms
[2] 要安装 NTPStat,可以显示时间同步状态
root@node01 ~]# dnf -y install ntpstat
[root@node01 ~]# ntpstat
synchronised to NTP server (10.0.0.30) at stratum 3
   time correct to within 29 ms
   polling server every 64 s
SSH服务器
OpenSSH:密码验证
配置 SSH 服务器以从远程计算机操作服务器。
[1] 即使您使用 Minimal Install 安装了 Fedora,OpenSSH 也已默认安装,因此不需要安装新软件包。您可以默认使用密码验证登录。
root@dlp ~]# systemctl status sshd
*  sshd.service - OpenSSH server daemon
     Loaded: loaded (/usr/lib/systemd/system/sshd.service; enabled; vendor pres>
     Active: active (running) since Thu 2021-11-04 09:40:43 JST; 3h 38min ago
       Docs: man:sshd(8)
             man:sshd_config(5)
   Main PID: 770 (sshd)
      Tasks: 1 (limit: 4649)
     Memory: 2.5M
        CPU: 12ms
     CGroup: /system.slice/sshd.service
             +-- 770 "sshd: /usr/sbin/sshd -D [listener] 0 of 10-100 startups"
.....
.....
[2]如果 Firewalld 正在运行,请允许 SSH 服务。SSH 使用 [22/TCP]。(一般默认允许)
[root@dlp ~]# firewall-cmd --add-service=ssh
success
[root@dlp ~]# firewall-cmd --runtime-to-permanent
success
SSH 客户端:Fedora
为 Fedora 配置 SSH 客户端。
[3] 安装 SSH 客户端。
[root@client ~]# dnf -y install openssh-clients[4] 使用任何普通用户连接到 SSH 服务器。
# ssh [username@(hostname or IP address)]
[root@client ~]# ssh fedora@dlp.srv.world
The authenticity of host 'dlp.srv.world (10.0.0.30)' can't be established.
ED25519 key fingerprint is SHA256:gM9dNgDXW8/3Zv6bw1xD3nY1ffRrMZ6ZWZxYpmMn3PQ.
This key is not known by any other names
Are you sure you want to continue connecting (yes/no/[fingerprint])? yes
Warning: Permanently added 'dlp.srv.world' (ED25519) to the list of known hosts.
fedora@dlp.srv.world's password:
Web console: https://dlp.srv.world:9090/ or https://10.0.0.30:9090/

[fedora@dlp ~]$   # logined
[5] 可以使用 SSH 在远程主机上执行命令,如下所示。
# for example, run [cat /etc/passwd]
[fedora@client ~]$ ssh fedora@dlp.srv.world "cat /etc/passwd"
fedora@dlp.srv.world's password:
root:x:0:0:root:/root:/bin/bash
bin:x:1:1:bin:/bin:/sbin/nologin
daemon:x:2:2:daemon:/sbin:/sbin/nologin
.....
.....
tcpdump:x:72:72::/:/sbin/nologin
fedora:x:1000:1000::/home/fedora:/bin/bash
clevis:x:990:988:Clevis Decryption Framework unprivileged user:/var/cache/clevis:/usr/sbin/nologin
SSH 客户端:Windows #1
为 Windows 配置 SSH 客户端。此示例在 Windows 11 上。
[6] 下载适用于 Windows 的 SSH 客户端软件。
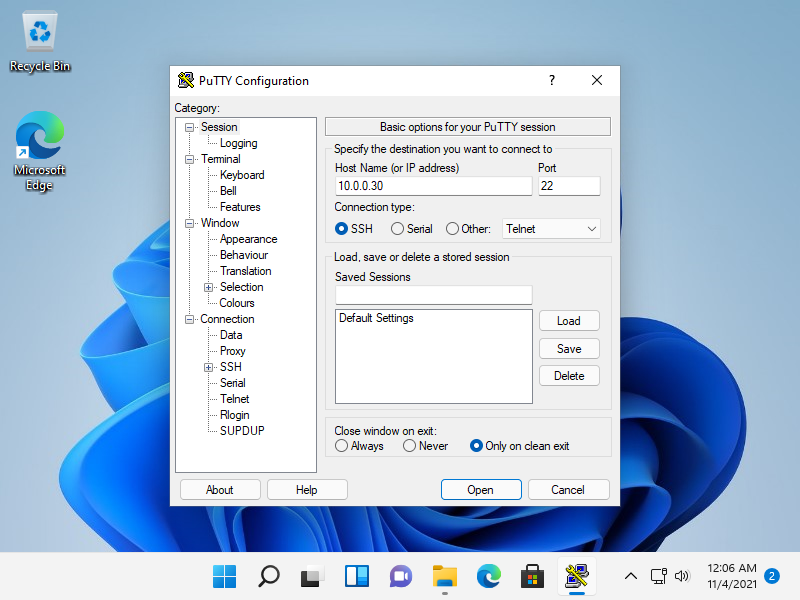
在此示例中,它显示了 Putty (www.chiark.greenend.org.uk/~sgtatham/putty/)。
安装并启动 Putty,然后在 [Host name] 字段中输入您的服务器的主机名或 IP 地址,然后单击 [Open] 按钮进行连接。
 |
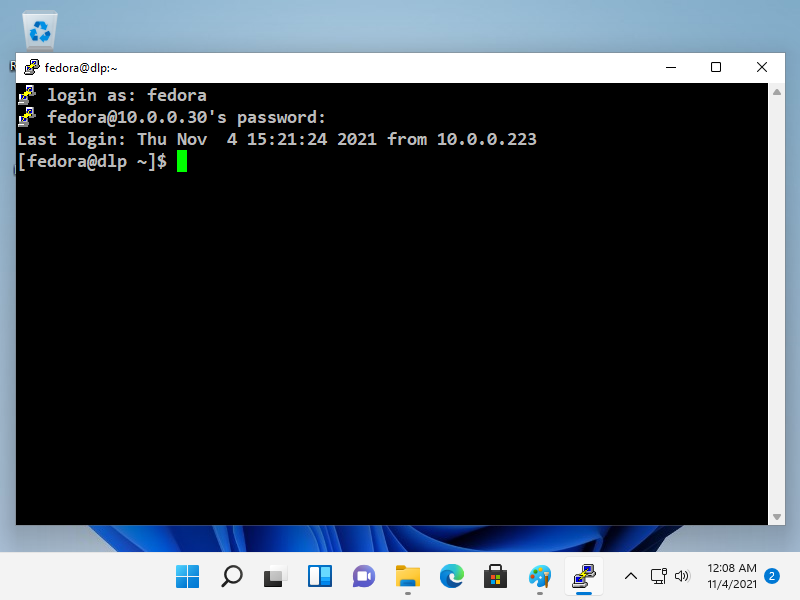
[7] 认证成功后,就可以从远程计算机登录并操作 Fedora 服务器了。
 |
SSH 客户端:Windows #2
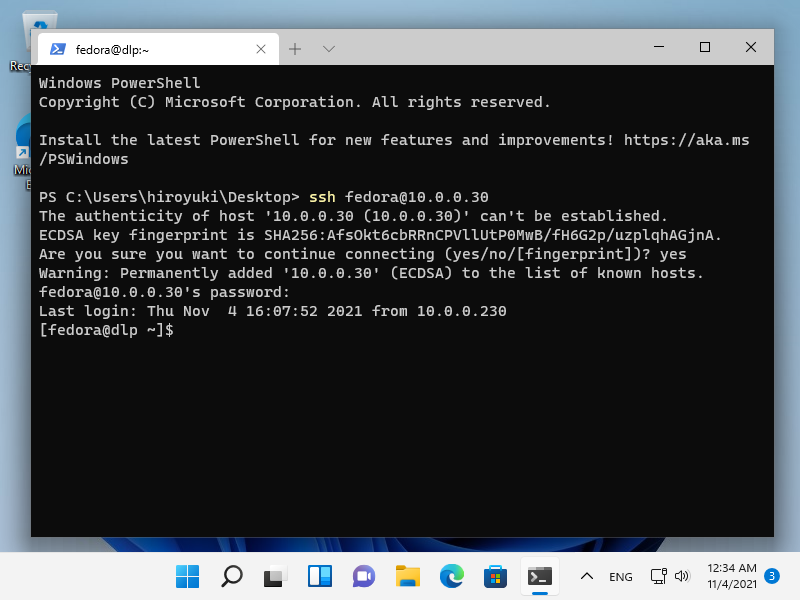
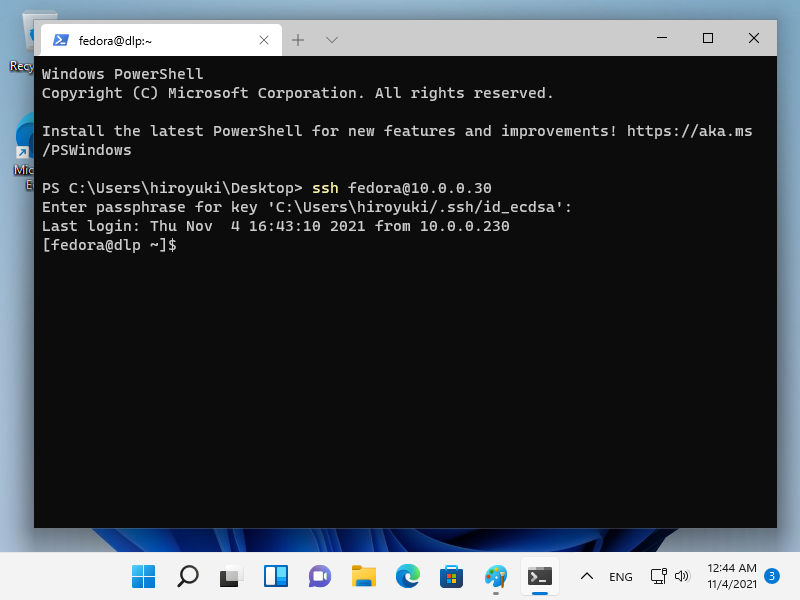
[8] 在 Windows 11 上,OpenSSH 客户端已作为 Windows 功能实现,
因此可以在没有 Putty 或其他 3rd 方 SSH 软件的情况下在 PowerShell 或命令提示符上使用 [ssh] 命令。
用法相同,因为它是 OpenSSH 客户端,请参阅 [4]、[5] 部分。
 |
OpenSSH : SSH 文件传输 (Fedora)
可以通过 SSH 传输文件。
[1] 这是使用 SCP (Secure Copy) 的例子。
# command ⇒scp [Option] Source Target
# copy the [test.txt] on localhost to remote host [node01.srv.world]
[fedora@dlp ~]$ scp ./test.txt fedora@node01.srv.world:~/
fedora@node01.srv.world's password:     # password of the user
test.txt                                      100%   10     0.0KB/s   00:00

# copy the [/home/fedora/test.txt] on remote host [node01.srv.world] to the localhost
[fedora@dlp ~]$ scp fedora@node01.srv.world:/home/fedora/test.txt ./test.txt
fedora@node01.srv.world's password:
test.txt                                      100%   10     0.0KB/s   00:00
[2] 这是使用 SFTP(SSH 文件传输协议)的示例。SFTP 服务器功能默认开启,
如果没有开启,在 [/etc/ssh/sshd_config] 中添加 [Subsystem sftp /usr/libexec/openssh/sftp-server] 行。
# sftp [Option] [user@host]
[redhat@dlp ~]$ sftp fedora@node01.srv.world
fedora@node01.srv.world's password:    # password of the user
Connected to node01.srv.world.
sftp>

# show current directory on remote host
sftp> pwd
Remote working directory: /home/fedora

# show current directory on localhost
sftp> !pwd
/home/redhat

# show files in current directory on remote host
sftp> ls -l
drwxrwxr-x    2 fedora     fedora            7 Nov 04 21:33 public_html
-rw-rw-r--    1 fedora     fedora           10 Nov 04 22:53 test.txt

# show files in current directory on localhost
sftp> !ls -l
total 4
-rw-rw-r--    1 redhat     redhat           10 Nov 04 21:53 test.txt

# change directory
sftp> cd public_html
sftp> pwd
Remote working directory: /home/fedora/public_html

# upload a file to remote host
sftp> put test.txt redhat.txt
Uploading test.txt to /home/fedora/redhat.txt
test.txt                           100%   10     0.0KB/s   00:00
sftp> ls -l
drwxrwxr-x    2 fedora     fedora            6 Nov 04 21:33 public_html
-rw-rw-r--    1 fedora     fedora           10 Nov 04 21:39 redhat.txt
-rw-rw-r--    1 fedora     fedora           10 Nov 04 22:53 test.txt

# upload some files to remote host
sftp> put *.txt
Uploading test.txt to /home/fedora/test.txt
test.txt                                           100%   10     0.0KB/s   00:00
Uploading test2.txt to /home/fedora/test2.txt
test2.txt                                          100%    0     0.0KB/s   00:00
sftp> ls -l
drwxrwxr-x    2 fedora     fedora            6 Nov 04 21:33 public_html
-rw-rw-r--    1 fedora     fedora           10 Nov 04 21:39 redhat.txt
-rw-rw-r--    1 fedora     fedora           10 Nov 04 21:45 test.txt
-rw-rw-r--    1 fedora     fedora           10 Nov 04 21:46 test2.txt

# download a file from remote host
sftp> get test.txt
Fetching /home/fedora/test.txt to test.txt
/home/fedora/test.txt                   100%   10     0.0KB/s   00:00

# download some files from remote host
sftp> get *.txt
Fetching /home/fedora/fedora.txt to fedora.txt
/home/fedora/fedora.txt                                       100%   10     0.0KB/s   00:00
Fetching /home/fedora/test.txt to test.txt
/home/fedora/test.txt                                         100%   10     0.0KB/s   00:00
Fetching /home/fedora/test2.txt to test2.txt
/home/fedora/test2.txt                                        100%   10     0.0KB/s   00:00

# create a directory on remote host
sftp> mkdir testdir
sftp> ls -l
drwxrwxr-x    2 fedora     fedora            6 Nov 04 21:33 public_html
-rw-rw-r--    1 fedora     fedora           10 Nov 04 21:39 redhat.txt
-rw-rw-r--    1 fedora     fedora           10 Nov 04 21:45 test.txt
-rw-rw-r--    1 fedora     fedora           10 Nov 04 21:46 test2.txt
drwxrwxr-x    2 fedora     fedora            6 Nov 04 21:53 testdir

# delete a directory on remote host
sftp> rmdir testdir
rmdir ok, `testdir' removed
sftp> ls -l
drwxrwxr-x    2 fedora     fedora            6 Nov 04 21:33 public_html
-rw-rw-r--    1 fedora     fedora           10 Nov 04 21:39 redhat.txt
-rw-rw-r--    1 fedora     fedora           10 Nov 04 21:45 test.txt
-rw-rw-r--    1 fedora     fedora           10 Nov 04 21:46 test2.txt

# delete a file on remote host
sftp> rm test2.txt
Removing /home/fedora/test2.txt
sftp> ls -l
drwxrwxr-x    2 fedora     fedora            6 Nov 04 21:33 public_html
-rw-rw-r--    1 fedora     fedora           10 Nov 04 21:39 redhat.txt
-rw-rw-r--    1 fedora     fedora           10 Nov 04 Nov 04 21:45 test.txt

# execute commands with ![command]
sftp> !cat /etc/passwd
root:x:0:0:root:/root:/bin/bash
bin:x:1:1:bin:/bin:/sbin/nologin
.....
.....
redhat:x:1001:1001::/home/redhat:/bin/bash

# exit
sftp> quit
221 Goodbye.
OpenSSH : SSH 文件传输 (Windows)
可以在 Windows 客户端上通过 SSH 传输文件。
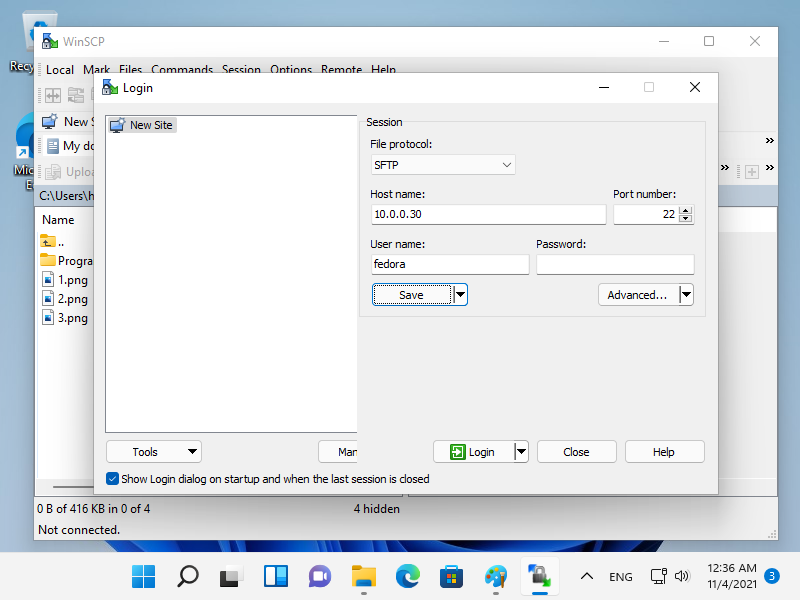
在此示例中,它显示了 WinSCP (winscp.net/eng/download.php)。
在 Windows 11 上,OpenSSH 客户端已作为 Windows 功能实现,
因此可以使用 [scp]、[sftp] 命令,如此处的示例。
[1] 安装并启动 WinSCP,然后显示以下窗口。
输入主机名、用户名、用户密码,然后点击【登录】按钮。
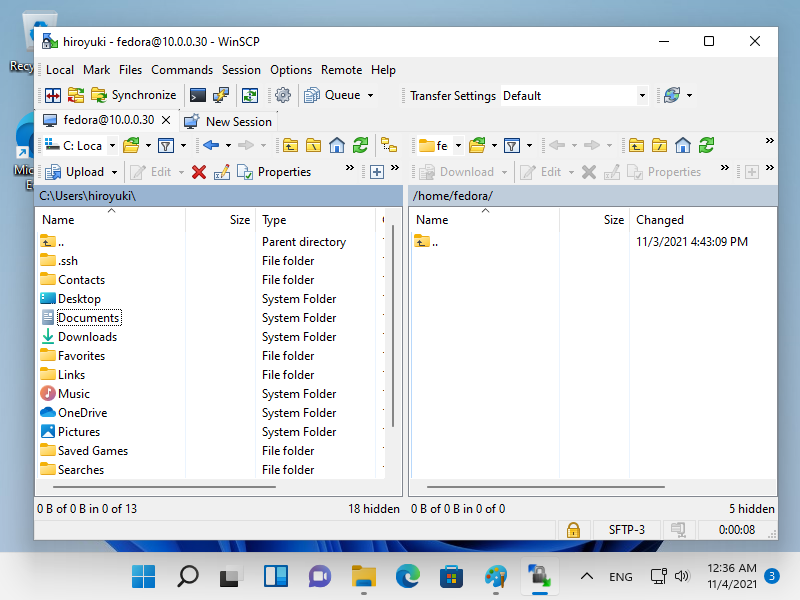
[2] 成功通过认证后,就可以在 WinSCP 上通过 SSH 传输文件了。
OpenSSH:SSH 密钥对认证
配置 SSH 服务器以使用密钥对身份验证登录。
为客户端创建一个私钥,为服务器创建一个公钥。
[1] 由每个用户创建密钥对,因此在 SSH 服务器主机上使用普通用户登录并按如下方式工作。
# create key-pair
[fedora@dlp ~]$ ssh-keygen -t ecdsa
Generating public/private ecdsa key pair.
Enter file in which to save the key (/home/fedora/.ssh/id_ecdsa): # Enter or input changes if you want
Created directory '/home/fedora/.ssh'.
Enter passphrase (empty for no passphrase): # set passphrase (if set no passphrase, Enter with empty)
Enter same passphrase again:
Your identification has been saved in /home/fedora/.ssh/id_ecdsa
Your public key has been saved in /home/fedora/.ssh/id_ecdsa.pub
The key fingerprint is:
SHA256:eZV3AxI39NqZglzADa/51KFMR3wyvbMlBhkQrZTymNI fedora@dlp.srv.world
The key's randomart image is:
.....
.....

[fedora@dlp ~]$ ll ~/.ssh
total 8
-rw-------. 1 fedora fedora 557 Nov  4 14:54 id_ecdsa
-rw-r--r--. 1 fedora fedora 182 Nov  4 14:54 id_ecdsa.pub

[fedora@dlp ~]$ mv ~/.ssh/id_ecdsa.pub ~/.ssh/authorized_keys
[2] 将在服务器上创建的私钥传输到客户端,然后可以使用密钥对身份验证登录。
[fedora@node01 ~]$ mkdir ~/.ssh
[fedora@node01 ~]$ chmod 700 ~/.ssh
# transfer the private key to the local ssh directory
[fedora@node01 ~]$ scp fedora@dlp.srv.world:/home/fedora/.ssh/id_ecdsa ~/.ssh/
fedora@dlp.srv.world's password:
id_ecdsa                                      100% 2655     2.2MB/s   00:00

[fedora@node01 ~]$ ssh fedora@dlp.srv.world
Enter passphrase for key '/home/fedora/.ssh/id_ecdsa':   # passphrase if you set
Last login: Thu Apr 28 19:49:52 2021
[fedora@dlp ~]$   # logined
[3] 如果设置[PasswordAuthentication no],则更安全。
[root@dlp ~]# vi /etc/ssh/sshd_config
# line 65 : uncomment and change to [no]
PasswordAuthentication no
[root@dlp ~]# systemctl restart sshd
Windows 客户端 #1 上的 SSH 密钥对身份验证
这是从 Windows 客户端登录 SSH 服务器的示例。
它在这个例子中使用了 Putty。
在此之前,将私钥传输到 Windows 客户端。
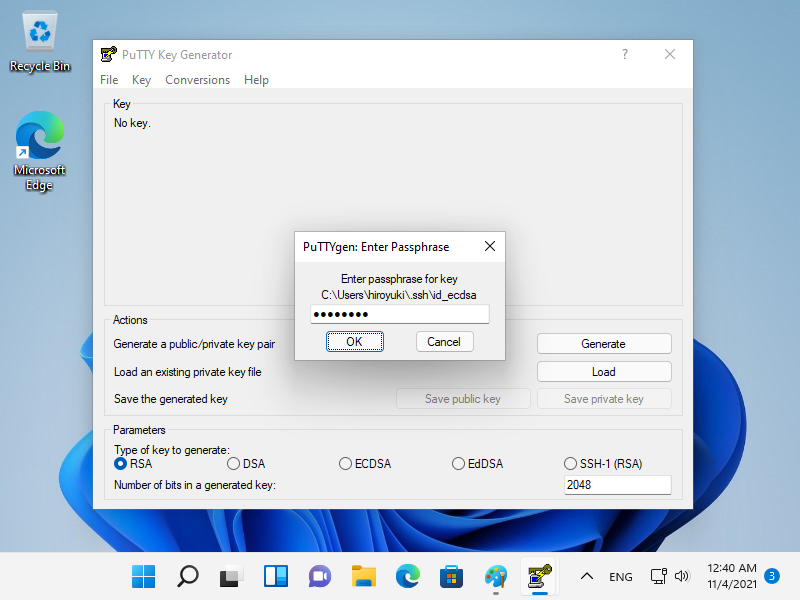
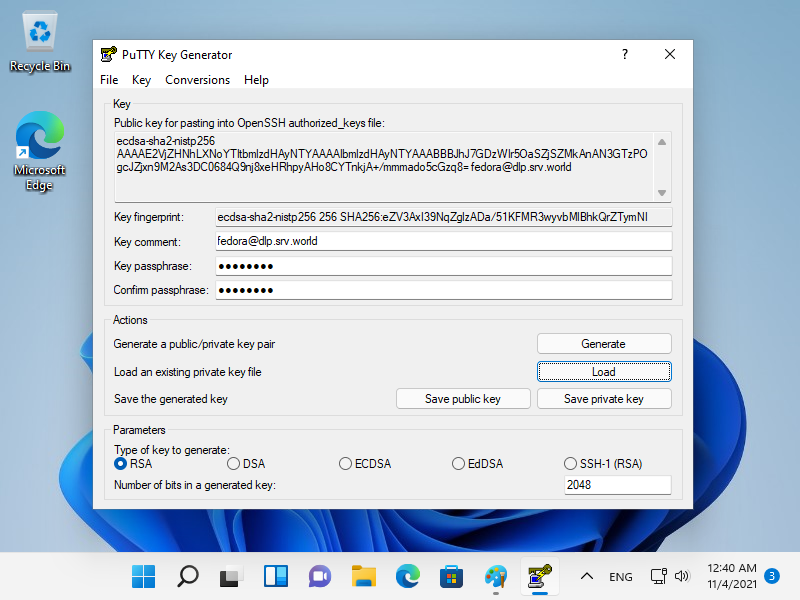
[4] 运行 [Putty] 中包含的 [Puttygen.exe]。(放置在文件夹[Putty.exe]也放置)
如果不包含,从官方网站(www.chiark.greenend.org.uk/~sgtatham/putty/)下载。
启动 [Puttygen.exe] 后,单击以下窗口中的 [Load] 按钮。
 |
[5] 指定您从 SSH 服务器传输的私钥,然后需要密码,如下所示,回答它。(如果没有设置密码,则跳过此步骤)
 |
[6] 单击[保存私钥]按钮,将其保存在您喜欢的文件夹下,使用您喜欢的任何文件名。
 |
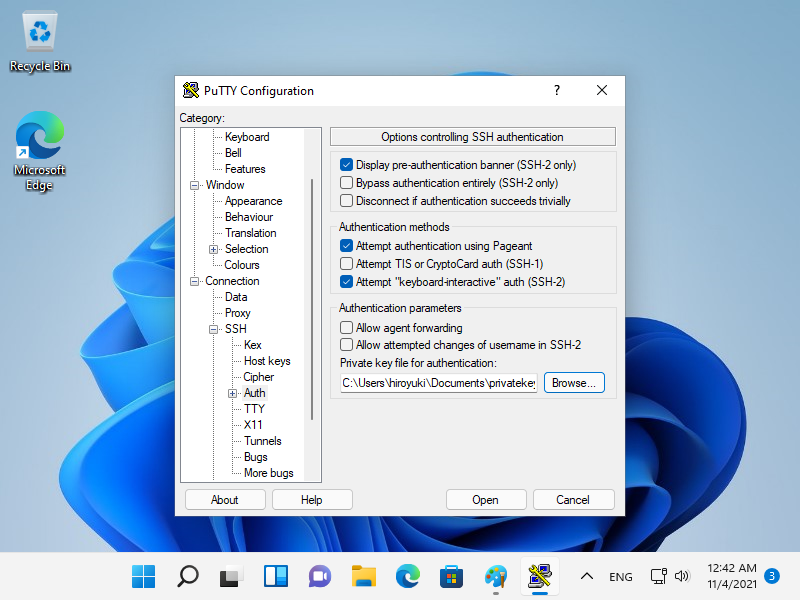
[7] 启动 Putty 并打开左侧窗格中的 [Connection] - [SSH] - [Auth],然后在 [Private key file] 字段中指定您的私钥。
 |
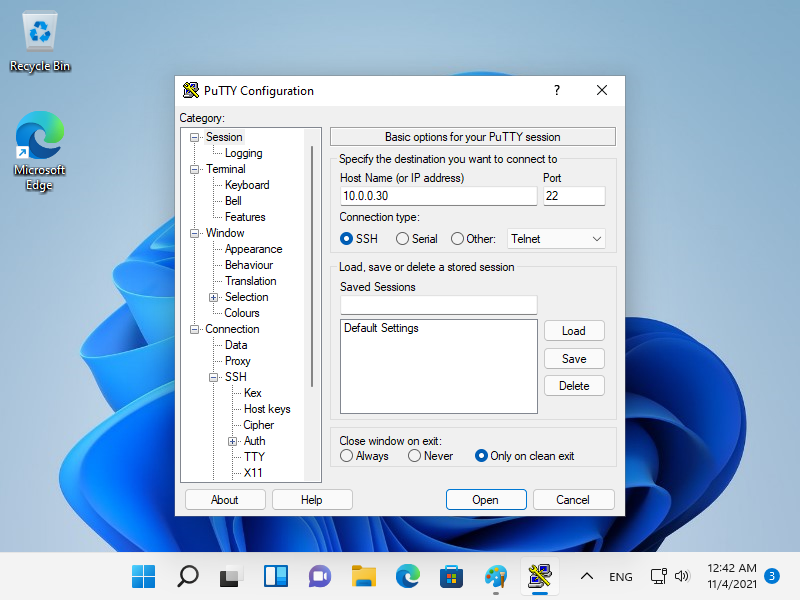
[8] 返回左侧窗格中的 [Session] 并指定要连接的 SSH 服务器主机。
 |
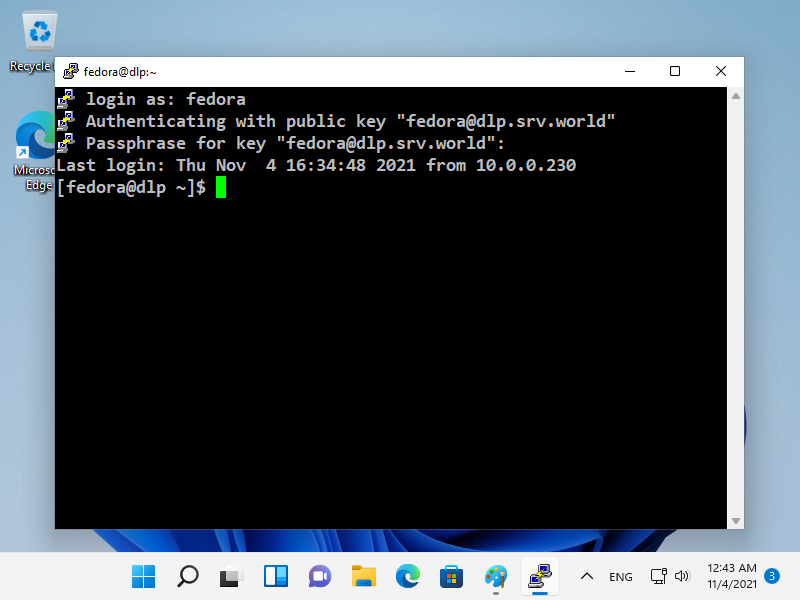
[9] 设置 SSH 密钥对时,如果设置了密码,则需要如下所示登录,然后回答。
 |
Windows #2 上的 SSH 密钥对身份验证
[10] 在 Windows 11 上,OpenSSH 客户端已作为 Windows 功能实现,
因此可以在没有 Putty 和其他 3rd 方软件的情况下使用 SSH 密钥对进行身份验证。
将您的私钥传输到您的 Windows 10 并将其放在 [(logon user home).ssh] 文件夹下,如下所示,然后就可以使用密钥对身份 验证了。
 |
OpenSSH:仅 SFTP + Chroot
仅配置 SFTP + Chroot。
一些应用此设置的用户只能使用 SFTP 访问,并且还应用了 chroot 目录。
[1] 例如,将 [/home] 设置为 Chroot 目录。
# create a group for SFTP only
[root@dlp ~]# groupadd sftp_users
# for example, set [fedora] user as SFTP only user
[root@dlp ~]# usermod -aG sftp_users fedora
[root@dlp ~]# vi /etc/ssh/sshd_config
# line 123 : comment out and add a line
#Subsystem      sftp    /usr/libexec/openssh/sftp-server
Subsystem       sftp    internal-sftp

# add to the end
Match Group sftp_users
  X11Forwarding no
  AllowTcpForwarding no
  ChrootDirectory /home
  ForceCommand internal-sftp
[root@dlp ~]# systemctl restart sshd[fedora@node01 ~]$ ssh dlp.srv.world
fedora@dlp.srv.world's password:
This service allows sftp connections only.
Connection to dlp.srv.world closed. # denied normally
[fedora@node01 ~]$ sftp dlp.srv.world
fedora@dlp.srv.world's password:
Connected to dlp.srv.world.
sftp> ls -l
drwx------ 3 1000 1000 95 Nov 4 05:54 fedora
drwx------ 2 1001 1001 83 Nov 3 23:43 redhat
sftp> pwd
Remote working directory: /
sftp> exit
OpenSSH:使用 SSH 代理
使用 SSH-Agent 自动输入 SSH 密钥对认证的密码。
[1]这是使用 SSH-Agent 的一些示例。
# run SSH-Agent
[fedora@node01 ~]$ eval $(ssh-agent)
Agent pid 1389
# add passphrase
[fedora@node01 ~]$ ssh-add
Enter passphrase for /home/fedora/.ssh/id_ecdsa:
Identity added: /home/fedora/.ssh/id_ecdsa (fedora@dlp.srv.world)
# confirm
[fedora@node01 ~]$ ssh-add -l
256 SHA256:eZV3AxI39NqZglzADa/51KFMR3wyvbMlBhkQrZTymNI fedora@dlp.srv.world (ECDSA)
# verify to conenct without inputting passphrase
[fedora@node01 ~]$ ssh dlp.srv.world hostname
dlp.srv.world
# stop SSH-Agent
# if not execute it, SSH-Agent process remains even if you logout System, be careful
[fedora@node01 ~]$ eval $(ssh-agent -k)
Agent pid 1389 killed
DNS / DHCP服务器
为内部网络配置
安装 BIND 以配置 DNS(域名系统)服务器,为客户端提供名称或地址解析服务。
[1] 安装 BIND
[root@dlp ~]# dnf -y install bind bind-utils[2] 在此示例中,为内部网络配置 BIND。
下面的例子是本地网络是[10.0.0.0/24],域名是[srv.world]的情况,替换成你自己的环境。
[root@dlp ~]# vi /etc/named.conf
.....
.....
# add : set ACL entry for local network
acl internal-network {
        10.0.0.0/24;
};

options {
        # change ( listen all )
        listen-on port 53 { any; };
        # change if need ( if not listen IPv6, set [none] )
        listen-on-v6 { any; };
        directory       "/var/named";
        dump-file       "/var/named/data/cache_dump.db";
        statistics-file "/var/named/data/named_stats.txt";
        memstatistics-file "/var/named/data/named_mem_stats.txt";
        secroots-file   "/var/named/data/named.secroots";
        recursing-file  "/var/named/data/named.recursing";
        # add local network set on [acl] section above
        # network range you allow to recive queries from hosts
        allow-query     { localhost; internal-network; };
        # network range you allow to transfer zone files to clients
        # add secondary DNS servers if it exist
        allow-transfer  { localhost; };

        .....
        .....

        recursion yes;

        dnssec-enable yes;
        dnssec-validation yes;

        managed-keys-directory "/var/named/dynamic";

        pid-file "/run/named/named.pid";
        session-keyfile "/run/named/session.key";

        /* https://fedoraproject.org/wiki/Changes/CryptoPolicy */
        include "/etc/crypto-policies/back-ends/bind.config";
};

logging {
        channel default_debug {
                file "data/named.run";
                severity dynamic;
        };
};

zone "." IN {
        type hint;
        file "named.ca";
};

include "/etc/named.rfc1912.zones";
include "/etc/named.root.key";

# add zones for your network and domain name
zone "srv.world" IN {
        type master;
        file "srv.world.lan";
        allow-update { none; };
};
zone "0.0.10.in-addr.arpa" IN {
        type master;
        file "0.0.10.db";
        allow-update { none; };
};

# if you don't use IPv6 and also suppress logs for IPv6 related, possible to change
# set BIND to use only IPv4
[root@dlp ~]# vi /etc/sysconfig/named
# add to the end
OPTIONS="-4"
 # For how to write the section [*.*.*.*.in-addr.arpa], write your network address reversely like follows
# case of 10.0.0.0/24
# network address    ⇒ 10.0.0.0
# network range      ⇒ 10.0.0.0 - 10.0.0.255
# how to write       ⇒ 0.0.10.in-addr.arpa

# case of 192.168.1.0/24
# network address    ⇒ 192.168.1.0
# network range      ⇒ 192.168.1.0 - 192.168.1.255
# how to write       ⇒ 1.168.192.in-addr.arpa
[3]接下来,为您在上面的 [named.conf] 中设置的每个区域配置区域文件
BIND : 配置区域文件
将以下示例中的网络或域名替换为您自己的环境。
[1] 创建服务器从域名解析 IP 地址的区域文件。
下面的示例使用内部网络 [10.0.0.0/24],域名 [srv.world]。
替换为您自己的环境。
[root@dlp ~]# vi /var/named/srv.world.lan
$TTL 86400
@   IN  SOA     dlp.srv.world. root.srv.world. (
        # any numerical values are OK for serial number but
        # recommendation is [YYYYMMDDnn] (update date + number)
        2021110901  ;Serial
        3600        ;Refresh
        1800        ;Retry
        604800      ;Expire
        86400       ;Minimum TTL
)
        # define Name Server
        IN  NS      dlp.srv.world.
        # define Name Server's IP address
        IN  A       10.0.0.30
        # define Mail Exchanger Server
        IN  MX 10   dlp.srv.world.

# define each IP address of a hostname
dlp     IN  A       10.0.0.30
www     IN  A       10.0.0.31
[3] 接下来,启动 BIND 并验证名称或地址解析,请参阅此处。
BIND : 验证分辨率
[1] 启动并启用 BIND。
[root@dlp ~]# systemctl enable --now named[2] 如果 Firewalld 正在运行,请允许 DNS 服务。DNS 使用 [53/TCP,UDP]。
[root@dlp ~]# firewall-cmd --add-service=dns
success
[root@dlp ~]# firewall-cmd --runtime-to-permanent
success
[3] 如果需要,更改 DNS 设置以引用自己的 DNS。(将 [enp1s0] 替换为您自己的环境)。
root@dlp ~]# nmcli connection modify enp1s0 ipv4.dns 10.0.0.30
[root@dlp ~]# nmcli connection down enp1s0; nmcli connection up enp1s0
[4] 验证名称和地址解析。如果显示 [ANSWER SECTION],则可以。
[root@dlp ~]# dig dlp.srv.world.

; <<>> DiG 9.16.22-RH <<>> dlp.srv.world.
;; global options: +cmd
;; Got answer:
;; ->>HEADER<<- opcode: QUERY, status: NOERROR, id: 49661
;; flags: qr aa rd ra; QUERY: 1, ANSWER: 1, AUTHORITY: 0, ADDITIONAL: 1

;; OPT PSEUDOSECTION:
; EDNS: version: 0, flags:; udp: 1232
; COOKIE: dfa3f5cee693b548010000006189b47fd276e33a7ce318ef (good)
;; QUESTION SECTION:
;dlp.srv.world.                 IN      A

;; ANSWER SECTION:
dlp.srv.world.          86400   IN      A       10.0.0.30

;; Query time: 2 msec
;; SERVER: 10.0.0.30#53(10.0.0.30)
;; WHEN: Tue Nov 09 08:36:31 JST 2021
;; MSG SIZE  rcvd: 86

[root@dlp ~]# dig -x 10.0.0.30

; <<>> DiG 9.16.22-RH <<>> -x 10.0.0.30
;; global options: +cmd
;; Got answer:
;; ->>HEADER<<- opcode: QUERY, status: NOERROR, id: 40024
;; flags: qr aa rd ra; QUERY: 1, ANSWER: 1, AUTHORITY: 0, ADDITIONAL: 1

;; OPT PSEUDOSECTION:
; EDNS: version: 0, flags:; udp: 1232
; COOKIE: 7fa0458fcfcb227e010000006189b4a41afc0733b0cca9e3 (good)
;; QUESTION SECTION:
;30.0.0.10.in-addr.arpa.                IN      PTR

;; ANSWER SECTION:
30.0.0.10.in-addr.arpa. 86400   IN      PTR     dlp.srv.world.

;; Query time: 4 msec
;; SERVER: 10.0.0.30#53(10.0.0.30)
;; WHEN: Tue Nov 09 08:37:08 JST 2021
;; MSG SIZE  rcvd: 106
BIND : 为外部网络配置
安装 BIND 以配置 DNS(域名系统)服务器,为客户端提供名称或地址解析服务。
[1] 安装 BIND。
[root@dlp ~]# dnf -y install bind bind-utils[2] 在此示例中,为外部网络配置 BIND。
下面的例子是针对外部网络是[172.16.0.80/29],域名是[srv.world]的情况,替换成你自己的环境。
(实际上,[172.16.0.80/29] 是用于私有 IP 地址的。)
[root@dlp ~]# vi /etc/named.conf
.....
.....
options {
        # change ( listen all )
        listen-on port 53 { any; };
        # change if need ( if not listen IPv6, set [none] )
        listen-on-v6 { any; };
        directory       "/var/named";
        dump-file       "/var/named/data/cache_dump.db";
        statistics-file "/var/named/data/named_stats.txt";
        memstatistics-file "/var/named/data/named_mem_stats.txt";
        secroots-file   "/var/named/data/named.secroots";
        recursing-file  "/var/named/data/named.recursing";
        # change : receive queries from all hosts
        allow-query     { any; };
        # network range you allow to transfer zone files to clients
        # add secondary DNS servers if it exist
        allow-transfer  { localhost; };

        .....
        .....

        # change : not allow recursive queries
        # answer to zones only this server has their entries
        recursion no;

        dnssec-enable yes;
        dnssec-validation yes;

        managed-keys-directory "/var/named/dynamic";

        pid-file "/run/named/named.pid";
        session-keyfile "/run/named/session.key";

        /* https://fedoraproject.org/wiki/Changes/CryptoPolicy */
        include "/etc/crypto-policies/back-ends/bind.config";
};

logging {
        channel default_debug {
                file "data/named.run";
                severity dynamic;
        };
};

zone "." IN {
        type hint;
        file "named.ca";
};

include "/etc/named.rfc1912.zones";
include "/etc/named.root.key";

# add zones for your network and domain name
zone "srv.world" IN {
        type master;
        file "srv.world.wan";
        allow-update { none; };
};
zone "80.0.16.172.in-addr.arpa" IN {
        type master;
        file "80.0.16.172.db";
        allow-update { none; };
};

# if you don't use IPv6 and also suppress logs for IPv6 related, possible to change
# set BIND to use only IPv4
[root@dlp ~]# vi /etc/sysconfig/named
# add to the end
OPTIONS="-4"
# For how to write the section [*.*.*.*.in-addr.arpa], write your network address reversely like follows
# case of 172.16.0.80/29
# network address    ⇒ 172.16.0.80
# network range      ⇒ 172.16.0.80 - 172.16.0.87
# how to write       ⇒ 80.0.16.172.in-addr.arpa
[3] 接下来,为您在上面的 [named.conf] 中设置的每个区域配置区域文件。
将以下示例中的网络或域名替换为您自己的环境。
[1] 创建服务器从域名解析 IP 地址的区域文件。
下面的示例使用内部网络 [10.0.0.0/24],域名 [srv.world]。
替换为您自己的环境。
[root@dlp ~]# vi /var/named/srv.world.lan
$TTL 86400
@   IN  SOA     dlp.srv.world. root.srv.world. (
        # any numerical values are OK for serial number but
        # recommendation is [YYYYMMDDnn] (update date + number)
        2021110901  ;Serial
        3600        ;Refresh
        1800        ;Retry
        604800      ;Expire
        86400       ;Minimum TTL
)
        # define Name Server
        IN  NS      dlp.srv.world.
        # define Name Server's IP address
        IN  A       10.0.0.30
        # define Mail Exchanger Server
        IN  MX 10   dlp.srv.world.

# define each IP address of a hostname
dlp     IN  A       10.0.0.30
www     IN  A       10.0.0.31
[2] 创建服务器从 IP 地址解析域名的区域文件。
下面的示例使用内部网络 [10.0.0.0/24],域名 [srv.world]。
替换为您自己的环境。
[root@dlp ~]# vi /var/named/0.0.10.db
$TTL 86400
@   IN  SOA     dlp.srv.world. root.srv.world. (
        2021110901  ;Serial
        3600        ;Refresh
        1800        ;Retry
        604800      ;Expire
        86400       ;Minimum TTL
)
        # define Name Server
        IN  NS      dlp.srv.world.

# define each hostname of an IP address
30      IN  PTR     dlp.srv.world.
31      IN  PTR     www.srv.world.
[3] 接下来,启动 BIND 并验证名称或地址解析,请参阅此处。
BIND : 验证分辨率
[1] 启动并启用 BIND。
[root@dlp ~]# systemctl enable --now named[2] 如果 Firewalld 正在运行,请允许 DNS 服务。DNS 使用 [53/TCP,UDP]。
[root@dlp ~]# firewall-cmd --add-service=dns
success
[root@dlp ~]# firewall-cmd --runtime-to-permanent
success
[3] 如果需要,更改 DNS 设置以引用自己的 DNS。
(将 [enp1s0] 替换为您自己的环境)。
[root@dlp ~]# nmcli connection modify enp1s0 ipv4.dns 10.0.0.30
[root@dlp ~]# nmcli connection down enp1s0; nmcli connection up enp1s0
[4] 验证名称和地址解析。如果显示 [ANSWER SECTION],则可以。
[root@dlp ~]# dig dlp.srv.world.

; <<>> DiG 9.16.22-RH <<>> dlp.srv.world.
;; global options: +cmd
;; Got answer:
;; ->>HEADER<<- opcode: QUERY, status: NOERROR, id: 49661
;; flags: qr aa rd ra; QUERY: 1, ANSWER: 1, AUTHORITY: 0, ADDITIONAL: 1

;; OPT PSEUDOSECTION:
; EDNS: version: 0, flags:; udp: 1232
; COOKIE: dfa3f5cee693b548010000006189b47fd276e33a7ce318ef (good)
;; QUESTION SECTION:
;dlp.srv.world.                 IN      A

;; ANSWER SECTION:
dlp.srv.world.          86400   IN      A       10.0.0.30

;; Query time: 2 msec
;; SERVER: 10.0.0.30#53(10.0.0.30)
;; WHEN: Tue Nov 09 08:36:31 JST 2021
;; MSG SIZE  rcvd: 86

[root@dlp ~]# dig -x 10.0.0.30

; <<>> DiG 9.16.22-RH <<>> -x 10.0.0.30
;; global options: +cmd
;; Got answer:
;; ->>HEADER<<- opcode: QUERY, status: NOERROR, id: 40024
;; flags: qr aa rd ra; QUERY: 1, ANSWER: 1, AUTHORITY: 0, ADDITIONAL: 1

;; OPT PSEUDOSECTION:
; EDNS: version: 0, flags:; udp: 1232
; COOKIE: 7fa0458fcfcb227e010000006189b4a41afc0733b0cca9e3 (good)
;; QUESTION SECTION:
;30.0.0.10.in-addr.arpa.                IN      PTR

;; ANSWER SECTION:
30.0.0.10.in-addr.arpa. 86400   IN      PTR     dlp.srv.world.

;; Query time: 4 msec
;; SERVER: 10.0.0.30#53(10.0.0.30)
;; WHEN: Tue Nov 09 08:37:08 JST 2021
;; MSG SIZE  rcvd: 106
BIND : 配置区域文件
将以下示例中的网络或域名替换为您自己的环境。
[1] 创建服务器从域名解析 IP 地址的区域文件。
下面的示例使用内部网络 [10.0.0.0/24],域名 [srv.world]。
替换为您自己的环境。
[root@dlp ~]# vi /var/named/srv.world.lan
$TTL 86400
@   IN  SOA     dlp.srv.world. root.srv.world. (
        # any numerical values are OK for serial number but
        # recommendation is [YYYYMMDDnn] (update date + number)
        2021110901  ;Serial
        3600        ;Refresh
        1800        ;Retry
        604800      ;Expire
        86400       ;Minimum TTL
)
        # define Name Server
        IN  NS      dlp.srv.world.
        # define Name Server's IP address
        IN  A       10.0.0.30
        # define Mail Exchanger Server
        IN  MX 10   dlp.srv.world.

# define each IP address of a hostname
dlp     IN  A       10.0.0.30
www     IN  A       10.0.0.31
[2] 创建服务器从 IP 地址解析域名的区域文件。
下面的示例使用内部网络 [10.0.0.0/24],域名 [srv.world]。
替换为您自己的环境。
[root@dlp ~]# vi /var/named/0.0.10.db
$TTL 86400
@   IN  SOA     dlp.srv.world. root.srv.world. (
        2021110901  ;Serial
        3600        ;Refresh
        1800        ;Retry
        604800      ;Expire
        86400       ;Minimum TTL
)
        # define Name Server
        IN  NS      dlp.srv.world.

# define each hostname of an IP address
30      IN  PTR     dlp.srv.world.
31      IN  PTR     www.srv.world.
[3] 接下来,启动 BIND 并验证名称或地址解析,请参阅此处。
BIND : 验证分辨率
[1] 启动并启用 BIND。
[root@dlp ~]# systemctl enable --now named[2] 如果 Firewalld 正在运行,请允许 DNS 服务。DNS 使用 [53/TCP,UDP]。
[root@dlp ~]# firewall-cmd --add-service=dns
success
[root@dlp ~]# firewall-cmd --runtime-to-permanent
success
[3] 如果需要,更改 DNS 设置以引用自己的 DNS。
(将 [enp1s0] 替换为您自己的环境)。
[root@dlp ~]# nmcli connection modify enp1s0 ipv4.dns 10.0.0.30
[root@dlp ~]# nmcli connection down enp1s0; nmcli connection up enp1s0
[4] 验证名称和地址解析。如果显示 [ANSWER SECTION],则可以。
[root@dlp ~]# dig dlp.srv.world.

; <<>> DiG 9.16.22-RH <<>> dlp.srv.world.
;; global options: +cmd
;; Got answer:
;; ->>HEADER<<- opcode: QUERY, status: NOERROR, id: 49661
;; flags: qr aa rd ra; QUERY: 1, ANSWER: 1, AUTHORITY: 0, ADDITIONAL: 1

;; OPT PSEUDOSECTION:
; EDNS: version: 0, flags:; udp: 1232
; COOKIE: dfa3f5cee693b548010000006189b47fd276e33a7ce318ef (good)
;; QUESTION SECTION:
;dlp.srv.world.                 IN      A

;; ANSWER SECTION:
dlp.srv.world.          86400   IN      A       10.0.0.30

;; Query time: 2 msec
;; SERVER: 10.0.0.30#53(10.0.0.30)
;; WHEN: Tue Nov 09 08:36:31 JST 2021
;; MSG SIZE  rcvd: 86

[root@dlp ~]# dig -x 10.0.0.30

; <<>> DiG 9.16.22-RH <<>> -x 10.0.0.30
;; global options: +cmd
;; Got answer:
;; ->>HEADER<<- opcode: QUERY, status: NOERROR, id: 40024
;; flags: qr aa rd ra; QUERY: 1, ANSWER: 1, AUTHORITY: 0, ADDITIONAL: 1

;; OPT PSEUDOSECTION:
; EDNS: version: 0, flags:; udp: 1232
; COOKIE: 7fa0458fcfcb227e010000006189b4a41afc0733b0cca9e3 (good)
;; QUESTION SECTION:
;30.0.0.10.in-addr.arpa.                IN      PTR

;; ANSWER SECTION:
30.0.0.10.in-addr.arpa. 86400   IN      PTR     dlp.srv.world.

;; Query time: 4 msec
;; SERVER: 10.0.0.30#53(10.0.0.30)
;; WHEN: Tue Nov 09 08:37:08 JST 2021
;; MSG SIZE  rcvd: 106
BIND : 使用视图语句
这是在 [named.conf] 中使用 View 语句的示例。
在此示例中,使用 [named.conf] 中的查看语句 配置内部网络的 设置和外部网络的设置,如此处。
[1] 本例使用内网[10.0.0.0/24],外网[172.16.0.80/29],域名[srv.world],替换成自己的环境。
(实际上,[172.16.0.80/29] 是用于私有 IP 地址的。)
[root@dlp ~]# vi /etc/named.conf
.....
.....
# add : set ACL entry for local network
acl internal-network {
        10.0.0.0/24;
};

options {
        # change ( listen all )
        listen-on port 53 { any; };
        # change if need ( if not listen IPv6, set [none] )
        listen-on-v6 { any; };
        directory       "/var/named";
        dump-file       "/var/named/data/cache_dump.db";
        statistics-file "/var/named/data/named_stats.txt";
        memstatistics-file "/var/named/data/named_mem_stats.txt";
        secroots-file   "/var/named/data/named.secroots";
        recursing-file  "/var/named/data/named.recursing";
        # add local network set on [acl] section above
        # network range you allow to recive queries from hosts
        allow-query     { localhost; internal-network; };
        # network range you allow to transfer zone files to clients
        # add secondary DNS servers if it exist
        allow-transfer  { localhost; };

        .....
        .....

        recursion yes;

        dnssec-enable yes;
        dnssec-validation yes;

        managed-keys-directory "/var/named/dynamic";

        pid-file "/run/named/named.pid";
        session-keyfile "/run/named/session.key";

        /* https://fedoraproject.org/wiki/Changes/CryptoPolicy */
        include "/etc/crypto-policies/back-ends/bind.config";
};

logging {
        channel default_debug {
                file "data/named.run";
                severity dynamic;
        };
};

# change all lines follows
# set internal network zones
view "internal" {
        match-clients {
                localhost;
                internal-network;
        };
        zone "." IN {
                type hint;
                file "named.ca";
        };
        zone "srv.world" IN {
                type master;
                file "srv.world.lan";
                allow-update { none; };
        };
        zone "0.0.10.in-addr.arpa" IN {
                type master;
                file "0.0.10.db";
                allow-update { none; };
        };
include "/etc/named.rfc1912.zones";
include "/etc/named.root.key";
};

# set external network zones
view "external" {
        # match all except targets defined on [match-clients] on internal section
        match-clients { any; };
        allow-query { any; };
        # not allow recursive queries
        recursion no;
        zone "srv.world" IN {
                type master;
                file "srv.world.wan";
                allow-update { none; };
        };
        zone "80.0.16.172.in-addr.arpa" IN {
                type master;
                file "80.0.16.172.db";
                allow-update { none; };
        };
};
[2] 以上 [named.conf] 中设置的各个 Zone 文件的配置,请参考此处。
BIND : 配置区域文件
为 [named.conf] 中设置的每个区域配置区域文件。
将以下示例中的网络或域名替换为您自己的环境。
[1] 创建服务器从域名解析 IP 地址的区域文件。
下面的示例使用内部网络 [10.0.0.0/24],域名 [srv.world]。
替换为您自己的环境。
[root@dlp ~]# vi /var/named/srv.world.lan
$TTL 86400
@   IN  SOA     dlp.srv.world. root.srv.world. (
        # any numerical values are OK for serial number but
        # recommendation is [YYYYMMDDnn] (update date + number)
        2021110901  ;Serial
        3600        ;Refresh
        1800        ;Retry
        604800      ;Expire
        86400       ;Minimum TTL
)
        # define Name Server
        IN  NS      dlp.srv.world.
        # define Name Server's IP address
        IN  A       10.0.0.30
        # define Mail Exchanger Server
        IN  MX 10   dlp.srv.world.

# define each IP address of a hostname
dlp     IN  A       10.0.0.30
www     IN  A       10.0.0.31
[2] 创建服务器从 IP 地址解析域名的区域文件。
下面的示例使用内部网络 [10.0.0.0/24],域名 [srv.world]。
替换为您自己的环境。
[root@dlp ~]# vi /var/named/0.0.10.db
$TTL 86400
@   IN  SOA     dlp.srv.world. root.srv.world. (
        2021110901  ;Serial
        3600        ;Refresh
        1800        ;Retry
        604800      ;Expire
        86400       ;Minimum TTL
)
        # define Name Server
        IN  NS      dlp.srv.world.

# define each hostname of an IP address
30      IN  PTR     dlp.srv.world.
31      IN  PTR     www.srv.world.
[3] 接下来,启动 BIND 并验证名称或地址解析,请参阅此处。
BIND : 验证分辨率
[1] 启动并启用 BIND。
[root@dlp ~]# systemctl enable --now named
[2] 如果 Firewalld 正在运行,请允许 DNS 服务。DNS 使用 [53/TCP,UDP]。
[root@dlp ~]# firewall-cmd --add-service=dns
success
[root@dlp ~]# firewall-cmd --runtime-to-permanent
success
[3] 如果需要,更改 DNS 设置以引用自己的 DNS。
(将 [enp1s0] 替换为您自己的环境)。
[root@dlp ~]# nmcli connection modify enp1s0 ipv4.dns 10.0.0.30
[root@dlp ~]# nmcli connection down enp1s0; nmcli connection up enp1s0
[4] 验证名称和地址解析。如果显示 [ANSWER SECTION],则可以。
[root@dlp ~]# dig dlp.srv.world.

; <<>> DiG 9.16.22-RH <<>> dlp.srv.world.
;; global options: +cmd
;; Got answer:
;; ->>HEADER<<- opcode: QUERY, status: NOERROR, id: 49661
;; flags: qr aa rd ra; QUERY: 1, ANSWER: 1, AUTHORITY: 0, ADDITIONAL: 1

;; OPT PSEUDOSECTION:
; EDNS: version: 0, flags:; udp: 1232
; COOKIE: dfa3f5cee693b548010000006189b47fd276e33a7ce318ef (good)
;; QUESTION SECTION:
;dlp.srv.world.                 IN      A

;; ANSWER SECTION:
dlp.srv.world.          86400   IN      A       10.0.0.30

;; Query time: 2 msec
;; SERVER: 10.0.0.30#53(10.0.0.30)
;; WHEN: Tue Nov 09 08:36:31 JST 2021
;; MSG SIZE  rcvd: 86

[root@dlp ~]# dig -x 10.0.0.30

; <<>> DiG 9.16.22-RH <<>> -x 10.0.0.30
;; global options: +cmd
;; Got answer:
;; ->>HEADER<<- opcode: QUERY, status: NOERROR, id: 40024
;; flags: qr aa rd ra; QUERY: 1, ANSWER: 1, AUTHORITY: 0, ADDITIONAL: 1

;; OPT PSEUDOSECTION:
; EDNS: version: 0, flags:; udp: 1232
; COOKIE: 7fa0458fcfcb227e010000006189b4a41afc0733b0cca9e3 (good)
;; QUESTION SECTION:
;30.0.0.10.in-addr.arpa.                IN      PTR

;; ANSWER SECTION:
30.0.0.10.in-addr.arpa. 86400   IN      PTR     dlp.srv.world.

;; Query time: 4 msec
;; SERVER: 10.0.0.30#53(10.0.0.30)
;; WHEN: Tue Nov 09 08:37:08 JST 2021
;; MSG SIZE  rcvd: 106
BIND : 设置别名 (CNAME)
如果您想将别名(另一个名称)设置为主机,请在区域文件中设置 CNAME 记录。
[1] 在区域文件中设置 CNAME 记录。
[root@dlp ~]# vi /var/named/srv.world.lan
$TTL 86400
@   IN  SOA     dlp.srv.world. root.srv.world. (
        # update serial if update zone file
        2021110902  ;Serial
        3600        ;Refresh
        1800        ;Retry
        604800      ;Expire
        86400       ;Minimum TTL
)
        IN  NS      dlp.srv.world.
        IN  A       10.0.0.30
        IN  MX 10   dlp.srv.world.

dlp     IN  A       10.0.0.30
www     IN  A       10.0.0.31

# [Alias] IN CNAME [Original Name]
ftp     IN  CNAME   dlp.srv.world.

[root@dlp ~]# rndc reload
server reload successful
# verify resolution
[root@dlp ~]# dig ftp.srv.world.

; <<>> DiG 9.16.22-RH <<>> ftp.srv.world.
;; global options: +cmd
;; Got answer:
;; ->>HEADER<<- opcode: QUERY, status: NOERROR, id: 44967
;; flags: qr aa rd ra; QUERY: 1, ANSWER: 2, AUTHORITY: 0, ADDITIONAL: 1

;; OPT PSEUDOSECTION:
; EDNS: version: 0, flags:; udp: 1232
; COOKIE: 04c6ca63bc5d1dde010000006189b6eb91495a7eb8875559 (good)
;; QUESTION SECTION:
;ftp.srv.world.                 IN      A

;; ANSWER SECTION:
ftp.srv.world.          86400   IN      CNAME   dlp.srv.world.
dlp.srv.world.          86400   IN      A       10.0.0.30

;; Query time: 2 msec
;; SERVER: 10.0.0.30#53(10.0.0.30)
;; WHEN: Tue Nov 09 08:46:51 JST 2021
;; MSG SIZE  rcvd: 104
BIND : 配置 Chroot 环境
如果你想为命名配置 Chroot 环境,设置如下。
[1] 设置好 Chroot 环境后,配置文件放在 [/var/named/chroot] 下。
[named.conf] 放在 [/var/named/chroot/etc/named.conf] 下,
区域文件放在 [/var/named/chroot/var/named/***] 下。
修改设置时,请在 [/var/named/chroot] 文件下进行更改。
[root@dlp ~]# dnf -y install bind-chroot
[root@dlp ~]# mkdir /var/named/chroot/usr/lib64/named
[root@dlp ~]# /usr/libexec/setup-named-chroot.sh /var/named/chroot on
[root@dlp ~]# systemctl disable --now named
[root@dlp ~]# systemctl enable --now named-chroot
Created symlink /etc/systemd/system/multi-user.target.wants/named-chroot.service → /usr/lib/systemd/system/named-chroot.service.
[root@dlp ~]# ll /var/named/chroot/etc
total 716
drwxr-x---. 3 root named     23 Nov  2 04:55 crypto-policies
-rw-r--r--. 2 root root     309 Sep 27 05:32 localtime
drwxr-x---. 2 root named      6 Nov  2 04:55 named
-rw-r-----. 1 root named   2390 Nov  9 08:45 named.conf
-rw-r-----. 1 root named   1029 Nov  2 04:55 named.rfc1912.zones
-rw-r--r--. 1 root named    686 Nov  2 04:55 named.root.key
drwxr-x---. 3 root named     25 Nov  2 04:55 pki
-rw-r--r--. 1 root root    6568 Jul 16 17:35 protocols
-rw-r-----. 1 root named    100 Nov  9 08:35 rndc.key
-rw-r--r--. 1 root root  701745 Jul 16 17:35 services

[root@dlp ~]# ll /var/named/chroot/var/named
total 24
-rw-r--r--. 1 root  root   313 Nov  9 08:34 0.0.10.db
drwxr-x---. 7 root  named   61 Nov  2 04:55 chroot
drwxrwx---. 2 named named   23 Nov  9 08:35 data
drwxrwx---. 2 named named  108 Nov  9 08:47 dynamic
-rw-r-----. 1 root  named 2253 Nov  2 04:55 named.ca
-rw-r-----. 1 root  named  152 Nov  2 04:55 named.empty
-rw-r-----. 1 root  named  152 Nov  2 04:55 named.localhost
-rw-r-----. 1 root  named  168 Nov  2 04:55 named.loopback
drwxrwx---. 2 named named    6 Nov  2 04:55 slaves
-rw-r--r--. 1 root  root   404 Nov  9 08:46 srv.world.lan
BIND :配置辅助服务器
配置 DNS 辅助服务器(从服务器)。
在此示例中,它显示配置 DNS 辅助服务器 [ns.server.education] (192.168.100.85),DNS 主服务器是 [dlp.srv.world] (172.16.0.82),如下所示。将 IP 地址和主机名替换为您自己的环境。
[1] 在 DNS 主服务器主机上配置。
[root@dlp ~]# vi /etc/named.conf
.....
.....
options {
        listen-on port 53 { any; };
        listen-on-v6 { any; };
        directory       "/var/named";
        dump-file       "/var/named/data/cache_dump.db";
        statistics-file "/var/named/data/named_stats.txt";
        memstatistics-file "/var/named/data/named_mem_stats.txt";
        secroots-file   "/var/named/data/named.secroots";
        recursing-file  "/var/named/data/named.recursing";
        allow-query     { localhost; internal-network; };
        # add secondary server to allow to transfer zone files
        allow-transfer  { localhost; 192.168.100.85; };
.....
.....

[root@dlp ~]# vi /var/named/srv.world.wan
$TTL 86400
@   IN  SOA     dlp.srv.world. root.srv.world. (
        # update serial if update zone file
        2021110903  ;Serial
        3600        ;Refresh
        1800        ;Retry
        604800      ;Expire
        86400       ;Minimum TTL
)
        IN  NS      dlp.srv.world.
        # add secondary server
        IN  NS      ns.server.education.
        IN  A       172.16.0.82
        IN  MX 10   dlp.srv.world.

dlp     IN  A       172.16.0.82
www     IN  A       172.16.0.83

[root@dlp ~]# systemctl restart named
[2] 配置 onDNS 辅助服务器主机。
[root@ns ~]# vi /etc/named.conf
# add target zone info
# for IP address, it's the Master server's IP address
zone "srv.world" IN {
        type slave;
        masters { 172.16.0.82; };
        file "slaves/srv.world.wan";
        notify no;
};

[root@ns ~]# systemctl restart named
[root@ns ~]# ls /var/named/slaves
srv.world.wan   # zone file transfered
DHCP : 配置 DHCP 服务器
配置 DHCP(动态主机配置协议)服务器以将 IP 地址分配给本地网络中的客户端主机。
[1] 安装和配置 DHCP。在此示例中,它仅显示 IPv4 配置。
[root@dlp ~]# dnf -y install dhcp-server
[root@dlp ~]# vi /etc/dhcp/dhcpd.conf
# create new
# specify domain name
option domain-name     "srv.world";

# specify DNS server's hostname or IP address
option domain-name-servers     dlp.srv.world;

# default lease time
default-lease-time 600;

# max lease time
max-lease-time 7200;

# this DHCP server to be declared valid
authoritative;

# specify network address and subnetmask
subnet 10.0.0.0 netmask 255.255.255.0 {
    # specify the range of lease IP address
    range dynamic-bootp 10.0.0.200 10.0.0.254;
    # specify broadcast address
    option broadcast-address 10.0.0.255;
    # specify gateway
    option routers 10.0.0.1;
}

[root@dlp ~]# systemctl enable --now dhcpd
[2] 如果 Firewalld 正在运行,请允许 DHCP 服务。DHCP 服务器使用 [67/UDP]。
[root@dlp ~]# firewall-cmd --add-service=dhcp
success
[root@dlp ~]# firewall-cmd --runtime-to-permanent
success
DHCP:配置 DHCP 客户端:Fedora2021/11/09
配置 DHCP 客户端以从本地网络中的 DHCP 服务器获取 IP 地址。
[1] 对于 Fedora 客户端,配置如下。(将 [enp1s0] 替换为您自己的设备名称)
# install DHCP client if not installed (generally installed by default)
[root@client ~]# dnf -y install dhcp-client
[root@client ~]# nmcli connection modify enp1s0 ipv4.method auto
[root@client ~]# nmcli connection down enp1s0; nmcli connection up enp1s0
DHCP:配置 DHCP 客户端:Windows
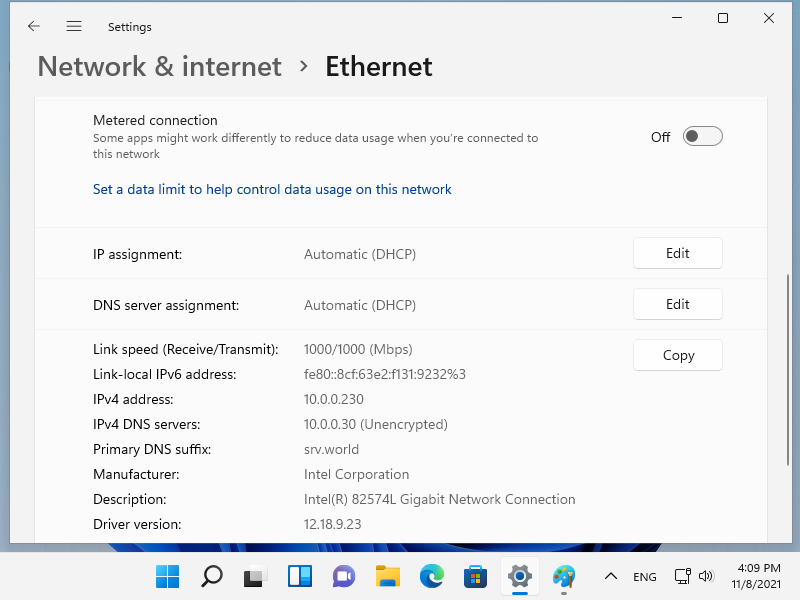
在 Windows 计算机上配置 DHCP 客户端。此示例基于 Windows 11。
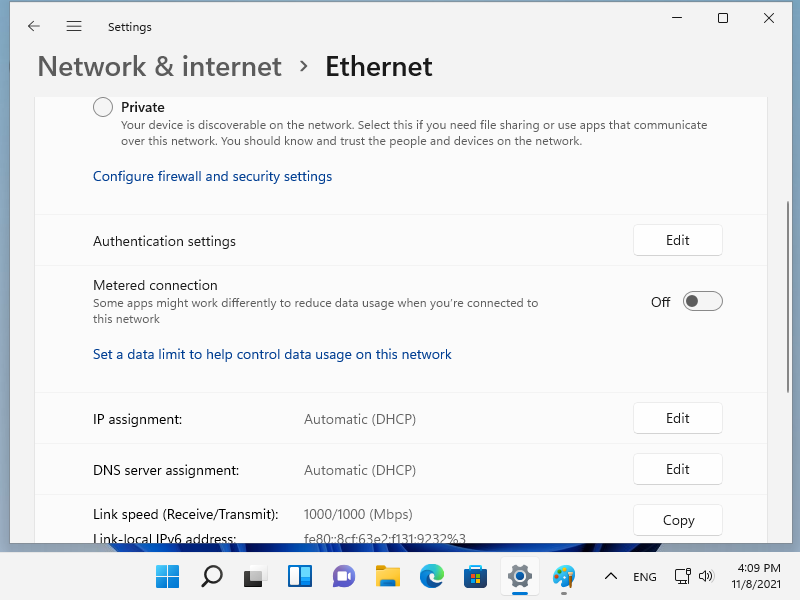
[2] 右键单击开始按钮并打开[网络连接],然后单击[属性]。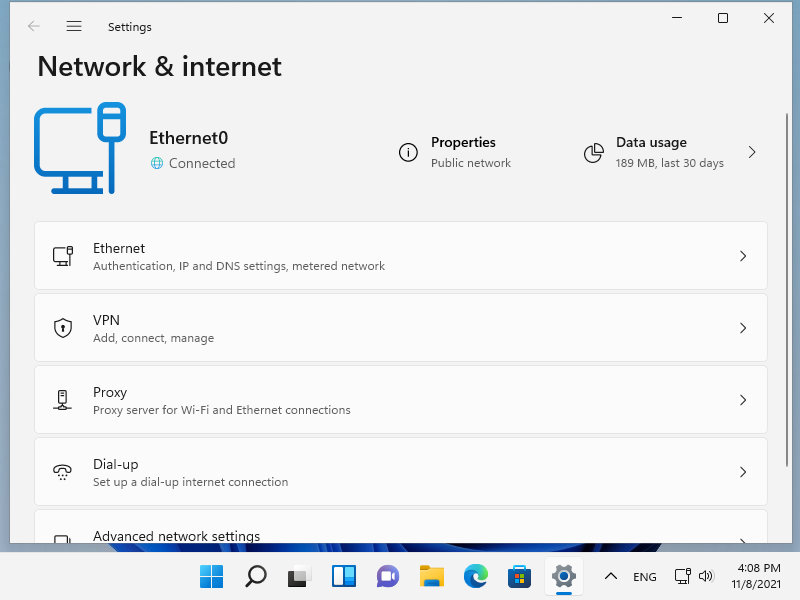 [3] 如果 [IP 分配] 是 [DHCP] 就可以了。如果没有,请单击 [编辑] 按钮。
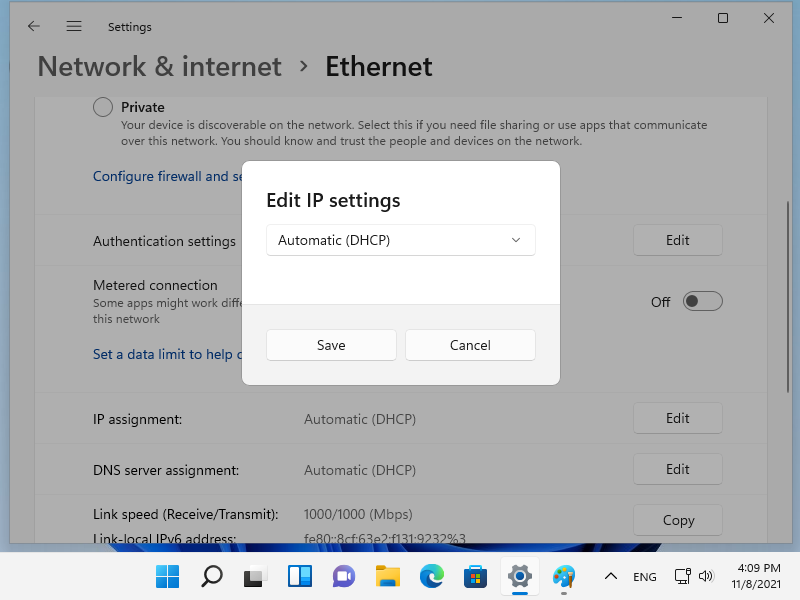
[4] 如果单击上一部分的[编辑]按钮,将显示以下窗口。选择 [自动 (DHCP)] 并保存。
[5] 确认网络连接状态,如果分配了 IP 就可以了。
存储
NFS
NFS:配置NFS Server
将NFS服务器配置为共享网络上的目录。
这个例子基于以下环境。
[1] 配置 NFS 服务器。
[root@dlp ~]# dnf -y install nfs-utils
[root@dlp ~]# vi /etc/idmapd.conf
# line 5 : uncomment and change to your domain name
Domain = srv.world
[root@dlp ~]# vi /etc/exports
# create new
# for example, set [/home/nfsshare] as NFS share
/home/nfsshare 10.0.0.0/24(rw,no_root_squash)
[root@dlp ~]# mkdir /home/nfsshare
[root@dlp ~]# systemctl enable --now rpcbind nfs-server
[2] 如果 Firewalld 正在运行,请允许 NFS 服务。
[root@dlp ~]# firewall-cmd --add-service=nfs
success
# if use NFSv3, allow follows, too
[root@dlp ~]# firewall-cmd --add-service={nfs3,mountd,rpc-bind}
success
[root@dlp ~]# firewall-cmd --runtime-to-permanent
success
出口的基本选择
| 选项 | 描述 |
| 读写 | 允许 NFS 卷上的读取和写入请求。 |
| 罗 | 仅允许 NFS 卷上的读取请求。 |
| 同步 | 仅在将更改提交到稳定存储后才回复请求。(默认) |
| 异步 | 此选项允许 NFS 服务器违反 NFS 协议并在请求所做的任何更改提交到稳定存储之前回复请求。 |
| 安全的 | 此选项要求请求源自小于 IPPORT_RESERVED (1024) 的 Internet 端口。(默认) |
| 不安全 | 此选项接受所有端口。 |
| 延迟 | 如果怀疑另一个相关的写入请求可能正在进行中或可能很快到达,则稍微延迟将写入请求提交到磁盘。(默认) |
| no_wdelay | 如果还设置了异步,则此选项无效。如果 NFS 服务器怀疑另一个相关的写入请求可能正在进行中或可能很快到达,它通常会稍微延迟向磁盘提交写入请求。这允许通过一个可以提高性能的操作将多个写入请求提交到磁盘。如果 NFS 服务器主要接收小的无关请求,则此行为实际上会降低性能,因此可以使用 no_wdelay 将其关闭。 |
| 子树检查 | 此选项启用子树检查。(默认) |
| no_subtree_check | 此选项禁用子树检查,这具有轻微的安全隐患,但在某些情况下可以提高可靠性。 |
| root_squash | 将请求从 uid/gid 0 映射到匿名 uid/gid。请注意,这不适用于可能同样敏感的任何其他 uid 或 gid,例如用户 bin 或组人员。 |
| no_root_squash | 关闭根挤压。此选项主要用于无磁盘客户端。 |
| all_squash | 将所有 uid 和 gid 映射到匿名用户。对于 NFS 导出的公共 FTP 目录、新闻假脱机目录等很有用。 |
| no_all_squash | 关闭所有挤压。(默认) |
| anonuid=UID | 这些选项显式设置匿名帐户的 uid 和 gid。此选项主要用于 PC/NFS 客户端,您可能希望所有请求都来自一个用户。例如,考虑下面示例部分中 /home/joe 的导出条目,它将所有请求映射到 uid 150。 |
| anongid=GID | 阅读上文(annuid=UID) |
NFS:配置 NFS 客户端配置
NFS 客户端以在 NFS 客户端上挂载 NFS 共享。
此示例基于如下环境。
+------------------------+ | +------------------------+
| [NFS 服务器] |10.0.0.30 | 10.0.0.51| [NFS 客户端] |
| dlp.srv.world +----------+----------+ node01.srv.world |
| | | |
+----------+ +----------+
[1] 配置 NFS 客户端。
[root@node01 ~]# dnf -y install nfs-utils
[root@node01 ~]# vi /etc/idmapd.conf
# line 5 : uncomment and change to your domain name
Domain = srv.world
[root@node01 ~]# mount -t nfs dlp.srv.world:/home/nfsshare /mnt
[root@node01 ~]# df -hT
Filesystem                     Type      Size  Used Avail Use% Mounted on
devtmpfs                       devtmpfs  1.9G     0  1.9G   0% /dev
tmpfs                          tmpfs     2.0G     0  2.0G   0% /dev/shm
tmpfs                          tmpfs     783M  968K  782M   1% /run
/dev/mapper/fedora_fedora-root xfs        15G  1.6G   14G  11% /
tmpfs                          tmpfs     2.0G  4.0K  2.0G   1% /tmp
/dev/vda1                      xfs      1014M  195M  820M  20% /boot
tmpfs                          tmpfs     392M     0  392M   0% /run/user/0
dlp.srv.world:/home/nfsshare   nfs4       15G  1.6G   14G  11% /mnt
# NFS share is mounted

# if mount with NFSv3, add [-o vers=3] option
[root@node01 ~]# mount -t nfs -o vers=3 dlp.srv.world:/home/nfsshare /mnt
[root@node01 ~]# df -hT /mnt
Filesystem                   Type  Size  Used Avail Use% Mounted on
dlp.srv.world:/home/nfsshare nfs    15G  1.5G   14G  10% /mnt
[2] 要在系统启动时自动挂载,请在 [/etc/fstab] 中配置设置。
[root@node01 ~]# vi /etc/fstab
/dev/mapper/fedora_fedora-root            /            xfs     defaults        0 0
UUID=7a32c4aa-4536-4a53-9098-d8fce81050e6 /boot        xfs     defaults        0 0
# add to the end : set NFS share
dlp.srv.world:/home/nfsshare              /mnt         nfs     defaults        0 0
[3] 要在任何人访问 NFS 共享时动态挂载,请配置 AutoFS。
[root@node01 ~]# dnf -y install autofs
[root@node01 ~]# vi /etc/auto.master
# add to the end
/-    /etc/auto.mount

[root@node01 ~]# vi /etc/auto.mount
# create new : [mount point] [option] [location]
/mnt   -fstype=nfs,rw  dlp.srv.world:/home/nfsshare

[root@node01 ~]# systemctl enable --now autofs
# move to the mount point to verify mounting
[root@node01 ~]# cd /mnt
[root@node01 mnt]# ll
total 4
drwxr-xr-x. 2 root root  6 Nov  9 14:13 testdir
-rw-r--r--. 1 root root 10 Nov  9 14:13 testfile.txt

[root@node01 mnt]# grep /mnt /proc/mounts
/etc/auto.mount /mnt autofs rw,relatime,fd=17,pgrp=24684,timeout=300,minproto=5,maxproto=5,direct,pipe_ino=50098 0 0
dlp.srv.world:/home/nfsshare /mnt nfs4 rw,relatime,vers=4.2,rsize=524288,wsize=524288,namlen=255,hard,proto=tcp,timeo=600,retrans=2,sec=sys,clientaddr=10.0.0.51,local_lock=none,addr=10.0.0.30 0 0
NFS:NFS 4 ACL 工具
可以在 NFS(v4) 文件系统上设置 ACL 以安装 NFS 4 ACL 工具。
POSIX ACL Tool 的用法基本相同。
[1] 在使用 NFSv4 安装 NFS 共享的 NFS 客户端上安装 NFS 4 ACL 工具。
[root@node01 ~]# dnf -y install nfs4-acl-tools[2] 在此示例中,它显示了环境中的使用示例,如下所示。
[root@node01 ~]# df -hT /mnt
Filesystem                   Type  Size  Used Avail Use% Mounted on
dlp.srv.world:/home/nfsshare nfs4   15G  1.6G   14G  11% /mnt

[root@node01 ~]# ll /mnt
total 4
drwx------. 2 root root  6 Nov  9 17:45 testdir
-rw-------. 1 root root 10 Nov  9 17:44 testfile.txt
[3] 在 NFSv4 文件系统上显示文件或目录的 ACL。
[root@node01 ~]# nfs4_getfacl /mnt/testfile.txt

# file: /mnt/testfile.txt
A::OWNER@:rwatTcCy
A::GROUP@:tcy
A::EVERYONE@:tcy

[root@node01 ~]# nfs4_getfacl /mnt/testdir

# file: /mnt/testdir
A::OWNER@:rwaDxtTcCy
A::GROUP@:tcy
A::EVERYONE@:tcy

# each entry means like follows
# ACE = Access Control Entry
# (ACE Type):(ACE Flags):(ACE Principal):(ACE Permissions)
描述
| 王牌类型 | |
| 一种 | A = Allow :表示允许访问。 |
| D | D = Deny :表示拒绝访问。 |
| 王牌标志 | |
| d | Directory-Inherit :新的子目录继承相同的 ACE。 |
| F | File-Inherit :新文件继承相同的 ACE 但不继承继承标志。 |
| n | No-Propogate-Inherit :新的子目录继承相同的 ACE 但不继承继承标志。 |
| 一世 | Inherit-Only :新文件/子目录继承相同的 ACE,但该目录没有 ACE。 |
| 王牌校长 | |
| (USER)@(NFSD 域) | 普通用户 对于 [NFSDomain],它只是为 [idmapd.conf] 中的 [Domain] 值指定的域名。 |
| (GROUP)@(NFSD 域) | 公共组 对于组,像这样指定 [g] 标志 ⇒ A:g:GROUP@NFSDomain:rxtncy |
| 所有者@ | 特别负责人:业主 |
| 团体@ | 特别负责人:集团 |
| 每个人@ | 特约校长:大家 |
| ACE 权限 | |
| r | 读取文件数据/列出目录中的文件 |
| w | 将数据写入文件/在目录中创建新文件 |
| 一种 | 将数据附加到文件/创建新的子目录 |
| X | 执行文件/更改目录 |
| d | 删除文件或目录 |
| D | 删除目录下的文件或子目录 |
| 吨 | 读取文件或目录的属性 |
| 吨 | 将属性写入文件或目录 |
| n | 读取文件或目录的命名属性 |
| ñ | 写入文件或目录的命名属性 |
| C | 读取文件或目录的 ACL |
| C | 写入文件或目录的 ACL |
| ○ | 更改文件或目录的所有权 |
| ACE 权限别名 | 对于使用 nfs4_setfacl,可以为 ACE 权限使用别名 |
| R | R = rntcy:通用读取 |
| W | W = watTNcCy :通用写入 |
| X | X = xtcy:通用执行 |
[4] 添加或删除 ACE。
[root@node01 ~]# ll /mnt
total 4
drwx------. 2 root root  6 Nov  9 17:45 testdir
-rw-------. 1 root root 10 Nov  9 17:44 testfile.txt

[root@node01 ~]# nfs4_getfacl /mnt/testfile.txt

# file: /mnt/testfile.txt
A::OWNER@:rwatTcCy
A::GROUP@:tcy
A::EVERYONE@:tcy

# add generic read/execute for [fedora] user to [/mnt/testfile.txt] file
[root@node01 ~]# nfs4_setfacl -a A::fedora@srv.world:rxtncy /mnt/testfile.txt
[root@node01 ~]# nfs4_getfacl /mnt/testfile.txt

# file: /mnt/testfile.txt
D::OWNER@:x
A::OWNER@:rwatTcCy
A::1000:rxtcy
A::GROUP@:tcy
A::EVERYONE@:tcy


# verify with [fedora] user
[fedora@node01 ~]$ ll /mnt
total 4
drwx------. 2 root root  6 Nov  9 17:45 testdir
-rw-r-x---. 1 root root 10 Nov  9 17:44 testfile.txt

[fedora@node01 ~]$ cat /mnt/testfile.txt
test file

# delete generic read/execute for [fedora] user from [/mnt/testfile.txt] file
[root@node01 ~]# nfs4_setfacl -x A::1000:rxtcy /mnt/testfile.txt
[root@node01 ~]# nfs4_getfacl /mnt/testfile.txt

# file: /mnt/testfile.txt
A::OWNER@:rwatTcCy
A::GROUP@:tcy
A::EVERYONE@:tcy
[5] 直接编辑 ACL。
[root@node01 ~]# nfs4_setfacl -e /mnt/testfile.txt

# $EDITOR is run and enter to ACL editing
# default $EDITOR on  Fedora 34 is [nano], if $EDITOR=null, default is set to [vi]
## Editing NFSv4 ACL for file: /mnt/testfile.txt
A::OWNER@:rwatTcCy
A::GROUP@:tcy
A::EVERYONE@:tcy
[6] 从文件中添加 ACE。
# create ACL list
[root@node01 ~]# vi acl.txt
A::fedora@srv.world:RX
A::redhat@srv.world:RWX

# add ACL from the file
[root@node01 ~]# nfs4_setfacl -A acl.txt /mnt/testfile.txt
[root@node01 ~]# nfs4_getfacl /mnt/testfile.txt

# file: /mnt/testfile.txt
D::OWNER@:x
A::OWNER@:rwatTcCy
A::1000:rxtcy
A::1001:rwaxtcy
A::GROUP@:tcy
A::EVERYONE@:tcy
[7] 将当前的 ACE 替换为新的 ACE。
# create ACL list
[root@node01 ~]# vi acl.txt
A::OWNER@:rwaxtTcCy
A::GROUP@:tcy
A::EVERYONE@:tcy

# replace ACL from the file
[root@node01 ~]# nfs4_setfacl -S acl.txt /mnt/testfile.txt
[root@node01 ~]# nfs4_getfacl /mnt/testfile.txt

# file: /mnt/testfile.txt
A::OWNER@:rwaxtTcCy
A::GROUP@:tcy
A::EVERYONE@:tcy
[8] 将特定的 ACE 替换为新的 ACE。
[root@node01 ~]# nfs4_getfacl /mnt/testfile.txt

# file: /mnt/testfile.txt
A::OWNER@:rwaxtTcCy
A::GROUP@:tcy
A::EVERYONE@:tcy

# replace EVERYONE's ACE to read/execute
[root@node01 ~]# nfs4_setfacl -m A::EVERYONE@:tcy A::EVERYONE@:RX /mnt/testfile.txt
[root@node01 ~]# nfs4_getfacl /mnt/testfile.txt

# file: /mnt/testfile.txt
A::OWNER@:rwaxtTcCy
A::GROUP@:rxtcy
A::EVERYONE@:rxtcy
iSCSI
iSCSI:配置目标(Targetcli)
使用 iSCSI 配置存储服务器。
网络上带有 iSCSI 的存储服务器称为 iSCSI Target,连接到 iSCSI Target 的 Client Host 称为 iSCSI Initiator。此示例基于如下环境。
+------------------------+ | +------------------------+
| [iSCSI 目标] |10.0.0.30 | 10.0.0.51| [iSCSI 启动器] |
| dlp.srv.world +----------+----------+ node01.srv.world |
| | | |
+----------+ +----------+
[1] 安装管理工具。
[root@dlp ~]# dnf -y install targetcli[2] 配置 iSCSI 目标。
例如,在 [/var/lib/iscsi_disks] 目录下创建一个磁盘映像,并将其设置为 SCSI 设备。
# create a directory
[root@dlp ~]# mkdir /var/lib/iscsi_disks
# enter the admin console
[root@dlp ~]# targetcli
targetcli shell version 2.1.54
Copyright 2011-2013 by Datera, Inc and others.
For help on commands, type 'help'.

/> cd backstores/fileio

# create a disk-image with the name [disk01] on [/var/lib/iscsi_disks/disk01.img] with 10G
/backstores/fileio> create disk01 /var/lib/iscsi_disks/disk01.img 10G
Created fileio disk01 with size 10737418240
/backstores/fileio> cd /iscsi

# create a target
# naming rule : [ iqn.(year)-(month).(reverse of domain name):(any name you like) ]
/iscsi> create iqn.2021-11.world.srv:dlp.target01
Created target iqn.2021-11.world.srv:dlp.target01.
Created TPG 1.
Global pref auto_add_default_portal=true
Created default portal listening on all IPs (0.0.0.0), port 3260.
/iscsi> cd iqn.2021-11.world.srv:dlp.target01/tpg1/luns

# set LUN
/iscsi/iqn.20...t01/tpg1/luns> create /backstores/fileio/disk01
Created LUN 0.
/iscsi/iqn.20...t01/tpg1/luns> cd ../acls

# set ACL (it's the IQN of an initiator you permit to connect)
/iscsi/iqn.20...t01/tpg1/acls> create iqn.2021-11.world.srv:node01.initiator01
Created Node ACL for iqn.2021-11.world.srv:node01.initiator01
Created mapped LUN 0.
/iscsi/iqn.20...t01/tpg1/acls> cd iqn.2021-11.world.srv:node01.initiator01

# set UserID and Password for authentication
/iscsi/iqn.20...w.initiator01> set auth userid=username
Parameter userid is now 'username'.
/iscsi/iqn.20...w.initiator01> set auth password=password
Parameter password is now 'password'.
/iscsi/iqn.20...w.initiator01> exit
Global pref auto_save_on_exit=true
Configuration saved to /etc/target/saveconfig.json

# after configuration above, the target enters in listening like follows
[root@dlp ~]# ss -napt | grep 3260
LISTEN 0      256          0.0.0.0:3260       0.0.0.0:*

[root@dlp ~]# systemctl enable target
[3] 如果 Firewalld 正在运行,请允许 iSCSI Target 服务。
[root@dlp ~]# firewall-cmd --add-service=iscsi-target
success
[root@dlp ~]# firewall-cmd --runtime-to-permanent
success
iSCSI:配置目标 (tgt)
使用 iSCSI 配置存储服务器。
这是使用 scsi-target-utils 配置 iSCSI Target 的示例。(tgt)
网络上带有 iSCSI 的存储服务器称为 iSCSI Target,连接到 iSCSI Target 的 Client Host 称为 iSCSI Initiator。
此示例基于如下环境。
+------------------------+ | +------------------------+
| [iSCSI 目标] |10.0.0.30 | 10.0.0.51| [iSCSI 启动器] |
| dlp.srv.world +----------+----------+ node01.srv.world |
| | | |
+----------+ +----------+
[1] 安装管理工具。
[root@dlp ~]# dnf -y install scsi-target-utils[2] 配置 iSCSI 目标。
例如,在 [/var/lib/iscsi_disks] 目录下创建一个磁盘映像,并将其设置为 SCSI 设备。
[root@dlp ~]# systemctl enable --now tgtd
# show status
[root@dlp ~]# tgtadm --mode target --op show
Target 1: iqn.2021-11.world.srv:dlp.target01
    System information:
        Driver: iscsi
        State: ready
    I_T nexus information:
    LUN information:
        LUN: 0
            Type: controller
            SCSI ID: IET     00010000
            SCSI SN: beaf10
            Size: 0 MB, Block size: 1
            Online: Yes
            Removable media: No
            Prevent removal: No
            Readonly: No
            SWP: No
            Thin-provisioning: No
            Backing store type: null
            Backing store path: None
            Backing store flags:
        LUN: 1
            Type: disk
            SCSI ID: IET     00010001
            SCSI SN: beaf11
            Size: 10737 MB, Block size: 512
            Online: Yes
            Removable media: No
            Prevent removal: No
            Readonly: No
            SWP: No
            Thin-provisioning: No
            Backing store type: rdwr
            Backing store path: /var/lib/iscsi_disks/disk01.img
            Backing store flags:
    Account information:
        username
    ACL information:
        ALL
        iqn.2021-11.world.srv:node01.initiator01
# create a disk image
[root@dlp ~]# mkdir /var/lib/iscsi_disks
[root@dlp ~]# dd if=/dev/zero of=/var/lib/iscsi_disks/disk01.img count=0 bs=1 seek=10G
[root@dlp ~]# vi /etc/tgt/conf.d/target01.conf
# create new
# if you set some devices, add <target>-</target> and set the same way with follows
# naming rule : [ iqn.(year)-(month).(reverse of domain name):(any name you like) ]
<target iqn.2021-11.world.srv:dlp.target01>
# provided device as a iSCSI target
backing-store /var/lib/iscsi_disks/disk01.img
# iSCSI Initiator's IQN you allow to connect
initiator-name iqn.2021-11.world.srv:node01.initiator01
# authentication info ( set anyone you like for "username", "password" )
incominguser username password
</target> [3] 如果 SELinux 已启用,请更改 SELinux 上下文。
[root@dlp ~]# dnf -y install policycoreutils-python-utils
[root@dlp ~]# chcon -R -t tgtd_var_lib_t /var/lib/iscsi_disks
[root@dlp ~]# semanage fcontext -a -t tgtd_var_lib_t /var/lib/iscsi_disks
[4] 如果 Firewalld 正在运行,请允许 iSCSI Target 服务。
[root@dlp ~]# firewall-cmd --add-service=iscsi-target
success
[root@dlp ~]# firewall-cmd --runtime-to-permanent
success
[5] 启动 tgtd 并验证状态。
[root@dlp ~]# systemctl enable --now tgtd
# show status
[root@dlp ~]# tgtadm --mode target --op show
Target 1: iqn.2021-11.world.srv:dlp.target01
    System information:
        Driver: iscsi
        State: ready
    I_T nexus information:
    LUN information:
        LUN: 0
            Type: controller
            SCSI ID: IET     00010000
            SCSI SN: beaf10
            Size: 0 MB, Block size: 1
            Online: Yes
            Removable media: No
            Prevent removal: No
            Readonly: No
            SWP: No
            Thin-provisioning: No
            Backing store type: null
            Backing store path: None
            Backing store flags:
        LUN: 1
            Type: disk
            SCSI ID: IET     00010001
            SCSI SN: beaf11
            Size: 10737 MB, Block size: 512
            Online: Yes
            Removable media: No
            Prevent removal: No
            Readonly: No
            SWP: No
            Thin-provisioning: No
            Backing store type: rdwr
            Backing store path: /var/lib/iscsi_disks/disk01.img
            Backing store flags:
    Account information:
        username
    ACL information:
        ALL
        iqn.2021-11.world.srv:node01.initiator01
iSCSI:配置启动器配置
iSCSI 发起程序。
此示例基于如下环境。
+------------------------+ | +------------------------+
| [iSCSI 目标] |10.0.0.30 | 10.0.0.51| [iSCSI 启动器] |
| dlp.srv.world +----------+----------+ node01.srv.world |
| | | |
+----------+ +----------+
[1] 配置 iSCSI Initiator 以连接到 iSCSI Target。
[root@node01 ~]# dnf -y install iscsi-initiator-utils
[root@node01 ~]# vi /etc/iscsi/initiatorname.iscsi
# change to the same IQN you set on the iSCSI target server
InitiatorName=iqn.2021-11.world.srv:node01.initiator01
[root@node01 ~]# vi /etc/iscsi/iscsid.conf
# line 58 : uncomment
node.session.auth.authmethod = CHAP
# line 69,70 : uncomment and specify the username and password you set on the iSCSI target server
node.session.auth.username = username
node.session.auth.password = password
# discover target
[root@node01 ~]# iscsiadm -m discovery -t sendtargets -p 10.0.0.30
10.0.0.30:3260,1 iqn.2021-11.world.srv:dlp.target01

# confirm status after discovery
[root@node01 ~]# iscsiadm -m node -o show
# BEGIN RECORD 2.1.4
node.name = iqn.2021-11.world.srv:dlp.target01
node.tpgt = 1
node.startup = automatic
node.leading_login = No
iface.iscsi_ifacename = default
.....
.....
node.conn[0].iscsi.HeaderDigest = None
node.conn[0].iscsi.DataDigest = None
node.conn[0].iscsi.IFMarker = No
node.conn[0].iscsi.OFMarker = No
# END RECORD

# login to the target # if logout ⇒ iscsiadm --mode node --logoutall=all
[root@node01 ~]# iscsiadm -m node --login
Logging in to [iface: default, target: iqn.2021-11.world.srv:dlp.target01, portal: 10.0.0.30,3260]
Login to [iface: default, target: iqn.2021-11.world.srv:dlp.target01, portal: 10.0.0.30,3260] successful.

# confirm the established session
[root@node01 ~]# iscsiadm -m session -o show
tcp: [1] 10.0.0.30:3260,1 iqn.2021-11.world.srv:dlp.target01 (non-flash)
# confirm the partitions
[root@node01 ~]# cat /proc/partitions
major minor  #blocks  name

  11        0    1048575 sr0
 252        0   31457280 sda
 252        1    1048576 sda1
 252        2   30407680 sda2
 253        0   15728640 dm-0
 251        0    4007936 zram0
   8        0   10485760 sdb
# added new device provided from the target server as [sdb]
[2] 设置 iSCSI 设备后,在 Initiator 上进行配置以像下面一样使用它。
# create label
[root@node01 ~]# parted --script /dev/sdb "mklabel gpt"
# create partiton
[root@node01 ~]# parted --script /dev/sdb "mkpart primary 0% 100%"
# format with XFS
[root@node01 ~]# mkfs.xfs -i size=1024 -s size=4096 /dev/sdb1
meta-data=/dev/sdb1              isize=1024   agcount=4, agsize=654336 blks
         =                       sectsz=4096  attr=2, projid32bit=1
         =                       crc=1        finobt=1, sparse=1, rmapbt=0
         =                       reflink=1    bigtime=0
data     =                       bsize=4096   blocks=2617344, imaxpct=25
         =                       sunit=0      swidth=0 blks
naming   =version 2              bsize=4096   ascii-ci=0, ftype=1
log      =internal log           bsize=4096   blocks=2560, version=2
         =                       sectsz=4096  sunit=1 blks, lazy-count=1
realtime =none                   extsz=4096   blocks=0, rtextents=0

[root@node01 ~]# mount /dev/sdb1 /mnt
[root@node01 ~]# df -hT
Filesystem                     Type      Size  Used Avail Use% Mounted on
devtmpfs                       devtmpfs  1.9G     0  1.9G   0% /dev
tmpfs                          tmpfs     2.0G     0  2.0G   0% /dev/shm
tmpfs                          tmpfs     786M  1.0M  785M   1% /run
/dev/mapper/fedora_fedora-root xfs        15G  1.6G   14G  11% /
tmpfs                          tmpfs     2.0G  4.0K  2.0G   1% /tmp
/dev/sda1                      xfs      1014M  186M  829M  19% /boot
tmpfs                          tmpfs     393M     0  393M   0% /run/user/0
/dev/sdb1                      xfs        10G   99M  9.9G   1% /mnt
GlusterFS 9
GlusterFS 9:安装
安装 GlusterFS 以配置存储集群。
强烈建议为 GlusterFS 卷使用不同于 / 分区的分区。
在此示例中,它显示了所有节点都具有 [sdb1] 的环境的设置并将其挂载到 [/glusterfs]。
[1] 在集群中的所有节点上安装 GlusterFS 服务器。
[root@node01 ~]# dnf -y install glusterfs-server
[root@node01 ~]# systemctl enable --now glusterd
[root@node01 ~]# gluster --version
glusterfs 9.4
Repository revision: git://git.gluster.org/glusterfs.git
Copyright (c) 2006-2016 Red Hat, Inc. <https://www.gluster.org/>
GlusterFS comes with ABSOLUTELY NO WARRANTY.
It is licensed to you under your choice of the GNU Lesser
General Public License, version 3 or any later version (LGPLv3
or later), or the GNU General Public License, version 2 (GPLv2),
in all cases as published by the Free Software Foundation.
[2] 如果 Firewalld 正在运行,请允许所有节点上的 GlusterFS 服务。
[root@node01 ~]# firewall-cmd --add-service=glusterfs
success
[root@node01 ~]# firewall-cmd --runtime-to-permanent
success
GlusterFS 9:分布式配置
使用 GlusterFS 配置存储集群。
例如,创建具有 2 个节点的分布式卷。
此示例显示使用 2 个节点,但也可以使用 3 个以上的节点。
|
+------------------------+ | +------------------------+
| [GlusterFS 服务器#1] |10.0.0.51 | 10.0.0.52| [GlusterFS 服务器#2] |
| node01.srv.world +----------+----------+ node02.srv.world |
| | | |
+----------+ +----------+
⇑ ⇑
文件 1,文件 3 ... 文件 2,文件 4 ...
强烈建议为 GlusterFS 卷使用不同于 / 分区的分区。
在此示例中,它显示了所有节点都具有 [sdb1] 的环境的设置并将其挂载到 [/glusterfs]。
[1] 在所有节点上安装 GlusterFS 服务器。
[2] 在所有节点上为 GlusterFS 卷创建目录。
[root@node01 ~]# mkdir -p /glusterfs/distributed[3] 在节点上配置集群,如下所示。(在任何节点上都可以)
# probe nodes
[root@node01 ~]# gluster peer probe node02
peer probe: success.
# confirm status
[root@node01 ~]# gluster peer status
Number of Peers: 1

Hostname: node02
Uuid: 447dedcb-fe9b-4743-851c-a7c2adef0043
State: Peer in Cluster (Connected)

# create volume
[root@node01 ~]# gluster volume create vol_distributed transport tcp \
node01:/glusterfs/distributed \
node02:/glusterfs/distributed
volume create: vol_distributed: success: please start the volume to access data
# start volume
[root@node01 ~]# gluster volume start vol_distributed
volume start: vol_distributed: success
# confirm volume info
[root@node01 ~]# gluster volume info

Volume Name: vol_distributed
Type: Distribute
Volume ID: 3a671a01-2a6c-4c4d-858c-4c8e401bc23c
Status: Started
Snapshot Count: 0
Number of Bricks: 2
Transport-type: tcp
Bricks:
Brick1: node01:/glusterfs/distributed
Brick2: node02:/glusterfs/distributed
Options Reconfigured:
storage.fips-mode-rchecksum: on
transport.address-family: inet
nfs.disable: on
GlusterFS 9:GlusterFS + NFS-Ganesha
NFS-Ganesha 支持的 NFS 协议有 v3、v4.0、v4.1、pNFS。
Gluster 中的 NFS 功能已正式弃用。
此外,如果 NFS 服务器正在运行,请停止并禁用它。
# OK if [nfs.disable: on] (default setting)
[root@node01 ~]# gluster volume get vol_distributed nfs.disable
Option                                  Value
------                                  -----
nfs.disable                             on

# if [nfs.disable: off], turn to disable
[root@node01 ~]# gluster volume set vol_distributed nfs.disable on
volume set: success
# if NFS server is running, disable it
[root@node01 ~]# systemctl disable --now nfs-server[root@node01 ~]# dnf -y install nfs-ganesha-gluster
[root@node01 ~]# mv /etc/ganesha/ganesha.conf /etc/ganesha/ganesha.conf.org
[root@node01 ~]# vi /etc/ganesha/ganesha.conf
# create new
NFS_CORE_PARAM {
# possible to mount with NFSv3 to NFSv4 Pseudo path
mount_path_pseudo = true;
# NFS protocol
Protocols = 3,4;
}
EXPORT_DEFAULTS {
# default access mode
Access_Type = RW;
}
EXPORT {
# uniq ID
Export_Id = 101;
# mount path of Gluster Volume
Path = "/vol_distributed";
FSAL {
# any name
name = GLUSTER;
# hostname or IP address of this Node
hostname="10.0.0.51";
# Gluster volume name
volume="vol_distributed";
}
# config for root Squash
Squash="No_root_squash";
# NFSv4 Pseudo path
Pseudo="/vfs_distributed";
# allowed security options
SecType = "sys";
}
LOG {
# default log level
Default_Log_Level = WARN;
}
[root@node01 ~]# systemctl enable --now nfs-ganesha
# verify mount
[root@node01 ~]# showmount -e localhost
Export list for localhost:
/vfs_distributed (everyone)[root@node01 ~]# firewall-cmd --add-service=nfs
success
[root@node01 ~]# firewall-cmd --runtime-to-permanent
success[root@client ~]# dnf -y install nfs-utils
# specify Pseudo path set on [Pseudo=***] in ganesha.conf
[root@client ~]# mount -t nfs4 node01.srv.world:/vfs_distributed /mnt
[root@client ~]# df -hT
Filesystem Type Size Used Avail Use% Mounted on
devtmpfs devtmpfs 1.9G 0 1.9G 0% /dev
tmpfs tmpfs 2.0G 0 2.0G 0% /dev/shm
tmpfs tmpfs 783M 996K 782M 1% /run
/dev/mapper/fedora_fedora-root xfs 15G 1.6G 14G 11% /
tmpfs tmpfs 2.0G 4.0K 2.0G 1% /tmp
/dev/vda1 xfs 1014M 195M 820M 20% /boot
tmpfs tmpfs 392M 0 392M 0% /run/user/0
node01.srv.world:/vfs_distributed nfs4 30G 3.5G 27G 12% /mnt
# verify reading and writing
[root@client ~]# echo "Gluster NFS write test" > /mnt/testfile.txt
[root@client ~]# cat /mnt/testfile.txt
Gluster NFS write test
GlusterFS 9:GlusterFS + SMB
配置 GlusterFS 卷以启用 SMB 协议。
[1] 配置 GlusterFS 以在 GlusterFS 集群中的节点上启用 SMB 设置。
[root@node01 ~]# dnf -y install samba ctdb samba-vfs-glusterfs
# stop the target Gluster volume and change settings
[root@node01 ~]# gluster volume stop vol_distributed
Stopping volume will make its data inaccessible. Do you want to continue? (y/n) y
volume stop: vol_distributed: success
[root@node01 ~]# gluster volume set vol_distributed user.smb enable
volume set: success
[root@node01 ~]# gluster volume set vol_distributed performance.write-behind off
volume set: success
[root@node01 ~]# gluster volume set vol_distributed group samba
volume set: success
[root@node01 ~]# vi /var/lib/glusterd/hooks/1/start/post/S29CTDBsetup.sh
# line 25 : change to the target Gluster volume name
META="vol_distributed"
[root@node01 ~]# vi /var/lib/glusterd/hooks/1/stop/pre/S29CTDB-teardown.sh
# line 13 : change to the target Gluster volume name
META="vol_distributed"
# start Gluster volume
[root@node01 ~]# gluster volume start vol_distributed
volume start: vol_distributed: success
# with the settings above, follwing mounting is done automatically
[root@node01 ~]# df -h /gluster/lock
Filesystem                             Size  Used Avail Use% Mounted on
node01.srv.world:/vol_distributed.tcp   30G  3.5G   27G  12% /gluster/lock

[root@node01 ~]# tail -1 /etc/fstab
node01.srv.world:/vol_distributed /gluster/lock glusterfs _netdev,transport=tcp,xlator-option=*client*.ping-timeout=10 0 0

[root@node01 ~]# vi /etc/ctdb/nodes
# create new
# write all Nodes that configure target Gluster volume
10.0.0.51
10.0.0.52
[root@node01 ~]# vi /etc/ctdb/public_addresses
# create new
# set virtual IP address for SMB access
# [enp1s0] means network interface name ⇒ replace to your environment
10.0.0.59/24 enp1s0
[root@node01 ~]# systemctl enable --now ctdb
# confirm status
[root@node01 ~]# ctdb status
Number of nodes:2
pnn:0 10.0.0.51        OK (THIS NODE)
pnn:1 10.0.0.52        DISCONNECTED|UNHEALTHY|INACTIVE
Generation:1113695787
Size:1
hash:0 lmaster:0
Recovery mode:NORMAL (0)
Recovery master:0

[root@node01 ~]# ctdb ip
Public IPs on node 0
10.0.0.59 0
[2] 配置 Samba。
例如,创建一个共享文件夹,[smbgroup] 组中的用户只能访问共享文件夹 [smbshare],并且他们需要用户身份验证。
# mount Gluster volume with GlusterFS Native and create a shared folder for SMB access
[root@node01 ~]# mount -t glusterfs node01.srv.world:/vol_distributed /mnt
[root@node01 ~]# mkdir /mnt/smbshare
[root@node01 ~]# groupadd smbgroup
[root@node01 ~]# chgrp smbgroup /mnt/smbshare
[root@node01 ~]# chmod 770 /mnt/smbshare
[root@node01 ~]# umount /mnt
[root@node01 ~]# vi /etc/samba/smb.conf
[global]
        workgroup = SAMBA
        security = user

        passdb backend = tdbsam

        printing = cups
        printcap name = cups
        load printers = yes
        cups options = raw
        # add follows
        clustering = yes
        kernel share modes = no
        kernel oplocks = no
        map archive = no
        map hidden = no
        map read only = no
        map system = no
        store dos attributes = yes

# follwoing 9 lines are configred automatically
[gluster-vol_distributed]
comment = For samba share of volume vol_distributed
vfs objects = glusterfs
glusterfs:volume = vol_distributed
glusterfs:logfile = /var/log/samba/glusterfs-vol_distributed.%M.log
glusterfs:loglevel = 7
path = /
read only = no
kernel share modes = no
# add follows
writable = yes
valid users = @smbgroup
force create mode = 777
force directory mode = 777
inherit permissions = yes

[root@node01 ~]# systemctl enable --now smb
# add Samba user
[root@node01 ~]# useradd fedora
[root@node01 ~]# smbpasswd -a fedora
New SMB password:     # set any SMB password
Retype new SMB password:
Added user fedora.
[root@node01 ~]# usermod -aG smbgroup fedora
[3] 如果启用了 SELinux,请更改策略。
[root@node01 ~]# setsebool -P use_fusefs_home_dirs on
[root@node01 ~]# setsebool -P samba_load_libgfapi on
[root@node01 ~]# setsebool -P domain_kernel_load_modules on
[4] 如果 Firewalld 正在运行,则允许服务。
[root@node01 ~]# firewall-cmd --add-service={samba,ctdb}
success
[root@node01 ~]# firewall-cmd --runtime-to-permanent
success
[5] 验证它可以从任何 Linux 客户端计算机通过 SMB 访问目标共享。
下面的示例是在 Linux 客户端上的,但可以通过普通方式从 Windows 客户端访问。
# verify with [smbclient]
[root@client ~]# smbclient //node01.srv.world/gluster-vol_distributed -U fedora
Enter SAMBA\fedora's password:
Try "help" to get a list of possible commands.

# verify witable to move to shared folder
smb: \> cd smbshare

smb: \smbshare\> mkdir testdir
smb: \smbshare\> ls
  .                                   D        0  Tue Nov  9 15:13:16 2021
  ..                                  D        0  Tue Nov  9 15:09:06 2021
  anaconda-ks.cfg                     A      872  Tue Nov  9 15:13:17 2021
  testdir                             D        0  Tue Nov  9 15:12:38 2021

                31436800 blocks of size 1024. 27701820 blocks available

smb: \smbshare\> exit
虚拟化
KVM:安装
这是使用KVM(基于内核的虚拟机)+QEMU的虚拟化配置。
它要求计算机上的CPU具有英特尔VT或AMD-V功能。
| [1] | 安装所需的软件包。 |
[root@dlp ~]# dnf -y install qemu-kvm libvirt virt-install
# confirm modules are loaded
[root@dlp ~]# lsmod | grep kvm
kvm_intel             331776  0
kvm                  1019904  1 kvm_intel
irqbypass              16384  1 kvm

[root@dlp ~]# systemctl enable --now libvirtd | [2] | 为KVM虚拟机配置Bridge网络。 为您自己的环境替换接口名称[enp1s0]。 |
# add bridge [br0]
[root@dlp ~]# nmcli connection add type bridge autoconnect yes con-name br0 ifname br0
Connection 'br0' (80672c58-969e-4e7e-9e09-c4baa6117afb) successfully added.
# set IP address for [br0]
[root@dlp ~]# nmcli connection modify br0 ipv4.addresses 10.0.0.30/24 ipv4.method manual
# set Gateway for [br0]
[root@dlp ~]# nmcli connection modify br0 ipv4.gateway 10.0.0.1
# set DNS for [br0]
[root@dlp ~]# nmcli connection modify br0 ipv4.dns 10.0.0.10
# set DNS search base for [br0]
[root@dlp ~]# nmcli connection modify br0 ipv4.dns-search srv.world
# remove the current interface
[root@dlp ~]# nmcli connection del enp1s0
# add the removed interface again as a member of [br0]
[root@dlp ~]# nmcli connection add type bridge-slave autoconnect yes con-name enp1s0 ifname enp1s0 master br0
# restart
[root@dlp ~]# reboot
[root@dlp ~]# ip addr
1: lo: <LOOPBACK,UP,LOWER_UP> mtu 65536 qdisc noqueue state UNKNOWN group default qlen 1000
    link/loopback 00:00:00:00:00:00 brd 00:00:00:00:00:00
    inet 127.0.0.1/8 scope host lo
       valid_lft forever preferred_lft forever
    inet6 ::1/128 scope host
       valid_lft forever preferred_lft forever
2: enp1s0: <BROADCAST,MULTICAST,UP,LOWER_UP> mtu 1500 qdisc fq_codel master br0 state UP group default qlen 1000
    link/ether 52:54:00:aa:86:00 brd ff:ff:ff:ff:ff:ff
3: br0: <NO-CARRIER,BROADCAST,MULTICAST,UP> mtu 1500 qdisc noqueue state DOWN group default qlen 1000
    link/ether 9a:7e:5f:73:79:d6 brd ff:ff:ff:ff:ff:ff
    inet 10.0.0.30/24 brd 10.0.0.255 scope global noprefixroute br0
       valid_lft forever preferred_lft forever
集装箱
Podman:安装
安装Podman,这是容器管理工具。
可以使用Docker Cli相同的易用性,Podman不需要特定的Service Daemon。
| [1] | 安装Podman。 |
[root@dlp ~]# dnf -y install podman| [2] | 下载官方图像并创建一个容器,并在容器内输出单词[欢迎来到Podman World]。 |
# download the official image
[root@dlp ~]# podman pull fedora
Resolved "fedora" as an alias (/etc/containers/registries.conf.d/000-shortnames.conf)
Trying to pull registry.fedoraproject.org/fedora:latest...
Getting image source signatures
.....
.....
Writing manifest to image destination
Storing signatures
1b52edb0818147bea39780625ec01ab46944284acf16d8bcfa4055f8a854a9f5

# run echo inside a container
[root@dlp ~]# podman run fedora /bin/echo "Welcome to the Podman World"
Welcome to the Podman World| [3] | 使用如下所示的[i]和[t]选项连接到容器的交互式会话。 如果从容器会话[退出],容器的过程将结束。 |
[root@dlp ~]# podman run -it fedora /bin/bash
[root@c466d78a528d /]#     # connected
[root@c466d78a528d /]# uname -a
Linux c466d78a528d 5.14.10-300.fc35.x86_64 #1 SMP Thu Oct 7 20:48:44 UTC 2021 x86_64 x86_64 x86_64 GNU/Linux
[root@c466d78a528d /]# exit
exit
[root@dlp ~]# # come back| [4] | 如果您想将容器作为守护进程运行,请添加[d]选项。 |
[root@dlp ~]# podman run -itd fedora /bin/bash
0c5954f2e21190f86c892de6e256951c1d5576b5d2aa00be6b799778709f56c9

# show podman proceses
[root@dlp ~]# podman ps
CONTAINER ID  IMAGE                                     COMMAND     CREATED         STATUS             PORTS       NAMES
0c5954f2e211  registry.fedoraproject.org/fedora:latest  /bin/bash   11 seconds ago  Up 11 seconds ago              funny_jang

# attach to container session
[root@dlp ~]# podman exec -it 0c5954f2e211 /bin/bash
[root@0c5954f2e211 /]#     # connected
[root@0c5954f2e211 /]# exit
# stop container process (if force stop, specify [kill])
[root@dlp ~]# podman stop 0c5954f2e211
[root@dlp ~]# podman ps
CONTAINER ID  IMAGE   COMMAND  CREATED  STATUS  PORTS   NAMES
目录服务器
FreeIPA:配置服务器
配置FreeIPA服务器,这是一个集成的安全信息管理系统。(在RHEL上称为[红帽身份管理])
| [1] | 安装FreeIPA软件包。 |
[root@dlp ~]# dnf -y install freeipa-server freeipa-server-dns freeipa-client| [2] | 设置具有集成DNS功能的FreeIPA服务器。 |
# add own hostname
[root@dlp ~]# echo '10.0.0.40 dlp.ipa.srv.world dlp' >> /etc/hosts
[root@dlp ~]# ipa-server-install --setup-dns

The log file for this installation can be found in /var/log/ipaserver-install.log
==============================================================================
This program will set up the IPA Server.
Version 4.9.7

This includes:
  * Configure a stand-alone CA (dogtag) for certificate management
  * Configure the NTP client (chronyd)
  * Create and configure an instance of Directory Server
  * Create and configure a Kerberos Key Distribution Center (KDC)
  * Configure Apache (httpd)
  * Configure DNS (bind)
  * Configure the KDC to enable PKINIT

To accept the default shown in brackets, press the Enter key.

Enter the fully qualified domain name of the computer
on which you're setting up server software. Using the form
<hostname>.<domainname>
Example: master.example.com.

# confirm hostname and Enter
Server host name [dlp.ipa.srv.world]:

Warning: skipping DNS resolution of host dlp.ipa.srv.world
The domain name has been determined based on the host name.

# confirm domain name and Enter
Please confirm the domain name [ipa.srv.world]:

The kerberos protocol requires a Realm name to be defined.
This is typically the domain name converted to uppercase.

# confirm realm name and Enter
Please provide a realm name [IPA.SRV.WORLD]:
Certain directory server operations require an administrative user.
This user is referred to as the Directory Manager and has full access
to the Directory for system management tasks and will be added to the
instance of directory server created for IPA.
The password must be at least 8 characters long.

# set Directory Manager password
Directory Manager password:
Password (confirm):

The IPA server requires an administrative user, named 'admin'.
This user is a regular system account used for IPA server administration.

# set IPA admin password
IPA admin password:
Password (confirm):

Checking DNS domain ipa.srv.world., please wait ...
# if you set DNS forwarder, answer [yes]
Do you want to configure DNS forwarders? [yes]:
The following DNS servers are configured in systemd-resolved: 10.0.0.10
Do you want to configure these servers as DNS forwarders? [yes]:
All detected DNS servers were added. You can enter additional addresses now:
Enter an IP address for a DNS forwarder, or press Enter to skip:
DNS forwarders: 10.0.0.10
Checking DNS forwarders, please wait ...
DNS server 10.0.0.10 does not support DNSSEC: answer to query '. SOA' is missing DNSSEC signatures (no RRSIG data)
Please fix forwarder configuration to enable DNSSEC support.

DNS server 10.0.0.10: answer to query '. SOA' is missing DNSSEC signatures (no RRSIG data)
Please fix forwarder configuration to enable DNSSEC support.
WARNING: DNSSEC validation will be disabled
# if you search reverse zone of DNS forwarder, answer [yes]
Do you want to search for missing reverse zones? [yes]:
# if you configure chrony, answer [yes]
Do you want to configure chrony with NTP server or pool address? [no]:

The IPA Master Server will be configured with:
Hostname:       dlp.ipa.srv.world
IP address(es): 10.0.0.40
Domain name:    ipa.srv.world
Realm name:     IPA.SRV.WORLD

The CA will be configured with:
Subject DN:   CN=Certificate Authority,O=IPA.SRV.WORLD
Subject base: O=IPA.SRV.WORLD
Chaining:     self-signed

BIND DNS server will be configured to serve IPA domain with:
Forwarders:       10.0.0.10
Forward policy:   only
Reverse zone(s):  No reverse zone

# confirm settings and proceed with [yes]
Continue to configure the system with these values? [no]: yes

The following operations may take some minutes to complete.
Please wait until the prompt is returned.

Disabled p11-kit-proxy
Synchronizing time
No SRV records of NTP servers found and no NTP server or pool address was provided.
Using default chrony configuration.
Attempting to sync time with chronyc.
Time synchronization was successful.
Configuring directory server (dirsrv). Estimated time: 30 seconds
  [1/41]: creating directory server instance
Validate installation settings ...
Create file system structures ...
Perform SELinux labeling ...
Create database backend: dc=ipa,dc=srv,dc=world ...
Perform post-installation tasks ...
  [2/41]: tune ldbm plugin
  [3/41]: adding default schema
  [4/41]: enabling memberof plugin

.....
.....

==============================================================================
Setup complete

Next steps:
        1. You must make sure these network ports are open:
                TCP Ports:
                  * 80, 443: HTTP/HTTPS
                  * 389, 636: LDAP/LDAPS
                  * 88, 464: kerberos
                  * 53: bind
                UDP Ports:
                  * 88, 464: kerberos
                  * 53: bind
                  * 123: ntp

        2. You can now obtain a kerberos ticket using the command: 'kinit admin'
           This ticket will allow you to use the IPA tools (e.g., ipa user-add)
           and the web user interface.

Be sure to back up the CA certificates stored in /root/cacert.p12
These files are required to create replicas. The password for these
files is the Directory Manager password
The ipa-server-install command was successful| [3] |
获取Kerberos门票。 |
[root@dlp ~]# kinit admin
Password for admin@IPA.SRV.WORLD:     # IPA admin password
[root@dlp ~]# klist
Ticket cache: KCM:0
Default principal: admin@IPA.SRV.WORLD

Valid starting       Expires              Service principal
11/11/2021 16:47:03 11/12/2021 16:09:58 krbtgt/IPA.SRV.WORLD@IPA.SRV.WORLD| [4] | 如果防火墙正在运行,请允许服务。 |
[root@dlp ~]# firewall-cmd --add-service={freeipa-ldap,freeipa-ldaps,dns,ntp}
success
[root@dlp ~]# firewall-cmd --runtime-to-permanent
success
网络服务器
Apache httpd:安装
安装Apache httpd以配置Web服务器。
| [1] | 安装Apache httpd。 |
[root@www ~]# dnf -y install httpd
# rename or remove welcome page
[root@www ~]# mv /etc/httpd/conf.d/welcome.conf /etc/httpd/conf.d/welcome.conf.org| [2] | 配置httpd。将服务器名称替换为您自己的环境。 |
[root@www ~]# vi /etc/httpd/conf/httpd.conf
# line 91 : change to admin's email address
ServerAdmin root@srv.world
# line 100 : change to your server's name
ServerName www.srv.world:80
# line 149 : change (remove [Indexes])
Options FollowSymLinks
# line 156 : change
AllowOverride All
# line 169 : add file name that it can access only with directory's name
DirectoryIndex index.html index.php index.cgi
# add follows to the end
# server's response header
ServerTokens Prod
[root@www ~]# systemctl enable --now httpd | [3] | 如果防火墙正在运行,请允许HTTP服务。HTTP使用80/TCP。 |
[root@www ~]# firewall-cmd --add-service=http
success
[root@www ~]# firewall-cmd --runtime-to-permanent
success| [4] | 创建HTML测试页面,并使用网页浏览器从任何客户端计算机访问它。如果显示以下页面,没关系。 |
[root@www ~]# vi /var/www/html/index.html
 <html>
<body>
<div style="width: 100%; font-size: 40px; font-weight: bold; text-align: center;">
Test Page
</div>
</body>
</html>
数据库
MariaDB 10.5:安装
安装 MariaDB 以配置数据库服务器。
| [1] | 安装 MariaDB 服务器。 |
[root@www ~]# dnf module -y install mariadb:10.5
[root@www ~]# vi /etc/my.cnf.d/charset.cnf
# create new
# set default charaset
# if not set, default is [latin1]
# for the case of 4 bytes UTF-8, specify [utf8mb4]
[mysqld]
character-set-server = utf8mb4

[client]
default-character-set = utf8mb4

[root@www ~]# systemctl enable --now mariadb| [2] | 如果 Firewalld 正在运行并且您允许从远程主机访问 MariaDB 服务器,请允许服务。MariaDB 使用 [3306/TCP]。 |
[root@www ~]# firewall-cmd --add-service=mysql
success
[root@www ~]# firewall-cmd --runtime-to-permanent
success| [3] | MariaDB 的初始设置。 |
[root@www ~]# mysql_secure_installation

NOTE: RUNNING ALL PARTS OF THIS SCRIPT IS RECOMMENDED FOR ALL MariaDB
      SERVERS IN PRODUCTION USE!  PLEASE READ EACH STEP CAREFULLY!

In order to log into MariaDB to secure it, we'll need the current
password for the root user. If you've just installed MariaDB, and
haven't set the root password yet, you should just press enter here.

Enter current password for root (enter for none):
OK, successfully used password, moving on...

Setting the root password or using the unix_socket ensures that nobody
can log into the MariaDB root user without the proper authorisation.

You already have your root account protected, so you can safely answer 'n'.

# Switch to [unix_socket] authentication or not
# [unix_socket] authentication is already enabled by default, so it's OK with [No]
Switch to unix_socket authentication [Y/n] n
 ... skipping.

You already have your root account protected, so you can safely answer 'n'.

# set MariaDB root password or not
# [unix_socket] authentication is enabled by default, but
# if you set root password, it's also possible to login with password authentication.
# if not set root password, only OS root user can login as MariaDB root user
Change the root password? [Y/n] n
 ... skipping.

By default, a MariaDB installation has an anonymous user, allowing anyone
to log into MariaDB without having to have a user account created for
them.  This is intended only for testing, and to make the installation
go a bit smoother.  You should remove them before moving into a
production environment.

# remove anonymous users
Remove anonymous users? [Y/n] y
 ... Success!

Normally, root should only be allowed to connect from 'localhost'.  This
ensures that someone cannot guess at the root password from the network.

# disallow root login remotely
Disallow root login remotely? [Y/n] y
 ... Success!

By default, MariaDB comes with a database named 'test' that anyone can
access.  This is also intended only for testing, and should be removed
before moving into a production environment.

# remove test database
Remove test database and access to it? [Y/n] y
 - Dropping test database...
 ... Success!
 - Removing privileges on test database...
 ... Success!

Reloading the privilege tables will ensure that all changes made so far
will take effect immediately.

# reload privilege tables
Reload privilege tables now? [Y/n] y
 ... Success!

Cleaning up...

All done!  If you've completed all of the above steps, your MariaDB
installation should now be secure.

Thanks for using MariaDB!

# connect to MariaDB with root
[root@www ~]# mysql
Welcome to the MariaDB monitor.  Commands end with ; or \g.
Your MariaDB connection id is 9
Server version: 10.5.11-MariaDB MariaDB Server

Copyright (c) 2000, 2018, Oracle, MariaDB Corporation Ab and others.

Type 'help;' or '\h' for help. Type '\c' to clear the current input statement.

# [Unix_Socket] authentication is enabled by default
MariaDB [(none)]> show grants for root@localhost;
+-----------------------------------------------------------------------------------------------------------------------------------------+
| Grants for root@localhost                                                                                                               |
+-----------------------------------------------------------------------------------------------------------------------------------------+
| GRANT ALL PRIVILEGES ON *.* TO `root`@`localhost` IDENTIFIED VIA mysql_native_password USING 'invalid' OR unix_socket WITH GRANT OPTION |
| GRANT PROXY ON ''@'%' TO 'root'@'localhost' WITH GRANT OPTION                                                                           |
+-----------------------------------------------------------------------------------------------------------------------------------------+
2 rows in set (0.000 sec)

# show user list
MariaDB [(none)]> select user,host,password from mysql.user;
+-------------+-----------+----------+
| User        | Host      | Password |
+-------------+-----------+----------+
| mariadb.sys | localhost |          |
| root        | localhost | invalid  |
| mysql       | localhost | invalid  |
+-------------+-----------+----------+
3 rows in set (0.002 sec)

# show database list
MariaDB [(none)]> show databases;
+--------------------+
| Database           |
+--------------------+
| information_schema |
| mysql              |
| performance_schema |
+--------------------+
3 rows in set (0.001 sec)

# create test database
MariaDB [(none)]> create database test_database;
Query OK, 1 row affected (0.000 sec)

# create test table on test database
MariaDB [(none)]> create table test_database.test_table (id int, name varchar(50), address varchar(50), primary key (id));
Query OK, 0 rows affected (0.108 sec)

# insert data to test table
MariaDB [(none)]> insert into test_database.test_table(id, name, address) values("001", "Fedora", "Hiroshima");
Query OK, 1 row affected (0.036 sec)

# show test table
MariaDB [(none)]> select * from test_database.test_table;
+----+--------+-----------+
| id | name   | address   |
+----+--------+-----------+
|  1 | Fedora | Hiroshima |
+----+--------+-----------+
1 row in set (0.000 sec)

# delete test database
MariaDB [(none)]> drop database test_database;
Query OK, 1 row affected (0.111 sec)

MariaDB [(none)]> exit
Bye| [4] | 如果你想删除 MariaDB 的所有数据并初始化它,运行如下。 |
[root@www ~]# systemctl stop mariadb
[root@www ~]# rm -rf /var/lib/mysql/*
[root@www ~]# mysql_install_db --datadir=/var/lib/mysql --user=mysql
[root@www ~]# systemctl start mariadb
FTP / 文件
Samba:完全访问的共享文件夹
| [1] | 安装和配置 Samba。 |
[root@smb ~]# dnf -y install samba
[root@smb ~]# mkdir /home/share
[root@smb ~]# chmod 777 /home/share
[root@smb ~]# vi /etc/samba/smb.conf
[global]
        # line 11 : add (set charset)
        unix charset = UTF-8
        dos charset = CP932
        # change (Windows default)
        workgroup = WORKGROUP
        security = user
        # add (IP addresses you allow to access)
        hosts allow = 127. 10.0.0.
        # add (no authentication)
        map to guest = Bad User

.....
.....

# add to the end
# any Share name you like
[Share]
        # specify shared directory
        path = /home/share
        # allow writing
        writable = yes
        # allow guest user (nobody)
        guest ok = yes
        # looks all as guest user
        guest only = yes
        # set permission [777] when file created
        force create mode = 777
        # set permission [777] when folder created
        force directory mode = 777

[root@smb ~]# systemctl enable --now smb| [2] | 如果 SELinux 已启用并且还像此示例一样使用 [/home],请更改 SELinux 策略。 |
[root@smb ~]# setsebool -P samba_enable_home_dirs on
[root@smb ~]# restorecon -R /home/share| [3] | 如果 Firewalld 正在运行,请允许 Samba 服务。 |
[root@smb ~]# firewall-cmd --add-service=samba
success
[root@smb ~]# firewall-cmd --runtime-to-permanent
success
邮件 / 代理
邮件服务器:安装 Postfix
安装 Postfix 以配置 SMTP 服务器。
| [1] | 安装后缀。 |
[root@mail ~]# dnf -y install postfix| [2] | 此示例显示配置SMTP-Auth 以使用 Dovecot 的 SASL 功能。 |
[root@mail ~]# vi /etc/postfix/main.cf
# line 95 : uncomment and specify hostname
myhostname = mail.srv.world
# line 102 : uncomment and specify domain name定
mydomain = srv.world
# line 118 : uncomment
myorigin = $mydomain
# line 135 : change
inet_interfaces = all
# line 138 : change it if use only IPv4
inet_protocols = ipv4
# line 183 : add
mydestination = $myhostname, localhost.$mydomain, localhost, $mydomain
# line 283 : uncomment and specify your local network
mynetworks = 127.0.0.0/8, 10.0.0.0/24
# line 438 : uncomment (use Maildir)
home_mailbox = Maildir/
# line 593 : add
smtpd_banner = $myhostname ESMTP
# add to the end
# for example, limit an email size for 10M
message_size_limit = 10485760

# SMTP-Auth settings
smtpd_sasl_type = dovecot
smtpd_sasl_path = private/auth
smtpd_sasl_auth_enable = yes
smtpd_sasl_security_options = noanonymous
smtpd_sasl_local_domain = $myhostname
smtpd_recipient_restrictions = permit_mynetworks, permit_auth_destination, permit_sasl_authenticated, reject

[root@mail ~]# systemctl enable --now postfix| [3] | 如果 Firewalld 正在运行,则允许 SMTP 服务。SMTP 使用 [25/TCP]。 |
[root@mail ~]# firewall-cmd --add-service=smtp
success
[root@mail ~]# firewall-cmd --runtime-to-permanent
success
桌面
桌面环境:GNOME 桌面
如果您在没有 GUI 的情况下安装了 Fedora,但由于需要 GUI 的应用程序等等,现在需要 GUI,请按如下方式安装桌面环境。
| [1] | 在此示例中安装 GNOME 桌面环境。 |
[root@dlp ~]# dnf -y group install "Basic Desktop" GNOME| [2] | 安装 Desktop 后,要在 CUI 上启动 Desktop 会话,请使用普通用户重新登录并运行如下。 |
[fedora@dlp ~]$ startx| [3] | 如果您想将系统默认更改为图形登录,请 像此处更改设置并重新启动计算机。 然后,图形登录屏幕如下所示。 |
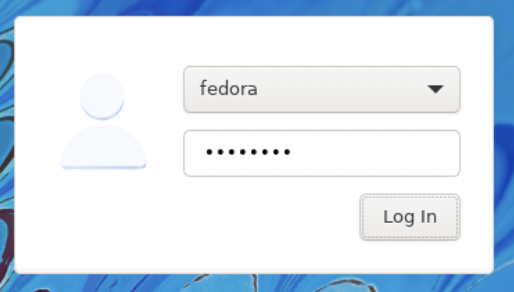
| [4] | 当每个用户初始登录时,他们应该选择语言或键盘设置。配置初始登录设置后,GNOME 桌面会话开始如下。 |

| [5] | GNOME Shell 设置为默认值,但如果您想更改为经典模式,请单击登录屏幕上 [Sign In] 按钮左侧的图标,然后在选择中选择 [GNOME Classic],如下所示。 |
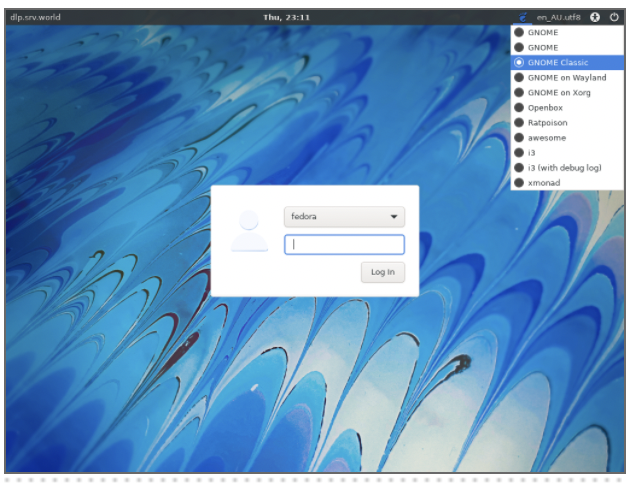
| [6] | GNOME 桌面经典会话开始。 |

其他
设置主机名
如果您想更改系统的主机名,请按如下方式设置。
| [1] | 更改主机名。(但是当系统重新启动时,它会回来) |
# show current hostname
[root@localhost ~]# hostname
localhost.localdomain
# change hostname
[root@localhost ~]# hostname dlp.srv.world
[root@localhost ~]# hostname
dlp.srv.world # changed| [2] | 永久更改主机名。 |
[root@localhost ~]# hostnamectl set-hostname dlp.srv.world
# show settings
[root@localhost ~]# hostnamectl
 Static hostname: dlp.srv.world
       Icon name: computer-vm
         Chassis: vm
      Machine ID: 4d832da9210f4cf8a4e4fbda78a5f42f
         Boot ID: 782a2058fcc74321938134befdb1709a
  Virtualization: kvm
Operating System: Fedora Linux 35 (Server Edition)
     CPE OS Name: cpe:/o:fedoraproject:fedora:35
          Kernel: Linux 5.14.10-300.fc35.x86_64
    Architecture: x86-64
 Hardware Vendor: Red Hat
  Hardware Model: KVM