路由器
- Dray Tek
- Linux下网卡的混杂模式
- WAN interface protocols
- 服务器 3 4 5号
- 小米路由器开启 SSH 方法
- 小米 AX6000 解锁 SSH 使用Clash节点教程
Dray Tek
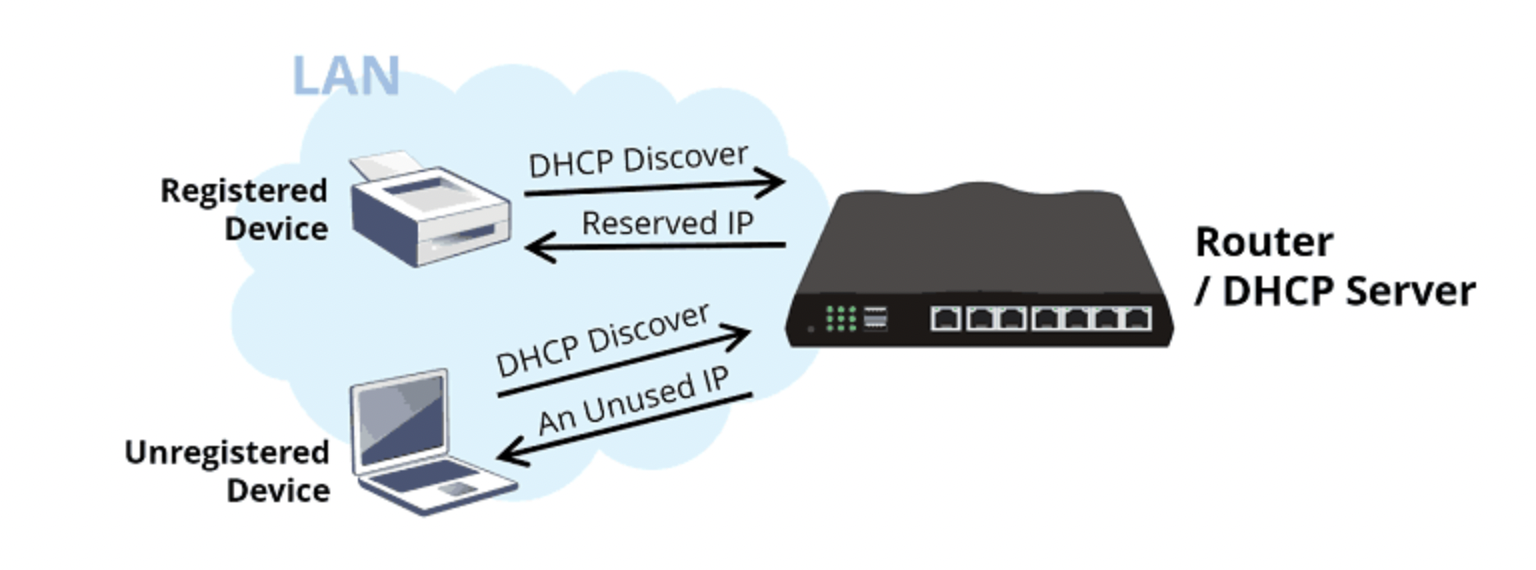
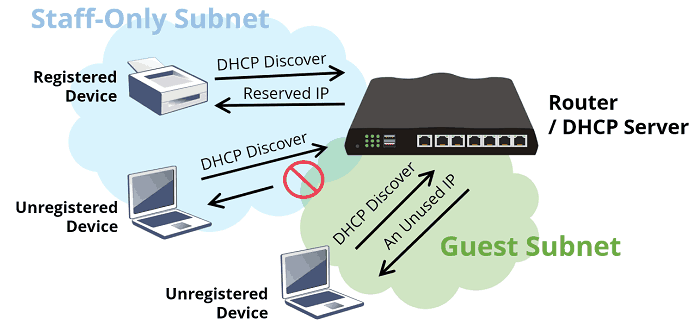
作为 LAN 网络的 DHCP 服务器,Vigor Router 为 DHCP Reservation 提供 Bind-IP-to-MAC。如果您保留一个 IP 地址,它将被排除在 DHCP 池之外,只有绑定到它的设备(MAC 地址)才能从路由器获取该 IP 地址。该功能允许网络管理员在使用 DHCP 进行网络 IP 配置时为某些设备提供特定的 IP 地址,特别是对于其他 LAN 客户端经常访问的设备,例如打印机、网络存储或服务器。此外,它使网络管理员能够管理每个 LAN 客户端的 IP 地址,而无需在每个设备上单独配置。
一:DrayOS
如何在普通模式和严格模式下使用绑定 IP 到 MAC ,以及导出 IP 绑定列表
设置绑定 IP 到 MAC
1.、转到LAN >> 绑定 IP 到 MAC,选择启用。
2. 将输入添加到 IP-MAC 绑定列表。ARP 表显示连接路由器的设备及其当前 IP 地址。您可以通过从 ARP 表中选择一个设备然后单击添加来从 ARP 表中添加一个 MAC 地址。
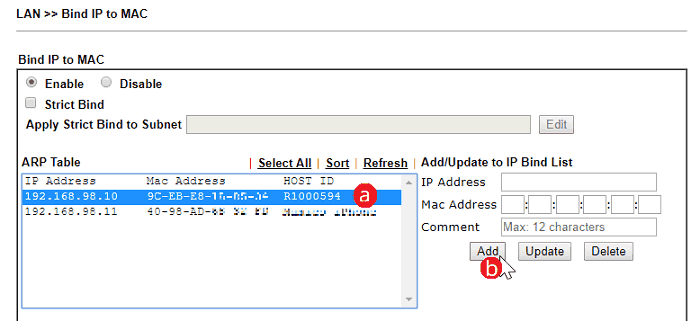
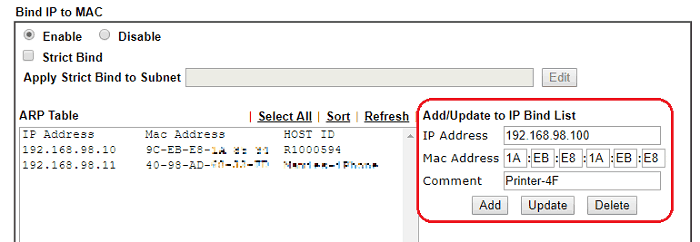
或者手动输入一对 IP 地址和一个 MAC 地址,然后单击添加。
严格模式
当 Bind-IP-to MAC 在正常模式下工作时,列表中的设备每次发送 DHCP 发现时总是会获得分配的 IP 地址。对于未列出的设备,它将从 IP Pool 中获取一个 IP 地址,但在 IP Bind List 之外。但是,如果您选中Strict Mode,则仅允许 IP 绑定列表中的设备访问网络。路由器将阻止来自不在列表中的设备的访问。由于只有注册的设备可以访问,严格模式可以为您的网络增加一层安全性。
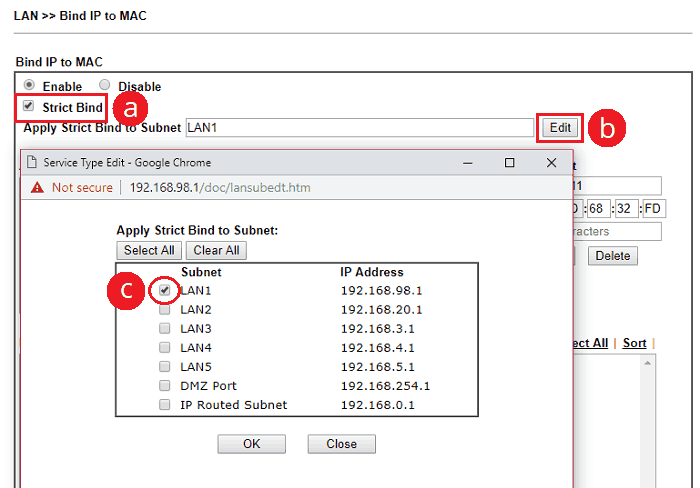
仅对某些子网进行严格绑定
从固件版本 3.8.5 开始,Strict Bind 只能应用于特定的子网,因此您可以对需要更高安全性的子网使用 Strict Bind,而其他 IP 子网仍然可以使用 DHCP。
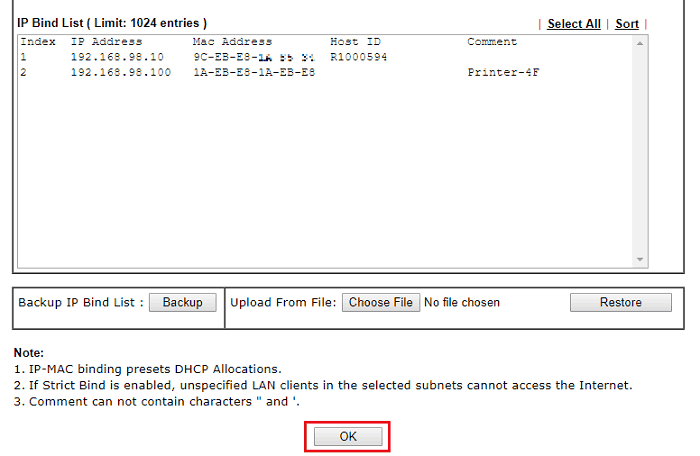
注意:如果在“Apply Strict Bind to Subnet”设置中没有选择任何 LAN 子网,则严格模式会像以前一样工作,并将应用于整个 LAN 网络。
复制和备份 IP 绑定列表
从固件版本 3.7.4.2 开始,您可以下载 MAC-IP 绑定列表并将其恢复到其他支持此功能的 DrayTek 路由器。
设置绑定 IP 到 MAC
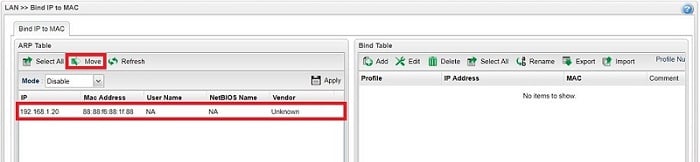
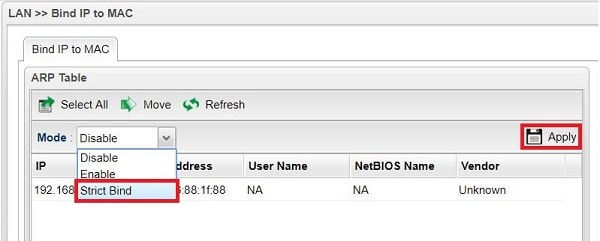
1. 转到LAN >> 绑定 IP 到 MAC,选择启用模式。

2. 将输入添加到 IP-MAC 绑定列表。ARP 表显示连接路由器的设备及其当前 IP 地址。您可以通过从 ARP 表中选择设备然后单击移动来从 ARP 表中添加 MAC 地址。
或者单击绑定表中的添加并手动输入一对 IP 地址和一个 MAC 地址。
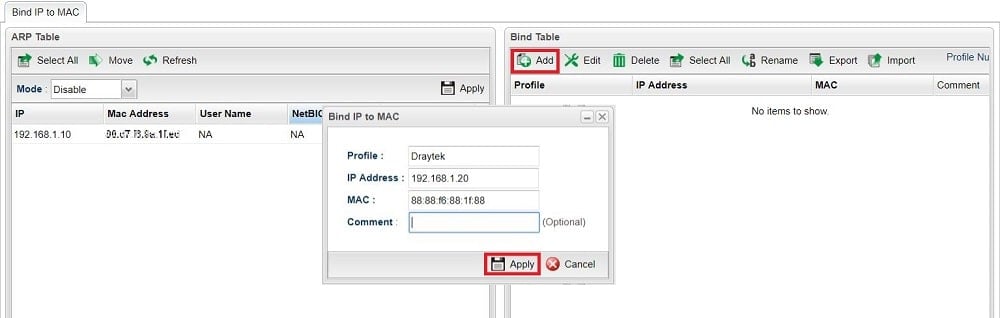
3. 最后,点击应用保存设置。
严格模式
当 Bind-IP-to MAC 在正常模式下工作时,列表中的设备每次发送 DHCP 发现时总是会获得分配的 IP 地址。对于未列出的设备,它将从 IP Pool 中获取一个 IP 地址,但在 IP Bind List 之外。但是,如果您选中Strict Mode,则仅允许 IP 绑定列表中的设备访问网络。路由器将阻止来自不在列表中的设备的访问。由于只有注册的设备可以访问,严格模式可以为您的网络增加一层安全性。
要使用 Strict Bind,请为Mode选择“Strict Bind” ,然后检查子网以应用限制。
复制和备份 IP 绑定列表
我们可以从路由器下载绑定表进行备份或导入到其他 Vigor 路由器单击导出按钮将绑定列表保存到名为“ipbindmacs.cfg”的 .cfg 文件中

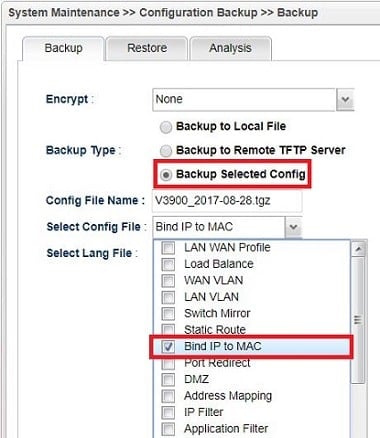
注意:导出的列表可以恢复到 Vigor3900、Vigor2960、Vigor300B 和固件版本 3.7.4.2 或更高版本的 Vigor 路由器。由于每个模型的配置不同,导出的绑定列表不会包含配置文件名称;导入到其他设备后,您会发现配置文件名称变为默认名称为“1_192_168_1_10”。如果要保留配置文件名称,请进入系统维护>>配置备份,选择配置文件选择“绑定IP到MAC”并下载整个配置。
Linux下网卡的混杂模式
混杂模式就是接收所有经过网卡的数据包,包括不是发给本机的包,即不验证MAC地址。普通模式下网卡只接收发给本机的包(包括广播包)传递给上层程序,其它的包一律丢弃。
一般来说,混杂模式不会影响网卡的正常工作,多在网络监听工具上使用。
网卡具有如下的几种工作模式: 1) 广播模式(Broad Cast Model):它的物理地址(MAC)地址是 0Xffffff 的帧为广播帧,工作在广播模式的网卡接收广播帧。 2)多播传送(MultiCast Model):多播传送地址作为目的物理地址的帧可以被组内的其它主机同时接收,而组外主机却接收不到。但是,如果将网卡设置为多播传送模式,它可以接收所有的多播传送帧,而不论它是不是组内成员。 3)直接模式(Direct Model):工作在直接模式下的网卡只接收目地址是自己 Mac地址的帧。 4)混杂模式(Promiscuous Model):工作在混杂模式下的网卡接收所有的流过网卡的帧,信包捕获程序就是在这种模式下运行的。
网卡的缺省工作模式包含广播模式和直接模式,即它只接收广播帧和发给自己的帧。如果采用混杂模式,一个站点的网卡将接受同一网络内所有站点所发送的数据包这样就可以到达对于网络信息监视捕获的目的。
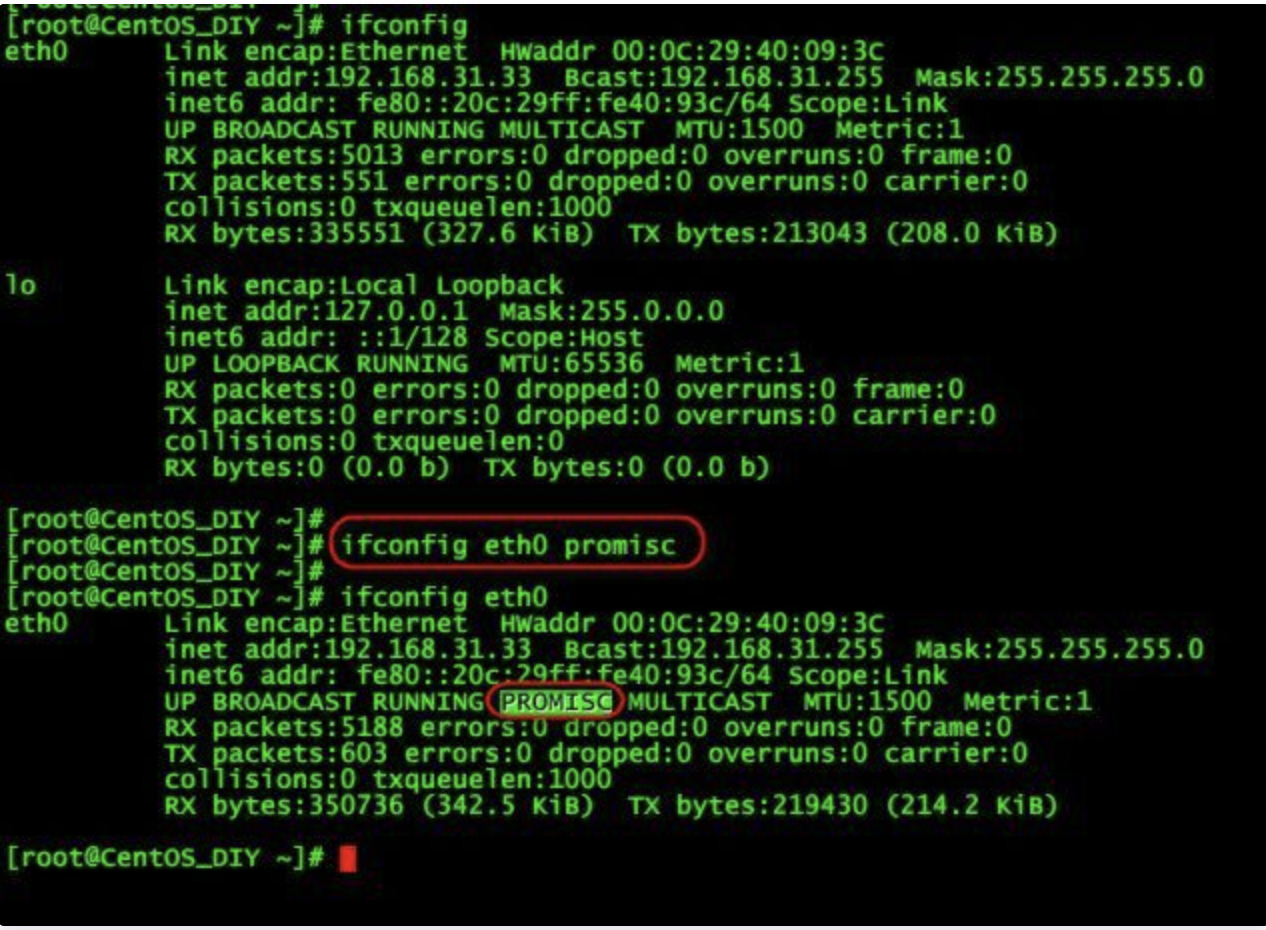
Linux下设置把网卡设置成混杂模式的命令也很简单
ifconfig eth0 promisc
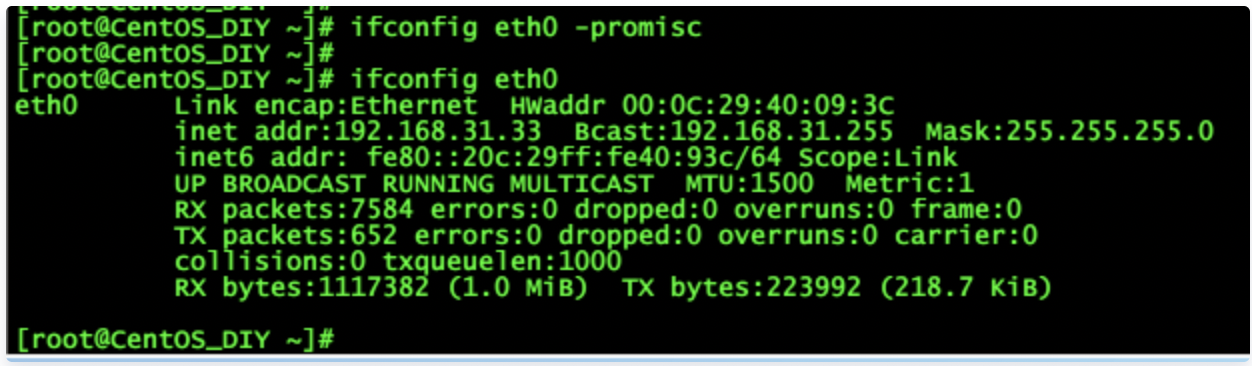
取消混杂模式
ifconfig eth0 -promisc
小知识:使用tcpdump抓包时网卡会进入混杂模式,可以在/var/log/messages里看到
如下图,开启tcpdump抓包后,在新窗口克隆会话tail -f /var/log/messages可以看到系统日志
kernel: device eth0 entered promiscuous mode

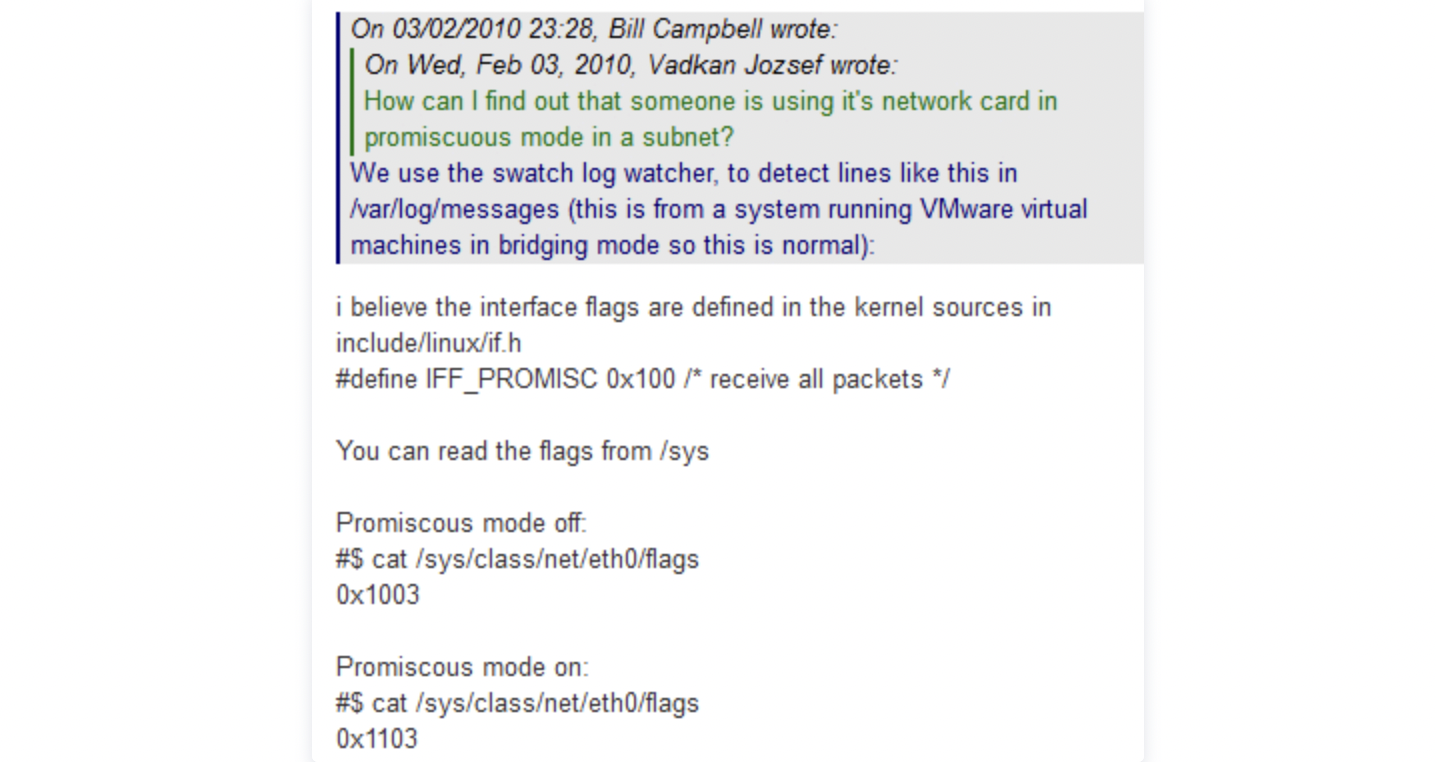
实际上网卡是否处于混杂模式并不能根据ifconfig查看是否有PROMISC字段来判断,
例如开启tcpdump抓包,这时ifconfig查看并没有PROMISC字段
实际上,网卡是否处于PROMISC模式,ifconfig并不是最直接的判断依据,换句话说就是ifconfig能看到PROMISC标记表示一定处于混杂模式,但处于混杂模式并不一定能看到PROMISC标记。内核判断网卡是否处于混杂模式是看/sys/class/net/eth0/flags的值,如果置位了0x100,则处于混杂模式

[root@CentOS_DIY ~]# cat /usr/include/linux/if.h | grep -i promisc
#define IFF_PROMISC 0x100 /* receive all packets */

google查到的相关解释
WAN interface protocols
Protocol "ppp" (PPP over Modem)
![]() The package
The package ppp must be installed to use PPP.
| Name | Type | Required | Default | Description |
|---|---|---|---|---|
device |
file path | yes | (none) | Modem device node |
username |
string | no(?) | (none) | Username for PAP/CHAP authentication |
password |
string | no(?) | (none) | Password for PAP/CHAP authentication |
connect |
file path | no | (none) | Path to custom PPP connect script |
disconnect |
file path | no | (none) | Path to custom PPP disconnect script |
keepalive |
number | no | (none) | Number of unanswered echo requests before considering the peer dead. The interval between echo requests is 5 seconds. |
demand |
number | no | (none) | Number of seconds to wait before closing the connection due to inactivity |
defaultroute |
boolean | no | 1 |
Replace existing default route on PPP connect |
peerdns |
boolean | no | 1 |
Use peer-assigned DNS server(s) |
dns |
list of ip addresses | no | (none) | Override peer-assigned DNS server(s) |
ipv6 |
[0,1,auto] | no | auto |
Enable IPv6 on the PPP link 0: IPv6 disabled 1: IPv6 enabled auto: IPv6 enabled. DHCPv6 client enabled. |
pppd_options |
string | no | (none) | Additional command line arguments to pass to the pppd daemon |
PPP-based protocols negotiate IPv4 and IPv6 support when the link is established. These protocols require option ipv6 to be specified in the parent config interface wan section if IPv6 support is required. Further configuration can be given in the alias config interface wan6 section – see ipv6.
Protocol "pppoe" (PPP over Ethernet)
![]() The packages
The packages ppp, kmod-pppoe and ppp-mod-pppoe must be installed to use PPPoE.
opkg update
opkg install ppp kmod-pppoe ppp-mod-pppoe
| Name | Type | Required | Default | Description | Example |
|---|---|---|---|---|---|
username |
string | no(?) | (none) | Username for PAP/CHAP authentication | |
password |
string | no(?) | (none) | Password for PAP/CHAP authentication | |
ac |
string | no | (none) | Specifies the Access Concentrator to connect to. If unset, pppd uses the first discovered one |
|
service |
string | no | (none) | Specifies the Service Name to connect to, If unset, pppd uses the first discovered one |
|
connect |
file path | no | (none) | Path to custom PPP connect script | |
disconnect |
file path | no | (none) | Path to custom PPP disconnect script | |
keepalive |
2 numbers | no | (none) | The numbers must be separated by a space. First number is “we assume the connection is down after this number of pings failed” (ppp's lcp-echo-failure option). Second number is for “seconds between each ping” (ppp's lcp-echo-interval option). | option keepalive '5 5' |
demand |
number | no | (none) | Number of seconds to wait before closing the connection due to inactivity | |
defaultroute |
boolean | no | 1 |
Replace existing default route on PPP connect | |
peerdns |
boolean | no | 1 |
Use peer-assigned DNS server(s) | |
dns |
list of ip addresses | no | (none) | Override peer-assigned DNS server(s) | |
ipv6 |
[0,1,auto] | no | auto |
Enable IPv6 on the PPP link. See Protocol “ppp” above | |
pppd_options |
string | no | (none) | Additional command line arguments to pass to the pppd daemon, e.g. debug |
Protocol "pppoa" (PPP over ATM AAL5)
![]() The package
The package ppp-mod-pppoa must be installed to use PPPoA.
| Name | Type | Required | Default | Description |
|---|---|---|---|---|
vci |
number | no | 35 |
PPPoA VCI |
vpi |
number | no | 8 |
PPPoA VPI |
atmdev |
number | no | 0 |
Specifies the ATM adapter number starting with 0. Most systems only have one ATM device and do not need this option |
encaps |
string | no | llc |
PPPoA encapsulation mode: 'llc' (LLC) or 'vc' (VC) |
username |
string | no(?) | (none) | Username for PAP/CHAP authentication |
password |
string | no(?) | (none) | Password for PAP/CHAP authentication |
connect |
file path | no | (none) | Path to custom PPP connect script |
disconnect |
file path | no | (none) | Path to custom PPP disconnect script |
keepalive |
number | no | (none) | Number of connection failures before reconnect |
demand |
number | no | (none) | Number of seconds to wait before closing the connection due to inactivity |
defaultroute |
boolean | no | 1 |
Replace existing default route on PPP connect |
peerdns |
boolean | no | 1 |
Use peer-assigned DNS server(s) |
dns |
list of ip addresses | no | (none) | Override peer-assigned DNS server(s) |
ipv6 |
[0,1,auto] | no | auto |
Enable IPv6 on the PPP link. See Protocol “ppp” above. |
pppd_options |
string | no | (none) | Additional command line arguments to pass to the pppd daemon |
Protocol "3g" (PPP over EV-DO, CDMA, UMTS or GPRS)
![]() The package
The package comgt must be installed to use 3G.
| Name | Type | Required | Default | Description |
|---|---|---|---|---|
device |
file path | yes | (none) | Modem device node |
service |
string | yes | umts |
3G service type: cdma/evdo, umts/umts_only/gprs_only (…._only options limited to Novatel & Option cards and dongles) |
apn |
string | yes | (none) | Used APN |
pincode |
number | no | (none) | PIN code to unlock SIM card |
dialnumber |
string | no | *99***1# | Modem dial string e.g. *99# |
maxwait |
number | no | 0 |
Number of seconds to wait for modem to become ready |
username |
string | no(?) | (none) | Username for PAP/CHAP authentication |
password |
string | no(?) | (none) | Password for PAP/CHAP authentication |
keepalive |
number | no | (none) | Number of connection failures before reconnect |
demand |
number | no | (none) | Number of seconds to wait before closing the connection due to inactivity |
defaultroute |
boolean | no | 1 |
Replace existing default route on PPP connect |
peerdns |
boolean | no | 1 |
Use peer-assigned DNS server(s) |
dns |
list of ip addresses | no | (none) | Override peer-assigned DNS server(s) |
ipv6 |
[0,1,auto] | no | auto |
Enable IPv6 on the PPP link. See Protocol “ppp” above. |
delay |
number | no | 0 | Seconds to wait before trying to interact with the modem (some ZTE modems require up to 30 s.) |
Protocol "qmi" (USB modems using QMI protocol)
![]() The package
The package uqmi must be installed to use QMI.
| Name | Type | Required | Default | Description |
|---|---|---|---|---|
device |
file path | yes | (none) | QMI device node, typically /dev/cdc-wdm0 |
apn |
string | yes | (none) | Used APN |
pincode |
number | no | (none) | PIN code to unlock SIM card |
username |
string | no | (none) | Username for PAP/CHAP authentication |
password |
string | no | (none) | Password for PAP/CHAP authentication |
auth |
string | no | (none) | Authentication type: pap, chap, both, none |
modes |
string | no | (modem default) | Allowed network modes, comma separated list of: all, lte, umts, gsm, cdma, td-scdma |
delay |
number | no | 0 | Seconds to wait before trying to interact with the modem (some ZTE modems require up to 30 s.) |
Protocol "ncm" (USB modems using NCM protocol)
![]() The package
The package comgt-ncm + modem specific driver must be installed to use NCM.
| Name | Type | Required | Default | Description |
|---|---|---|---|---|
device |
file path | yes | (none) | NCM device node, typically /dev/cdc-wdm0 or /dev/ttyUSB# |
apn |
string | yes | (none) | Used APN |
pincode |
number | no | (none) | PIN code to unlock SIM card |
username |
string | no | (none) | Username for PAP/CHAP authentication |
password |
string | no | (none) | Password for PAP/CHAP authentication |
auth |
string | no | (none) | Authentication type: pap, chap, both, none |
mode |
string | no | (modem default) | Used network mode, not every device support every mode: preferlte, preferumts, lte, umts, gsm, auto |
pdptype |
string | no | IPV4V6 |
Used IP-stack mode, IP (for IPv4), IPV6 (for IPv6) or IPV4V6 (for dual-stack) (Designated Driver #46844 and later) |
delay |
number | no | 0 | Seconds to wait before trying to interact with the modem (some modems require up to 30 s.) |
Protocol "wwan" (USB modems autodetecting above protocols)
![]() The package
The package wwan must be installed to use this feature. The “wwan” protocol detects the right protocol (3G/QMI/NCM/MBIM) for the USB Modem model and passes the configuration to the protocol.
| Name | Type | Required | Default | Description |
|---|---|---|---|---|
apn |
string | yes | (none) | Used APN |
auth |
string | no | (none) | Authentication type: pap, chap, both, none |
username |
string | no | (none) | Username for PAP/CHAP authentication |
password |
string | no | (none) | Password for PAP/CHAP authentication |
pincode |
number | no | (none) | PIN code to unlock SIM card |
modes |
string | no | (modem default) | Allowed network modes, comma separated list of: all, lte, umts, gsm, cdma, td-scdma |
delay |
number | no | 0 | Seconds to wait before trying to interact with the modem (some ZTE modems require up to 30 s.) |
Examples
Below are a few examples for special, non-standard interface configurations.
PPPoE internet connection
config 'interface' 'wan' option 'proto' 'pppoe' option 'ifname' 'eth1' option 'username' 'user' option 'password' 'pass' option 'timeout' '10'
PPPoA ADSL internet connection
config adsl-device 'adsl' option fwannex 'a' option annex 'a' config interface 'wan' option proto 'pppoa' option username 'jbloggs@plusdsl.net' option password 'XXXXXXXXX' option vpi '0' option vci '38' option encaps 'vc'
服务器 3 4 5号
芯片组
处理器 / 系统总线
1 x Socket R3 (LGA 2011-3; 方型 80x80mm;散热器螺丝长为3.7mm)
英特尔® 至强® 处理器 E5-1600 v4 产品家族
英特尔® 至强® 处理器 E5-1600 v3 产品家族
英特尔® 至强® 处理器 E5-2600 v4 产品家族
英特尔® 至强® 处理器 E5-2600 v3 产品家族
芯片组规格
Intel® C612 PCH
内存
内存插槽数 : 8个内存插槽 (4通道/CPU, 8-DIMM插槽/CPU)
内存容量 : 可达 512GB LRDIMM
内存类型 : DDR4 2133 /1866/1600/1333 RDIMM*
DDR4 2133 /1866/1600/1333 LRDIMM*
内存规格: 32GB, 16GB, 8GB, 4GB RDIMM
64GB, 32GB LRDIMM
扩展槽
插槽总数 : 6
插槽位置1 : PCI-E x8 (Gen2 X4 Link)
插槽位置2 : PCI 32bit/33MHz
插槽位置3 : PCI-E x8 (Gen3 X8 Link)
插槽位置4 : PCI-E x16 (Gen3 X16 Link), 如果插槽 3 被占用,自动切换到x8 link
插槽位置5 : PCI-E x8 (Gen3 X8 Link)
插槽位置6 : PCI-E x16 (Gen3 X16 Link), 如果插槽 5 被占用,自动切换到x8 link
插槽位置7 : MIO 声卡插槽
尺寸规格
ATX (12"x9.6", 305mm x 244mm)
华硕功能
风扇转速控制
机架式(机架式和直立式双用)
ASWM Enterprise
存储功能
SATA 控制器:
Intel® C612
10 x SATA3 6Gb/s 接口
或
9 x SATA3 6Gb/s 接口 + 1 x M.2 接口 *2
Intel® Rapid Storage Technology Enterprise(RSTe) (仅支持Windows)
(支持软件 RAID 0, 1, 5, 10 )
LSI® MegaRAID (支持 Linux/Windows)
(支持软件RAID 0, 1, 10 )
SAS/SATA 控制器 :
ASUS PIKE II 3008 8-port SAS HBA 卡
ASUS PIKE II 3108 8-port SAS HW RAID 卡
网络
2 x Intel® I210AT + 1 x 千兆管理网络接口
图形显示
Aspeed AST2400 + 32MB VRAM
板载 I/O
1 x TPM 接针
1 x PSU 电源接口 , 24-pin ATX 电源接口 + 8-pin ATX 12V 电源接口
1 x 管理接口 , Onboard socket for optional management card
1 x USB 3.0 pin 接针 , 高达 2 个设备
1 x USB 2.0 pin 接针 , 高达 2 个设备
6 x 风扇接口 , 支持4pin风扇
1 x SMBus
1 x 机箱开启检测接口
2 x 前端LAN LED
1 x 串口接针
1 x M.2 连接器 , NGFF 类型 : 2242, 容量: 16~128GB
背板 I/O 接口
2 x USB 3.1 Gen 1接口
2 x USB 2.0接口
1 x VGA 接口
2 x GbE LAN
1 x Mgmt LAN
1 x PS/2 键盘/鼠标接口
管理功能
ASWM Enterprise
可选配 ASMB8-iKVM for KVM-over-Internet
环境
操作温度: 10℃ ~ 35℃
非运作时温度: -40℃ ~ 70℃
非运作时湿度: 20% ~ 90% (无凝露)
重量
礼品包(1-in-1)
净重: 1.281 KG
毛重: 1.7 KG
整批包装(10-in-1)
净重: 9.79 KG
毛重: 12 KG
配件
Gift Box (1-in-1) with ASMB8-IKVM
1 x ASMB8-iKVM Module
3 x Support DVD
1 x IO Shield
1 x Cable Set
Gift Box (1-in-1)
2 x Support DVD
1 x IO Shield
1 x Cable Set
Bulk Pack (10-in-1) with ASMB8-IKVM
1 x ASMB8-iKVM Module
3 x Support DVD
1 x IO Shield
Bulk Pack (10-in-1)
2 x Support DVD
1 x IO Shield
监控
CPU 温度
风扇转速
备注
*1 EEB 安装孔位
*2 9 x SATA3 6Gb/s 接口 + 1 x M.2 连接器(SATA 6Gb/s)
*3 UDIMM 仅适于 Core i7
小米路由器开启 SSH 方法
登录小米路由Web管理页面,检查ROM版本是否为开发版(若为开发版直接跳至第二步,若为稳定版继续本步骤),进入小米路由器官网,在“下载”-> “ROM”中找到对应的小米路由器开发版并下载。
小米路由器官网地址:http://www1.miwifi.com/
然后在小米路由Web管理页面,“常用设置”->“系统状态”->“手动升级”中选择下载的对应的开发版文件 ,进行升级并等待升级完成 ,
进入小米路由器官网,在“开放”-> “开启SSH工具”-> “下载工具包”,下载“开启SSH工具”,
注意:这里需要您登陆小米账号,以关联你绑定的路由

请将下载的工具包bin文件复制到U盘(FAT/FAT32格式)的根目录下,保证文件名为miwifi_ssh.bin,
断开小米路由器的电源,将U盘插入USB接口,按住reset按钮之后重新接入电源,指示灯变为黄色闪烁状态即可松开reset键(需要多按几秒松开),
等待3-5秒后安装完成之后,小米路由器会自动重启,之后您就可以尽情折腾啦 ,
使用终端程序输入以下命令登录SSH:
ssh -p 22 root@192.168.31.1

为了以后连接的方便,建议将密码修改一下,毕竟自己的密码使用起来比较顺手,修改密码命令为:passwd,修改后下次登录直接使用新密码。
小米 AX6000 解锁 SSH 使用Clash节点教程
小米 AX6000 CPU 是 IPQ5018 双核 1.0 GHz,单核 1GHz,虽然无线方面有加强,也有了 1 个 2.5G 的网口,不过这 CPU 和 NPU 砍的实在是太厉害了,今天我们就解锁下这台小米 AX6000 安装 ShellClash 看看性能如何,能不能满足日常使用。
准备工作
一台能插网线的电脑,Windows 需要安装 Putty 和 WinSCP,MacOS 使用原本的终端命令行即可,
另外准备一台已经是 OpenWrt 的路由器或软路由,打开 SSH,用来当服务器,如果没有可以考虑虚拟机安装 OpenWrt 来充当,
下载好降级固件 和 解锁脚本,为了方便大家下载,本站提供了网盘不限速服务,到地址找到 ax6000.zip 进行下载,地址如下:
固件脚本下载:https://opssl.cn/download/ax6000.zip
系统降级
解压好下载的文件,登录小米路由器的后台,选择手动升级下载好的 1.0.41.bin 固件,选择开始升级(也就是降级),等待重启降级完成,这里就不多说了,傻瓜都会。

准备服务
准备刷写了 OpenWrt 的路由器或软路由,只需要接上电源有 Wi-Fi 信号,然后使用网线连接此 OpenWrt 路由器,我的这台 OpenWrt 路由器的地址是 10.0.0.1 你的应该不是,下面也记得根据你自己的修改,SCP 上传压缩包内解压出来的 wireless.sh 到 OpenWrt 路由器,把解压好的文件夹拖到命令里回车,在文件夹目录里执行,如果你是 Windows 命令提示符里没有 SCP 功能的话你可以单独下载一个 WinSCP。
scp wireless.sh root@10.0.0.1:/root/wireless.sh
然后 SSH 连接到这台 OpenWrt 路由器。
ssh root@10.0.0.1
再执行脚本(解锁脚本由天灵大佬提供),执行本脚本会更改您的网络和无线设定,执行之前请务必备份相关数据
sh /root/wireless.sh

这里直接回车选择继续执行

操作后这个脚本会修改我们 OpenWrt 路由器的 Wi-Fi 密码的一些设置,稍微等待一会,OpenWrt 插着电放在旁边即可,等会小米 AX6000 会连到 OpenWrt 的 Wi-Fi。
开启小米SSH
将电脑用 网线 和 小米 AX6000 连接,因为小米 AX6000 解锁 Wi-Fi 可能会掉线,所以这里推荐使用网线连接,特别要注意,登陆小米路由器后台后,浏览器地址栏 stok= 后面的一段内容即是(选中部分),准备好备用。

浏览器请求
打开浏览器,复制下面的内容到地址栏,并替换 <STOK>
http://192.168.31.1/cgi-bin/luci/;stok=<STOK>/api/xqsystem/extendwifi_connect_inited_router?ssid=MEDIATEK-ARM-IS-GREAT&password=ARE-YOU-OK&admin_username=root&admin_password=admin&admin_nonce=xxx
将替换好的值复制到浏览器请求,如果显示如下内容则表示成功,请求可能需要等待一会,如果请求失败请把错误内容留言到本文评论,我可以帮助您处理。

再次打开小米 AX6000 路由器后台查看 2.4G 频段 Wi-Fi 密码,这个 Wi-Fi 密码就是我们默认的 ssh 密码,保存好!!!

连接路由器
执行下面命令即可 SSH 连接到了路由器,输入 yes,密码是上面的,输入密码不会显示,输完回车即可,如下图:

安装 ShellClash
通过 SSH 连接上小米 AX6000 执行安装,请不要使用 telnet 连接安装 ShellClash,否则会乱码。
sh -c "$(curl -kfsSl https://cdn.jsdelivr.net/gh/juewuy/ShellClash@master/install.sh)" && source /etc/profile &> /dev/null
选择 在/etc目录 下安装(适合root用户)

目标目录 /etc空间剩余:多少M,确认安装?这里输入 1 确认安装

安装好就能使用 clash 命令了 ,输入 clash 就能进入配置,选择 1 各类路由器设备,如果你清楚别的可以自行选择。

到了这里 选择 1 不代理 UDP 流量,选择 1 安装 Dashboard 面板,选择 2 安装 yacd 面板。

是否导入配置文件?我们直接选择 1 进行下一步,如果你没有 Clash 的配置文件而是 V2ray、SS、Trojan 的订阅链接,你可以再选择 1 进行在线生成 Clash 配置文件,如果有的话可以选择 2 直接导入配置文件。

然后粘贴上你的URL订阅链接,再选择 1 开始生成配置文件,生成配置文件后按 0 返回上层菜单即可。

导入订阅节点后,通过界面提供的 http://192.168.31.1:9999/ui,进行节点的切换和规则的选择,当然你再按 4 选择开机启动也可以,这个时候应该就能浏览外网了,如下图:

节点测速
下面就看看 ShellClash 节点测速效果吧,为保证测速效果,测试环境为最低配置,移动100M + 普通节点,YouTube 4K 跑分为 46845Kbps,本次测速节点由 Gsou 云加速 提供,全站专线,游戏加速,流媒体4K秒开,年付新用户全场六折。

最后总结
开启使用 ShellClash 使用 Clash节点 会导致带宽无法跑满,关闭 ShellClash 后带宽就可以正常跑满,建议使用 V2ray、SS、Trojan 节点作为主力节点使用,小米 AX6000 CPU 和 NPU 实在阉割的太过头了,用 ShellClash 跑网络代理的速度真的特别拉垮,都远比不过百元级别搭载 IPQ6000 芯片的路由器,如果你有安装 ShellClash 有外网需求的,建议不要购买小米 AX6000 路由器。