# 实战 日期:2022.07.16 时间:17:00 地点:广制总经办公室 成员:张震、张劲 # Docker #### **设备** **云主机 CZ-A4**
**H102** **H103**
[![image-1658502254103.png](http://book.321jr.com/uploads/images/gallery/2022-07/scaled-1680-/X8qqbRT2lfVdMFRL-image-1658502254103.png)](http://book.321jr.com/uploads/images/gallery/2022-07/X8qqbRT2lfVdMFRL-image-1658502254103.png) [![image-1658501745942.png](http://book.321jr.com/uploads/images/gallery/2022-07/scaled-1680-/5bakl2bMJ9rHNseU-image-1658501745942.png)
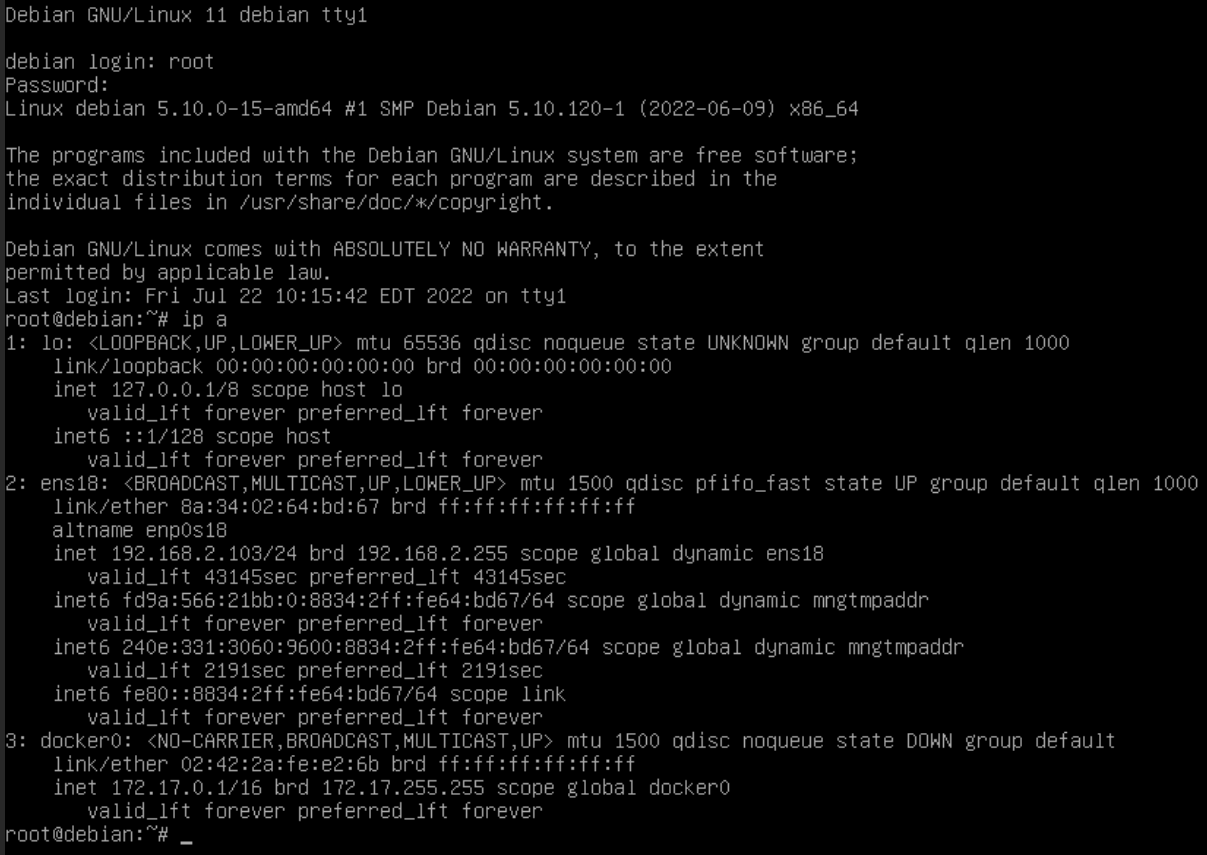
](http://book.321jr.com/uploads/images/gallery/2022-07/5bakl2bMJ9rHNseU-image-1658501745942.png)
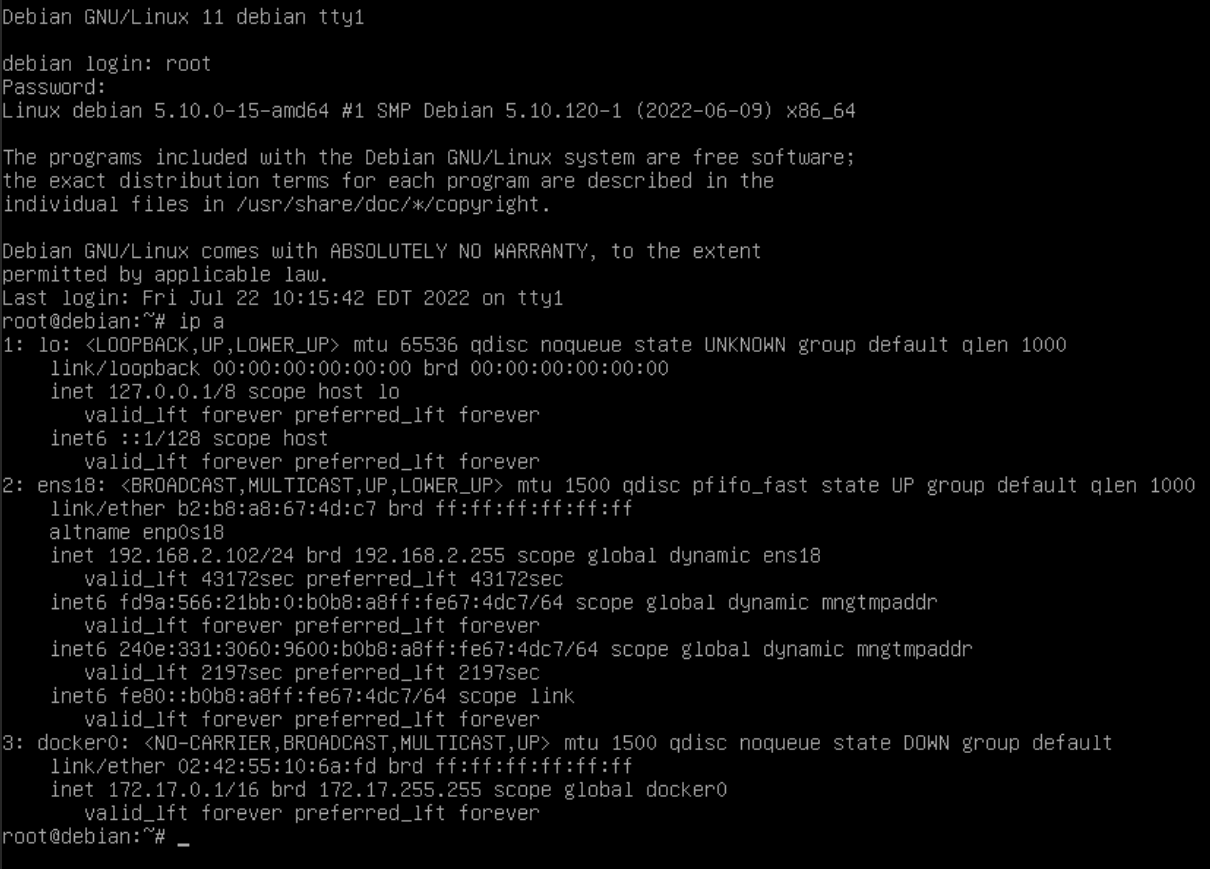
系统:Debian 11
数量:2台 | 配置 4 Cores,8.00 GiB,100 G
网址:pve.321jr.com | 账户:root / Jag..........9
端口:ssh-11021 | web.1-11022 | web.2-11023 端口:ssh-11031 | web.1-11032 | web.2-11033
使用者:张震 使用者:张劲
#### #### **任务** *示范* 【企业微信】-【运维】-【硬件】-【Docker】-【H101-11013】,http://pve.321jr.com:11013 **H101-11013**
[![image-1658502613035.png](http://book.321jr.com/uploads/images/gallery/2022-07/scaled-1680-/1D2voou4j96CecMp-image-1658502613035.png)](http://book.321jr.com/uploads/images/gallery/2022-07/1D2voou4j96CecMp-image-1658502613035.png)[![image-1658502662517.png](http://book.321jr.com/uploads/images/gallery/2022-07/scaled-1680-/82tI9DYgeth3ODSl-image-1658502662517.png)](http://book.321jr.com/uploads/images/gallery/2022-07/82tI9DYgeth3ODSl-image-1658502662517.png)
##### ##### **要求** *张震* — 合格 — 【企业微信】-【运维】-【硬件】-【Docker】-【H102-11022】,http://pve.321jr.com:11022 — 优秀 — 【企业微信】-【运维】-【硬件】-【Docker】-【H102-11023】,http://pve.321jr.com:11023 *张劲* — 合格 — 【企业微信】-【运维】-【硬件】-【Docker】-【H103-11032】,http://pve.321jr.com:11032 — 优秀 — 【企业微信】-【运维】-【硬件】-【Docker】-【H103-11033】,http://pve.321jr.com:11033 #### **参考** [Docker 入门教程](http://book.321jr.com/books/6974c/page/docker-GYm "Docker 入门教程") [Docker 微服务教程](http://book.321jr.com/books/6974c/page/docker-tWJ "Docker 微服务教程") #### **开源应用** [腾讯云开源应用](https://app.cloud.tencent.com/) # 入门 WordPress、Typecho ### **目标** ### [**WordPress**](https://wordpress.org/) [![企业微信截图_16579551672776.png](http://book.321jr.com/uploads/images/gallery/2022-07/scaled-1680-/btaYjWSHnk2YQtrH-16579551672776.png)](http://book.321jr.com/uploads/images/gallery/2022-07/btaYjWSHnk2YQtrH-16579551672776.png) ### [**Typecho**](http://typecho.org/) **[![企业微信截图_16579553035201.png](http://book.321jr.com/uploads/images/gallery/2022-07/scaled-1680-/hs4C92u82I91By8j-16579553035201.png)](http://book.321jr.com/uploads/images/gallery/2022-07/hs4C92u82I91By8j-16579553035201.png)** ## **参考** #### [WordPress](https://boke112.com/post/7858.html) #### [Typecho](https://boke112.com/post/7887.html) [其它](https://boke112.com/post/7941.html) # Docker 入门教程 # Docker 微服务教程 # Docker 命令
备注命令
查看帮助docker help
查看版本与系统信息docker version 或 docker info
查找镜像docker search redis
获取镜像docker pull nginx\[:tag\]
查看本地镜像信息docker images
查看镜像历史docker history nginx:latest
添加镜像标签docker tag name:tag name:tag
删除镜像docker rmi name:tag
创建容器docker run -d redis
创建容器时命名且映射端口docker run -d --name nginx -p 8080:80 nginx
查看绑定的随机端口docker run -d --name container\_name -p 6379 redis:latest
挂载目录docker run -d --name redcontainer\_name ismapped -v /opt/docker/data/redis:/data redis
查看容器docker ps 或 docker ps -a
停止容器docker stop container\_name
检查容器docker inspect container\_id
执行命令docker run nginx ps 或 docker run -it nginx bash
查看日志docker logs container\_id
复制文件docker cp source\_file container\_name:PATH
创建镜像docker commit container\_id image\_name
# iSCSI 配置存储服务器 网络上带有 iSCSI 的存储服务器称为 iSCSI Target,连接到 iSCSI Target 的 Client Host 称为 iSCSI Initiator。 此示例基于如下环境。 +------------------------+ | +------------------------+ | \[iSCSI 目标\] |10.0.0.30 | 10.0.0.51| \[iSCSI 启动器\] | | dlp.srv.world +----------+----------+ node01.srv.world | | | | | +----------+ +----------+ \[1\] 安装管理工具 ``` dnf -y install targetcli ``` \[2\] 配置 iSCSI 目标。 例如,在 \[/var/lib/iscsi\_disks\] 目录下创建一个磁盘映像,并将其设置为 SCSI 设备。 ``` # create a directory [root@dlp ~]# mkdir /var/lib/iscsi_disks # enter the admin console [root@dlp ~]# targetcli targetcli shell version 2.1.53 Copyright 2011-2013 by Datera, Inc and others. For help on commands, type 'help'. /> cd backstores/fileio # create a disk-image with the name [disk01] on [/var/lib/iscsi_disks/disk01.img] with 10G /backstores/fileio> create disk01 /var/lib/iscsi_disks/disk01.img 10G Created fileio disk01 with size 10737418240 /backstores/fileio> cd /iscsi # create a target # naming rule : [ iqn.(year)-(month).(reverse of domain name):(any name you like) ] /iscsi> create iqn.2021-03.world.srv:dlp.target01 Created target iqn.2021-03.world.srv:dlp.target01. Created TPG 1. Global pref auto_add_default_portal=true Created default portal listening on all IPs (0.0.0.0), port 3260. /iscsi> cd iqn.2021-03.world.srv:dlp.target01/tpg1/luns # set LUN /iscsi/iqn.20...t01/tpg1/luns> create /backstores/fileio/disk01 Created LUN 0. /iscsi/iqn.20...t01/tpg1/luns> cd ../acls # set ACL (it's the IQN of an initiator you permit to connect) /iscsi/iqn.20...t01/tpg1/acls> create iqn.2021-03.world.srv:node01.initiator01 Created Node ACL for iqn.2021-03.world.srv:node01.initiator01 Created mapped LUN 0. /iscsi/iqn.20...t01/tpg1/acls> cd iqn.2021-03.world.srv:node01.initiator01 # set UserID and Password for authentication /iscsi/iqn.20...w.initiator01> set auth userid=username Parameter userid is now 'username'. /iscsi/iqn.20...w.initiator01> set auth password=password Parameter password is now 'password'. /iscsi/iqn.20...w.initiator01> exit Global pref auto_save_on_exit=true Configuration saved to /etc/target/saveconfig.json # after configuration above, the target enters in listening like follows [root@dlp ~]# ss -napt | grep 3260 LISTEN 0 256 0.0.0.0:3260 0.0.0.0:* [root@dlp ~]# systemctl enable target ``` \[3\] 如果 Firewalld 正在运行,则允许 iSCSI Target 服务 ``` [root@dlp ~]# firewall-cmd --add-service=iscsi-target --permanent success [root@dlp ~]# firewall-cmd --reload success ``` # iSCSI 发起程序 配置 iSCSI 发起程序。 此示例基于如下环境。 +------------------------+ | +------------------------+ | \[iSCSI 目标\] |10.0.0.30 | 10.0.0.51| \[iSCSI 启动器\] | | dlp.srv.world +----------+----------+ node01.srv.world | | | | | +----------+ +----------+ \[1\] 配置 iSCSI Initiator 以连接到 iSCSI Target ``` [root@node01 ~]# dnf -y install iscsi-initiator-utils [root@node01 ~]# vi /etc/iscsi/initiatorname.iscsi # change to the same IQN you set on the iSCSI target server InitiatorName=iqn.2021-03.world.srv:node01.initiator01 [root@node01 ~]# vi /etc/iscsi/iscsid.conf # line 58 : uncomment node.session.auth.authmethod = CHAP # line 69,70 : uncomment and specify the username and password you set on the iSCSI target server node.session.auth.username = username node.session.auth.password = password # discover target [root@node01 ~]# iscsiadm -m discovery -t sendtargets -p 10.0.0.30 [ 894.285096] Loading iSCSI transport class v2.0-870. [ 894.308086] iscsi: registered transport (tcp) 10.0.0.30:3260,1 iqn.2021-03.world.srv:dlp.target01 # confirm status after discovery [root@node01 ~]# iscsiadm -m node -o show # BEGIN RECORD 2.1.2 node.name = iqn.2021-03.world.srv:dlp.target01 node.tpgt = 1 node.startup = automatic node.leading_login = No iface.iscsi_ifacename = default ..... ..... node.conn[0].iscsi.HeaderDigest = None node.conn[0].iscsi.DataDigest = None node.conn[0].iscsi.IFMarker = No node.conn[0].iscsi.OFMarker = No # END RECORD # login to the target [root@node01 ~]# iscsiadm -m node --login Logging in to [iface: default, target: iqn.2021-03.world.srv:dlp.target01, portal: 10.0.0.30,3260] Login to [iface: default, target: iqn.2021-03.world.srv:dlp.target01, portal: 10.0.0.30,3260] successful. # confirm the established session [root@node01 ~]# iscsiadm -m session -o show tcp: [1] 10.0.0.30:3260,1 iqn.2021-03.world.srv:dlp.target01 (non-flash) # confirm the partitions [root@node01 ~]# cat /proc/partitions major minor #blocks name 252 0 31457280 sda 252 1 1048576 sda1 252 2 30407680 sda2 252 16 83886080 sdb 252 17 83885056 sdb1 253 0 27258880 dm-0 253 1 3145728 dm-1 8 0 10485760 sdc # added new device provided from the target server as [sdc] ``` \[2\] 设置 iSCSI 设备后,在 Initiator 上进行配置以像下面一样使用它 ``` # create label [root@node01 ~]# parted --script /dev/sdc "mklabel gpt" # create partiton [root@node01 ~]# parted --script /dev/sdc "mkpart primary 0% 100%" # format with XFS [root@node01 ~]# mkfs.xfs -i size=1024 -s size=4096 /dev/sdc1 meta-data=/dev/sdc1 isize=1024 agcount=4, agsize=654336 blks = sectsz=4096 attr=2, projid32bit=1 = crc=1 finobt=1, sparse=1, rmapbt=0 = reflink=1 data = bsize=4096 blocks=2617344, imaxpct=25 = sunit=0 swidth=0 blks naming =version 2 bsize=4096 ascii-ci=0, ftype=1 log =internal log bsize=4096 blocks=2560, version=2 = sectsz=4096 sunit=1 blks, lazy-count=1 realtime =none extsz=4096 blocks=0, rtextents=0 [root@node01 ~]# mount /dev/sdc1 /mnt [root@node01 ~]# df -hT Filesystem Type Size Used Avail Use% Mounted on devtmpfs devtmpfs 1.9G 0 1.9G 0% /dev tmpfs tmpfs 1.9G 0 1.9G 0% /dev/shm tmpfs tmpfs 1.9G 8.6M 1.9G 1% /run tmpfs tmpfs 1.9G 0 1.9G 0% /sys/fs/cgroup /dev/mapper/cs-root xfs 26G 2.3G 24G 9% / /dev/sda1 xfs 1014M 259M 756M 26% /boot tmpfs tmpfs 374M 0 374M 0% /run/user/0 /dev/sdc1 xfs 10G 99M 9.9G 1% /mnt ``` # NFS 服务器 配置 NFS 服务器以共享网络上的目录。 此示例基于如下环境。 +------------------------+ | +------------------------+ | \[NFS 服务器\] |10.0.0.30 | 10.0.0.51| \[NFS 客户端\] | | dlp.srv.world +----------+----------+ node01.srv.world | | | | | +----------+ +----------+ \[1\] 配置 NFS 服务器 ``` [root@dlp ~]# dnf -y install nfs-utils [root@dlp ~]# vi /etc/idmapd.conf # line 5 : uncomment and change to your domain name Domain = srv.world [root@dlp ~]# vi /etc/exports # create new # for example, set [/home/nfsshare] as NFS share /home/nfsshare 10.0.0.0/24(rw,no_root_squash) [root@dlp ~]# mkdir /home/nfsshare [root@dlp ~]# systemctl enable --now rpcbind nfs-server ``` \[2\] 如果 Firewalld 正在运行,则允许 NFS 服务 ``` [root@dlp ~]# firewall-cmd --add-service=nfs --permanent success # if use NFSv3, allow follows, too [root@dlp ~]# firewall-cmd --add-service={nfs3,mountd,rpc-bind} --permanent success [root@dlp ~]# firewall-cmd --reload success ``` 出口的基本选择
选项描述
rw允许 NFS 卷上的读取和写入请求。
ro仅允许 NFS 卷上的读取请求。
sync仅在将更改提交到稳定存储后才回复请求。(默认)
async此选项允许 NFS 服务器违反 NFS 协议并在请求所做的任何更改提交到稳定存储之前回复请求。
secure此选项要求请求源自小于 IPPORT\_RESERVED (1024) 的 Internet 端口。(默认)
insecure此选项接受所有端口。
wdelay如果怀疑另一个相关的写入请求可能正在进行中或可能很快到达,则稍微延迟将写入请求提交到磁盘。(默认)
no\_wdelay如果还设置了异步,则此选项无效。如果 NFS 服务器怀疑另一个相关的写入请求可能正在进行中或可能很快到达,它通常会稍微延迟向磁盘提交写入请求。这允许通过一个可以提高性能的操作将多个写入请求提交到磁盘。如果 NFS 服务器主要接收小的无关请求,则此行为实际上会降低性能,因此可以使用 no\_wdelay 将其关闭。
subtree\_check此选项启用子树检查。(默认)
no\_subtree\_check此选项禁用子树检查,这具有轻微的安全隐患,但在某些情况下可以提高可靠性。
root\_squash将请求从 uid/gid 0 映射到匿名 uid/gid。请注意,这不适用于可能同样敏感的任何其他 uid 或 gid,例如用户 bin 或组人员。
no\_root\_squash关闭根挤压。此选项主要用于无磁盘客户端。
all\_squash将所有 uid 和 gid 映射到匿名用户。对于 NFS 导出的公共 FTP 目录、新闻假脱机目录等很有用。
no\_all\_squash关闭所有挤压。(默认)
anonuid=UID这些选项显式设置匿名帐户的 uid 和 gid。此选项主要用于 PC/NFS 客户端,您可能希望所有请求都来自一个用户。例如,考虑下面示例部分中 /home/joe 的导出条目,它将所有请求映射到 uid 150。
anongid=GID阅读上文(annuid=UID)
# NFS 客户端 配置 NFS 客户端以在 NFS 客户端上挂载 NFS 共享。 此示例基于如下环境。 +------------------------+ | +------------------------+ | \[NFS 服务器\] |10.0.0.30 | 10.0.0.51| \[NFS 客户端\] | | dlp.srv.world +----------+----------+ node01.srv.world | | | | | +----------+ +----------+ \[1\] 配置 NFS 客户端 ``` [root@node01 ~]# dnf -y install nfs-utils [root@node01 ~]# vi /etc/idmapd.conf # line 5 : uncomment and change to your domain name Domain = srv.world [root@node01 ~]# mount -t nfs dlp.srv.world:/home/nfsshare /mnt [root@node01 ~]# df -hT Filesystem Type Size Used Avail Use% Mounted on devtmpfs devtmpfs 1.9G 0 1.9G 0% /dev tmpfs tmpfs 1.9G 0 1.9G 0% /dev/shm tmpfs tmpfs 1.9G 8.6M 1.9G 1% /run tmpfs tmpfs 1.9G 0 1.9G 0% /sys/fs/cgroup /dev/mapper/cs-root xfs 26G 2.3G 24G 9% / /dev/vda1 xfs 1014M 259M 756M 26% /boot tmpfs tmpfs 374M 0 374M 0% /run/user/0 dlp.srv.world:/home/nfsshare nfs4 26G 2.3G 24G 9% /mnt # NFS share is mounted # if mount with NFSv3, add [-o vers=3] option [root@node01 ~]# mount -t nfs -o vers=3 dlp.srv.world:/home/nfsshare /mnt [root@node01 ~]# df -hT /mnt Filesystem Type Size Used Avail Use% Mounted on dlp.srv.world:/home/nfsshare nfs 26G 2.3G 24G 9% /mnt ``` \[2\] 要在系统启动时自动挂载,请在 \[/etc/fstab\] 中配置设置 ``` [root@node01 ~]# vi /etc/fstab /dev/mapper/cs-root / xfs defaults 0 0 UUID=72e65d16-7d1a-40bc-9bc1-e45a8ba6d084 /boot xfs defaults 0 0 /dev/mapper/cs-swap none swap defaults 0 0 # add to the end : set NFS share dlp.srv.world:/home/nfsshare /mnt nfs defaults 0 0 ``` \[3\] 要在任何人访问 NFS 共享时动态挂载,请配置 AutoFS ``` [root@node01 ~]# dnf -y install autofs [root@node01 ~]# vi /etc/auto.master # add to the end /- /etc/auto.mount [root@node01 ~]# vi /etc/auto.mount # create new : [mount point] [option] [location] /mnt -fstype=nfs,rw dlp.srv.world:/home/nfsshare [root@node01 ~]# systemctl enable --now autofs # move to the mount point to verify mounting [root@node01 ~]# cd /mnt [root@node01 mnt]# ll total 8 -rw-r--r--. 1 root root 10 Mar 3 19:14 testfile.txt -rw-r--r--. 1 root root 5 Mar 3 19:17 test.txt [root@node01 mnt]# grep /mnt /proc/mounts /etc/auto.mount /mnt autofs rw,relatime,fd=17,pgrp=2468,timeout=300,minproto=5,maxproto=5,direct,pipe_ino=33352 0 0 dlp.srv.world:/home/nfsshare /mnt nfs4 rw,relatime,vers=4.2,rsize=1048576,wsize=1048576,namlen=255,hard,proto=tcp,timeo=600,retrans=2,sec=sys,clientaddr=10.0.0.51,local_lock=none,addr=10.0.0.30 0 0 ```